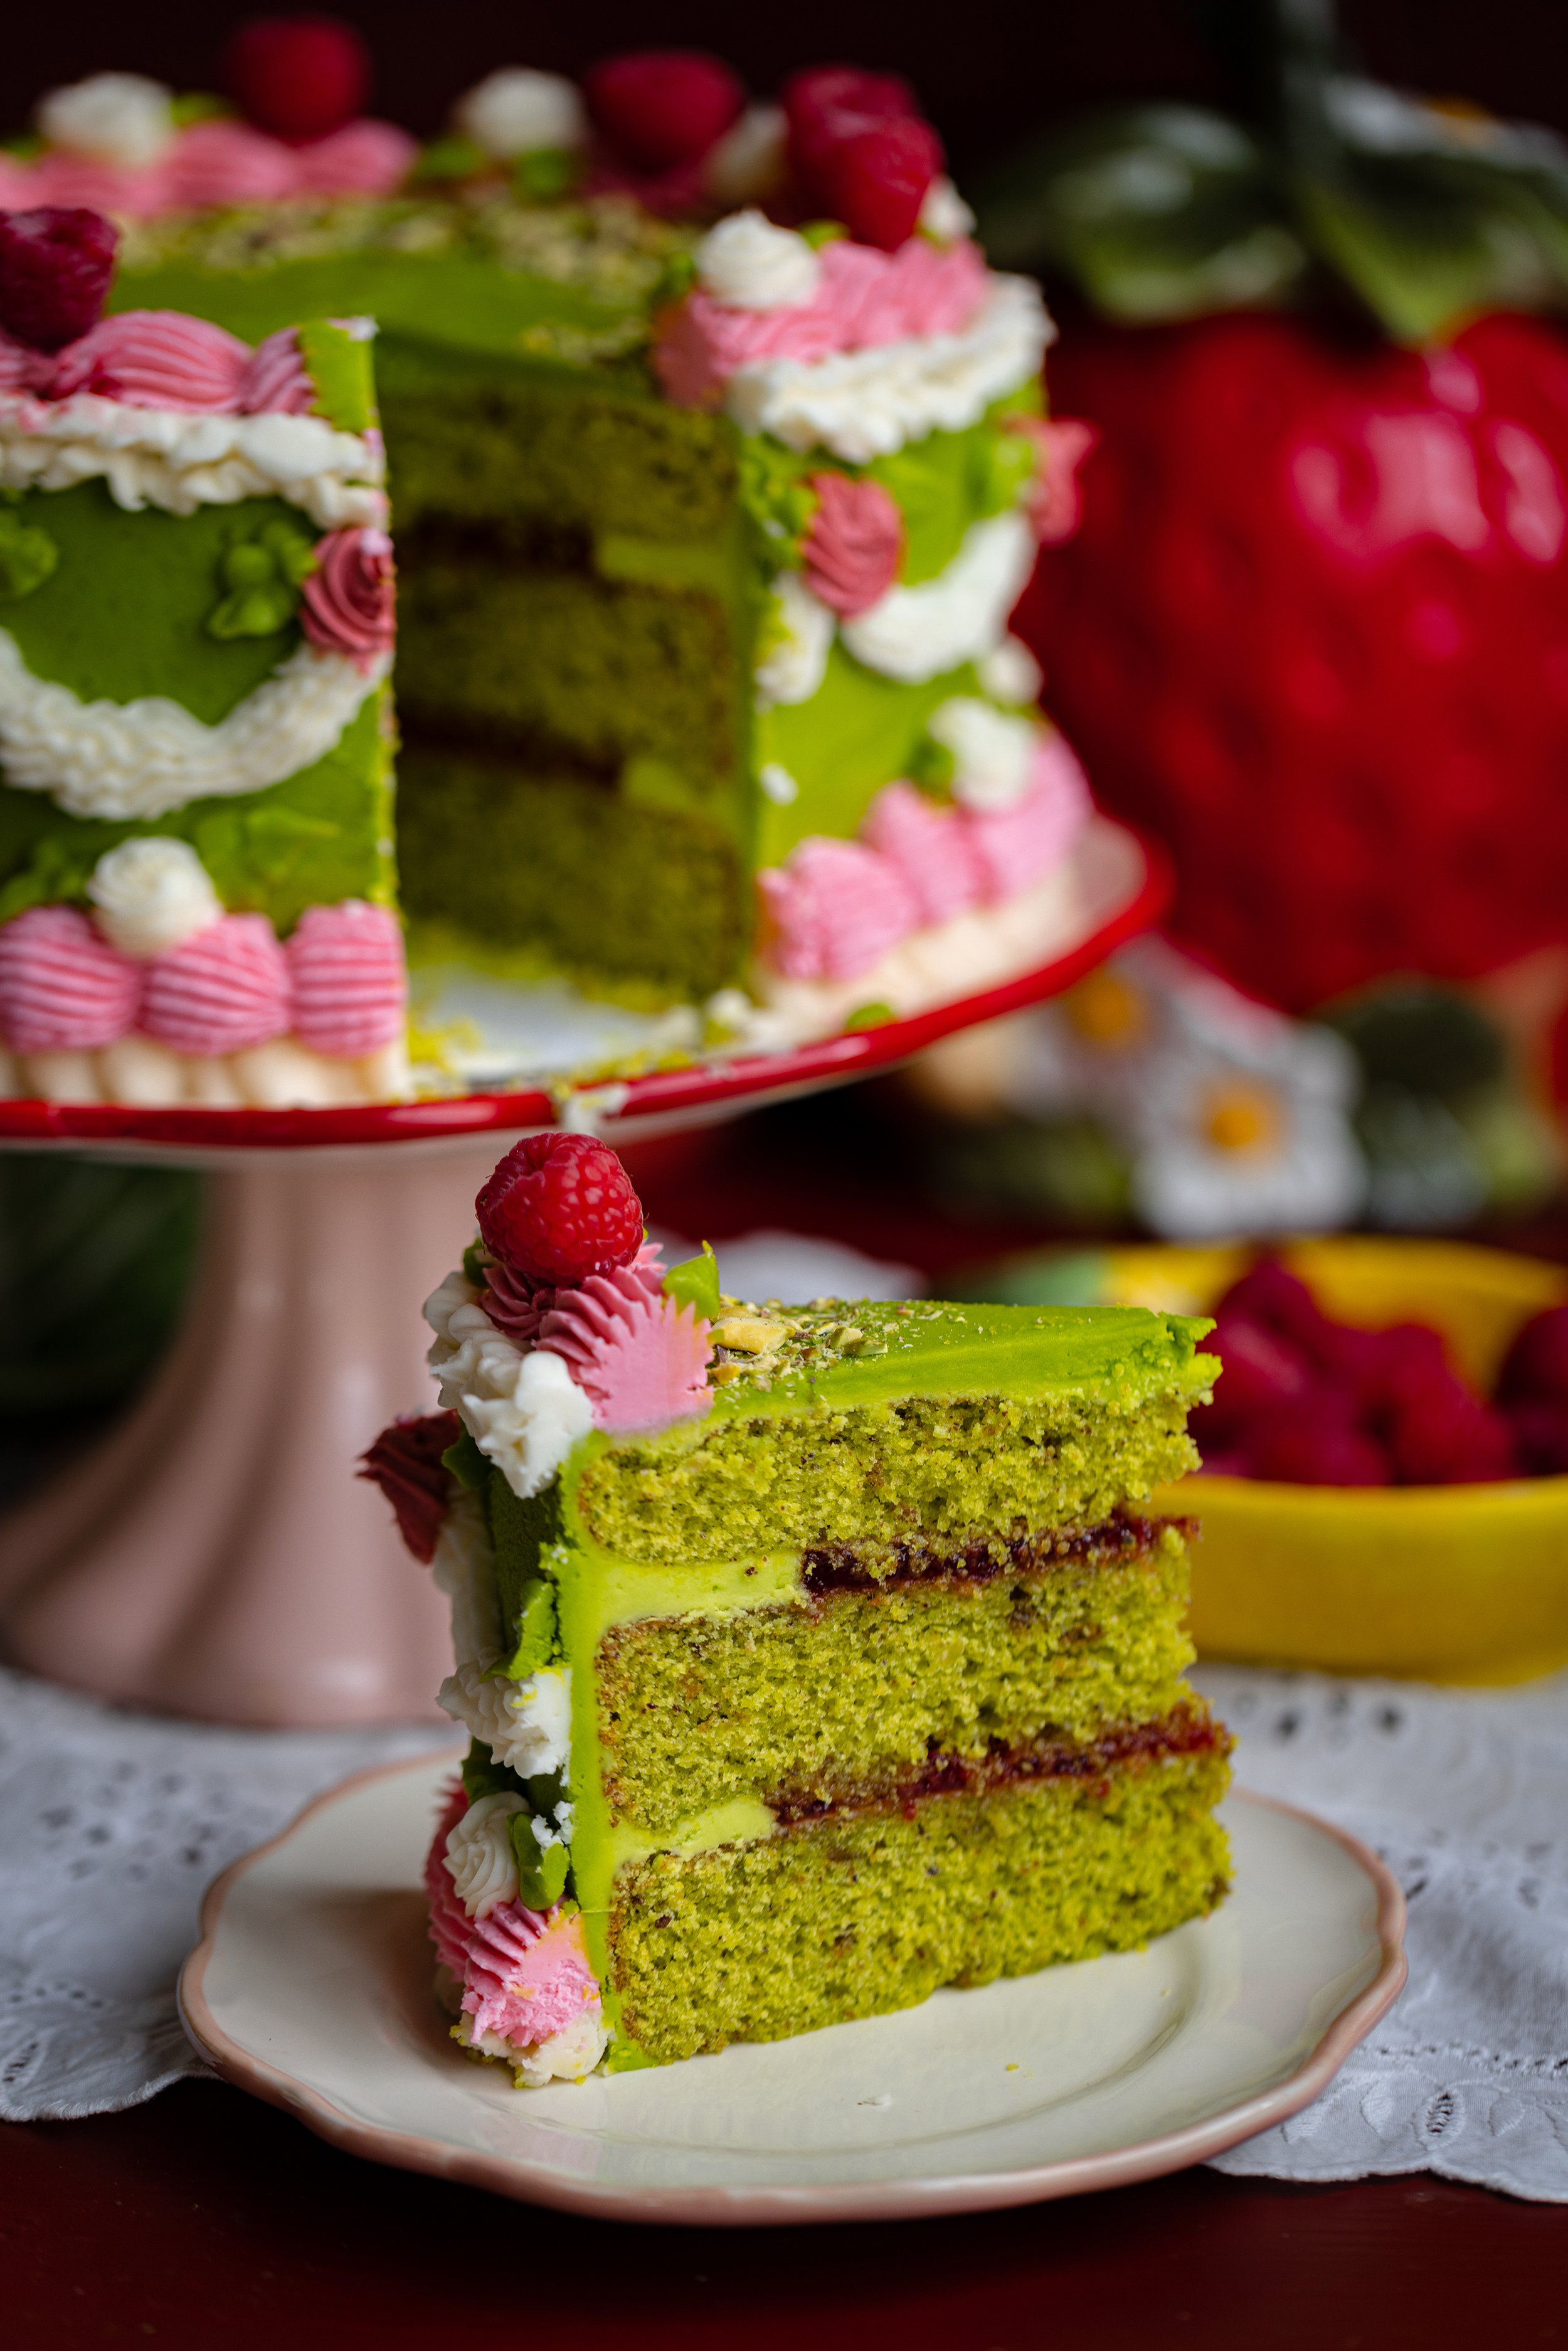
Pistachio Cake with Raspberry Filling
This post may contain affiliate links, please see our privacy policy for more information.
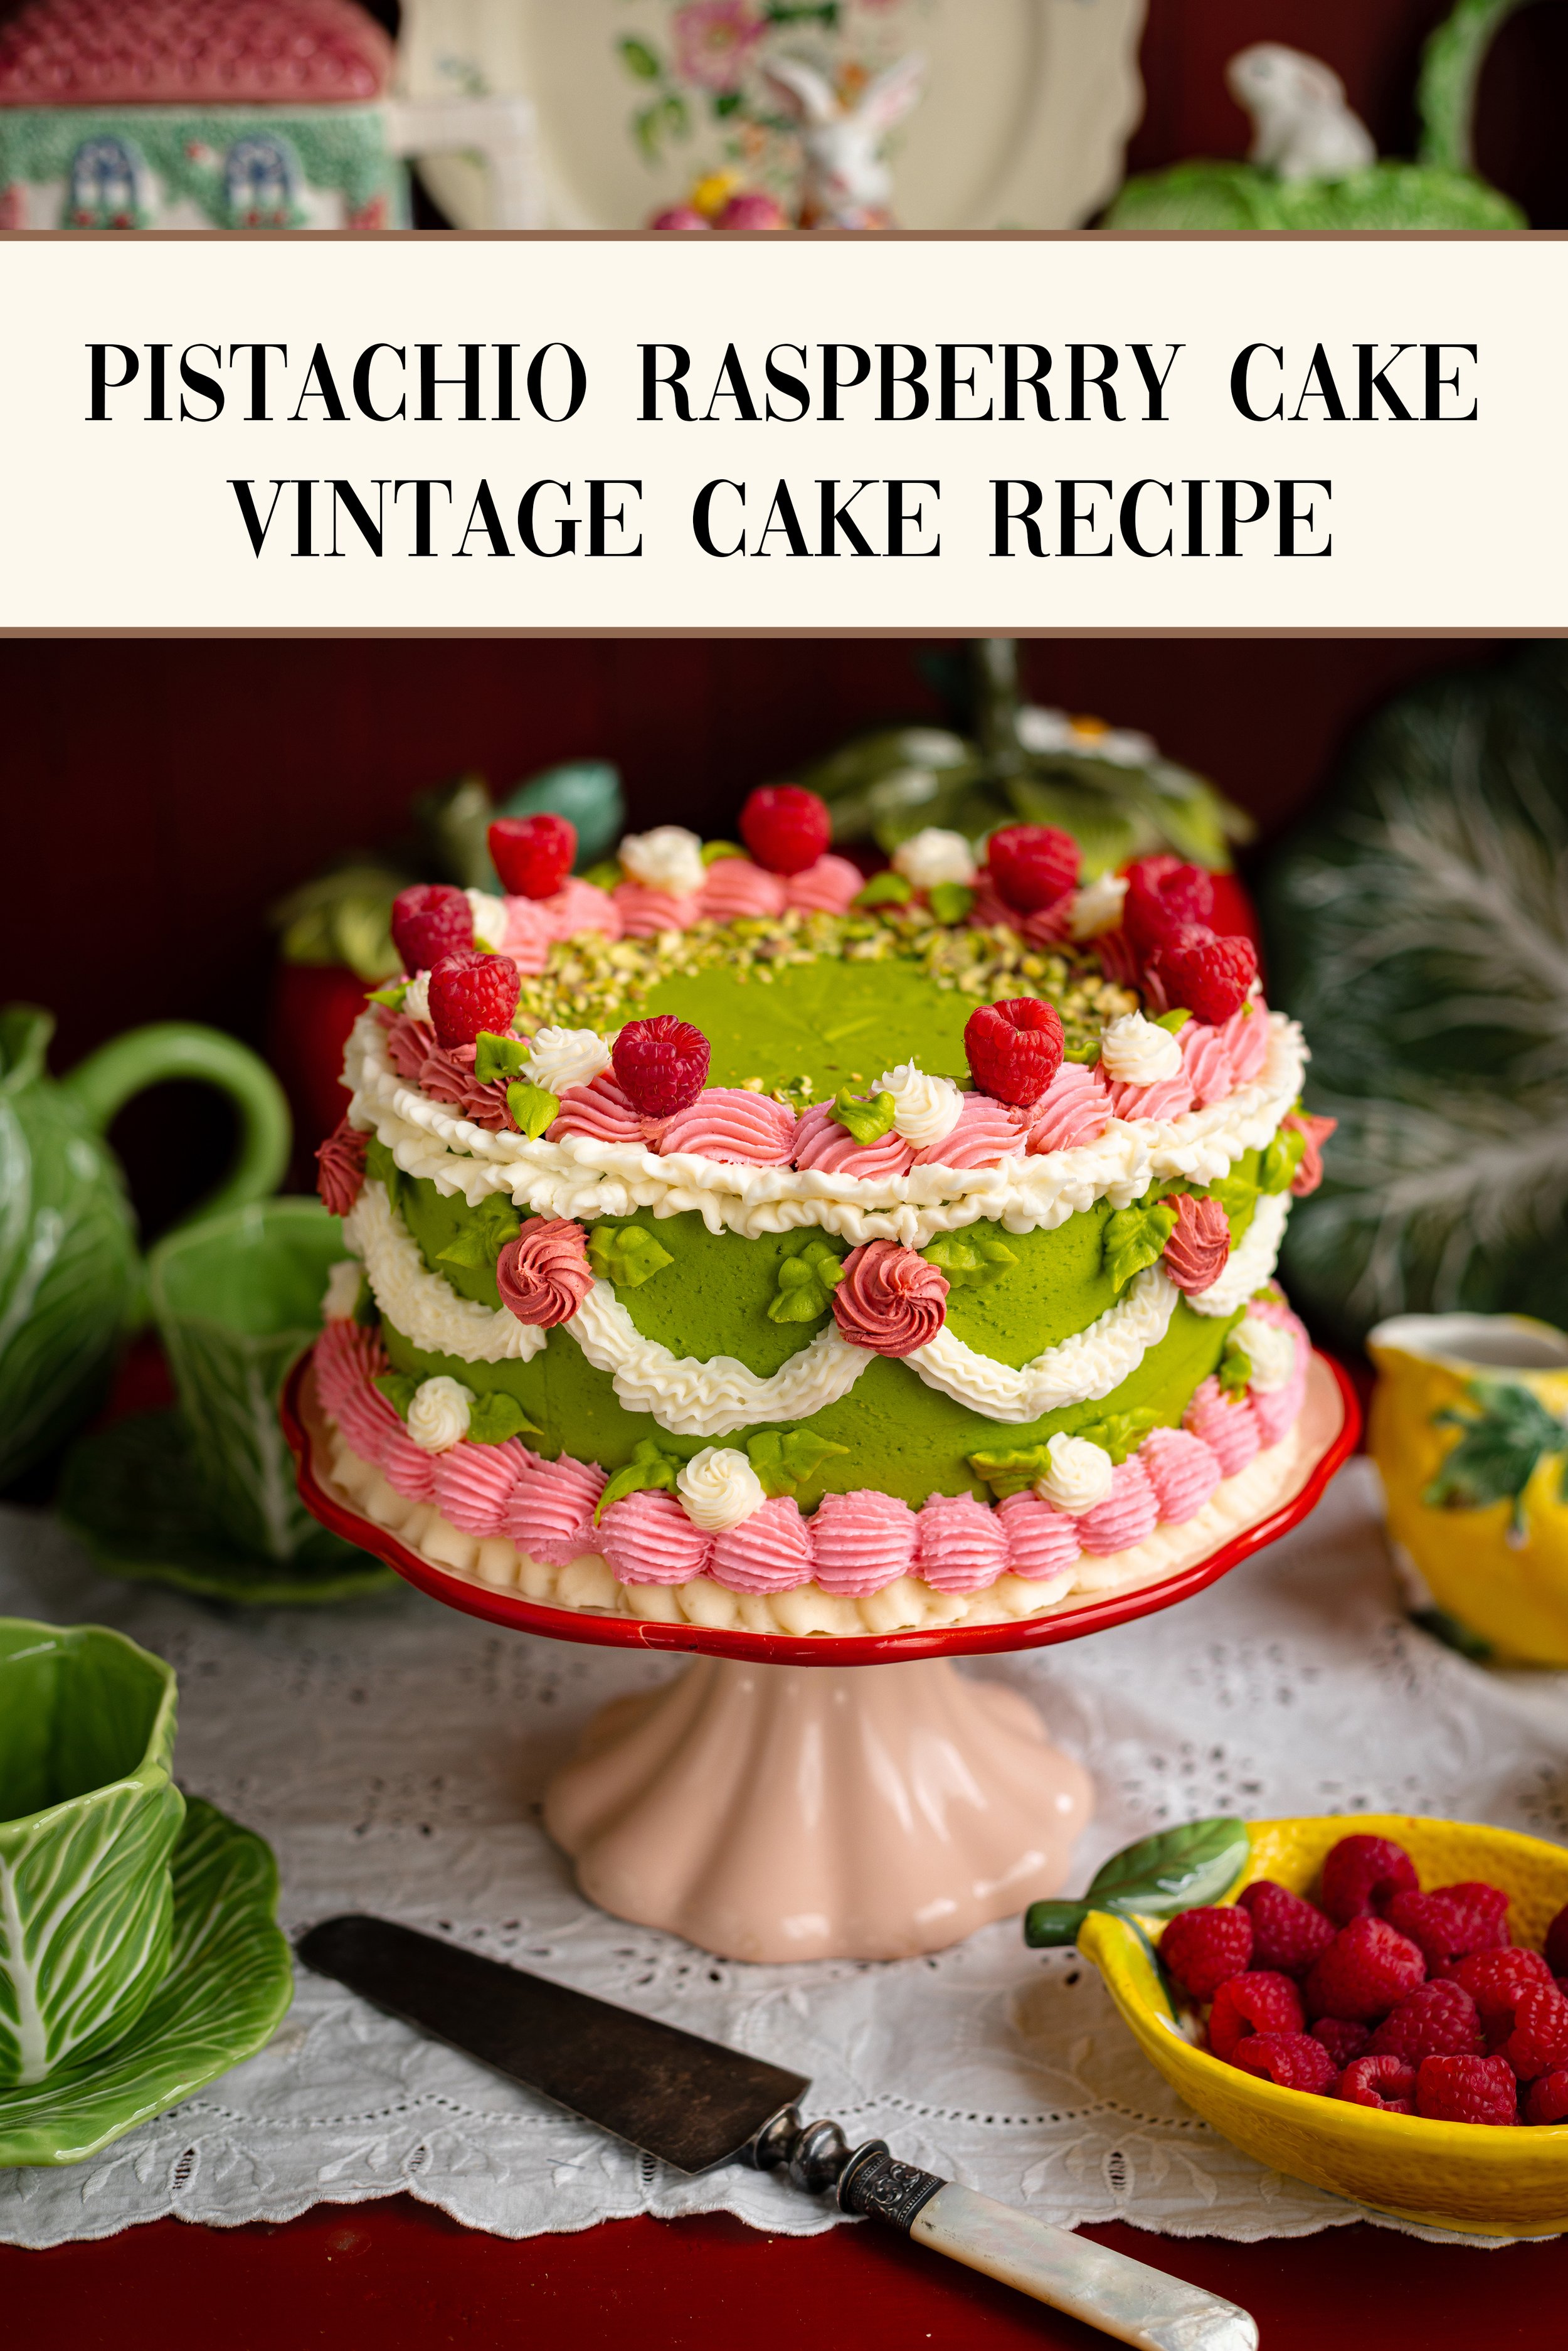
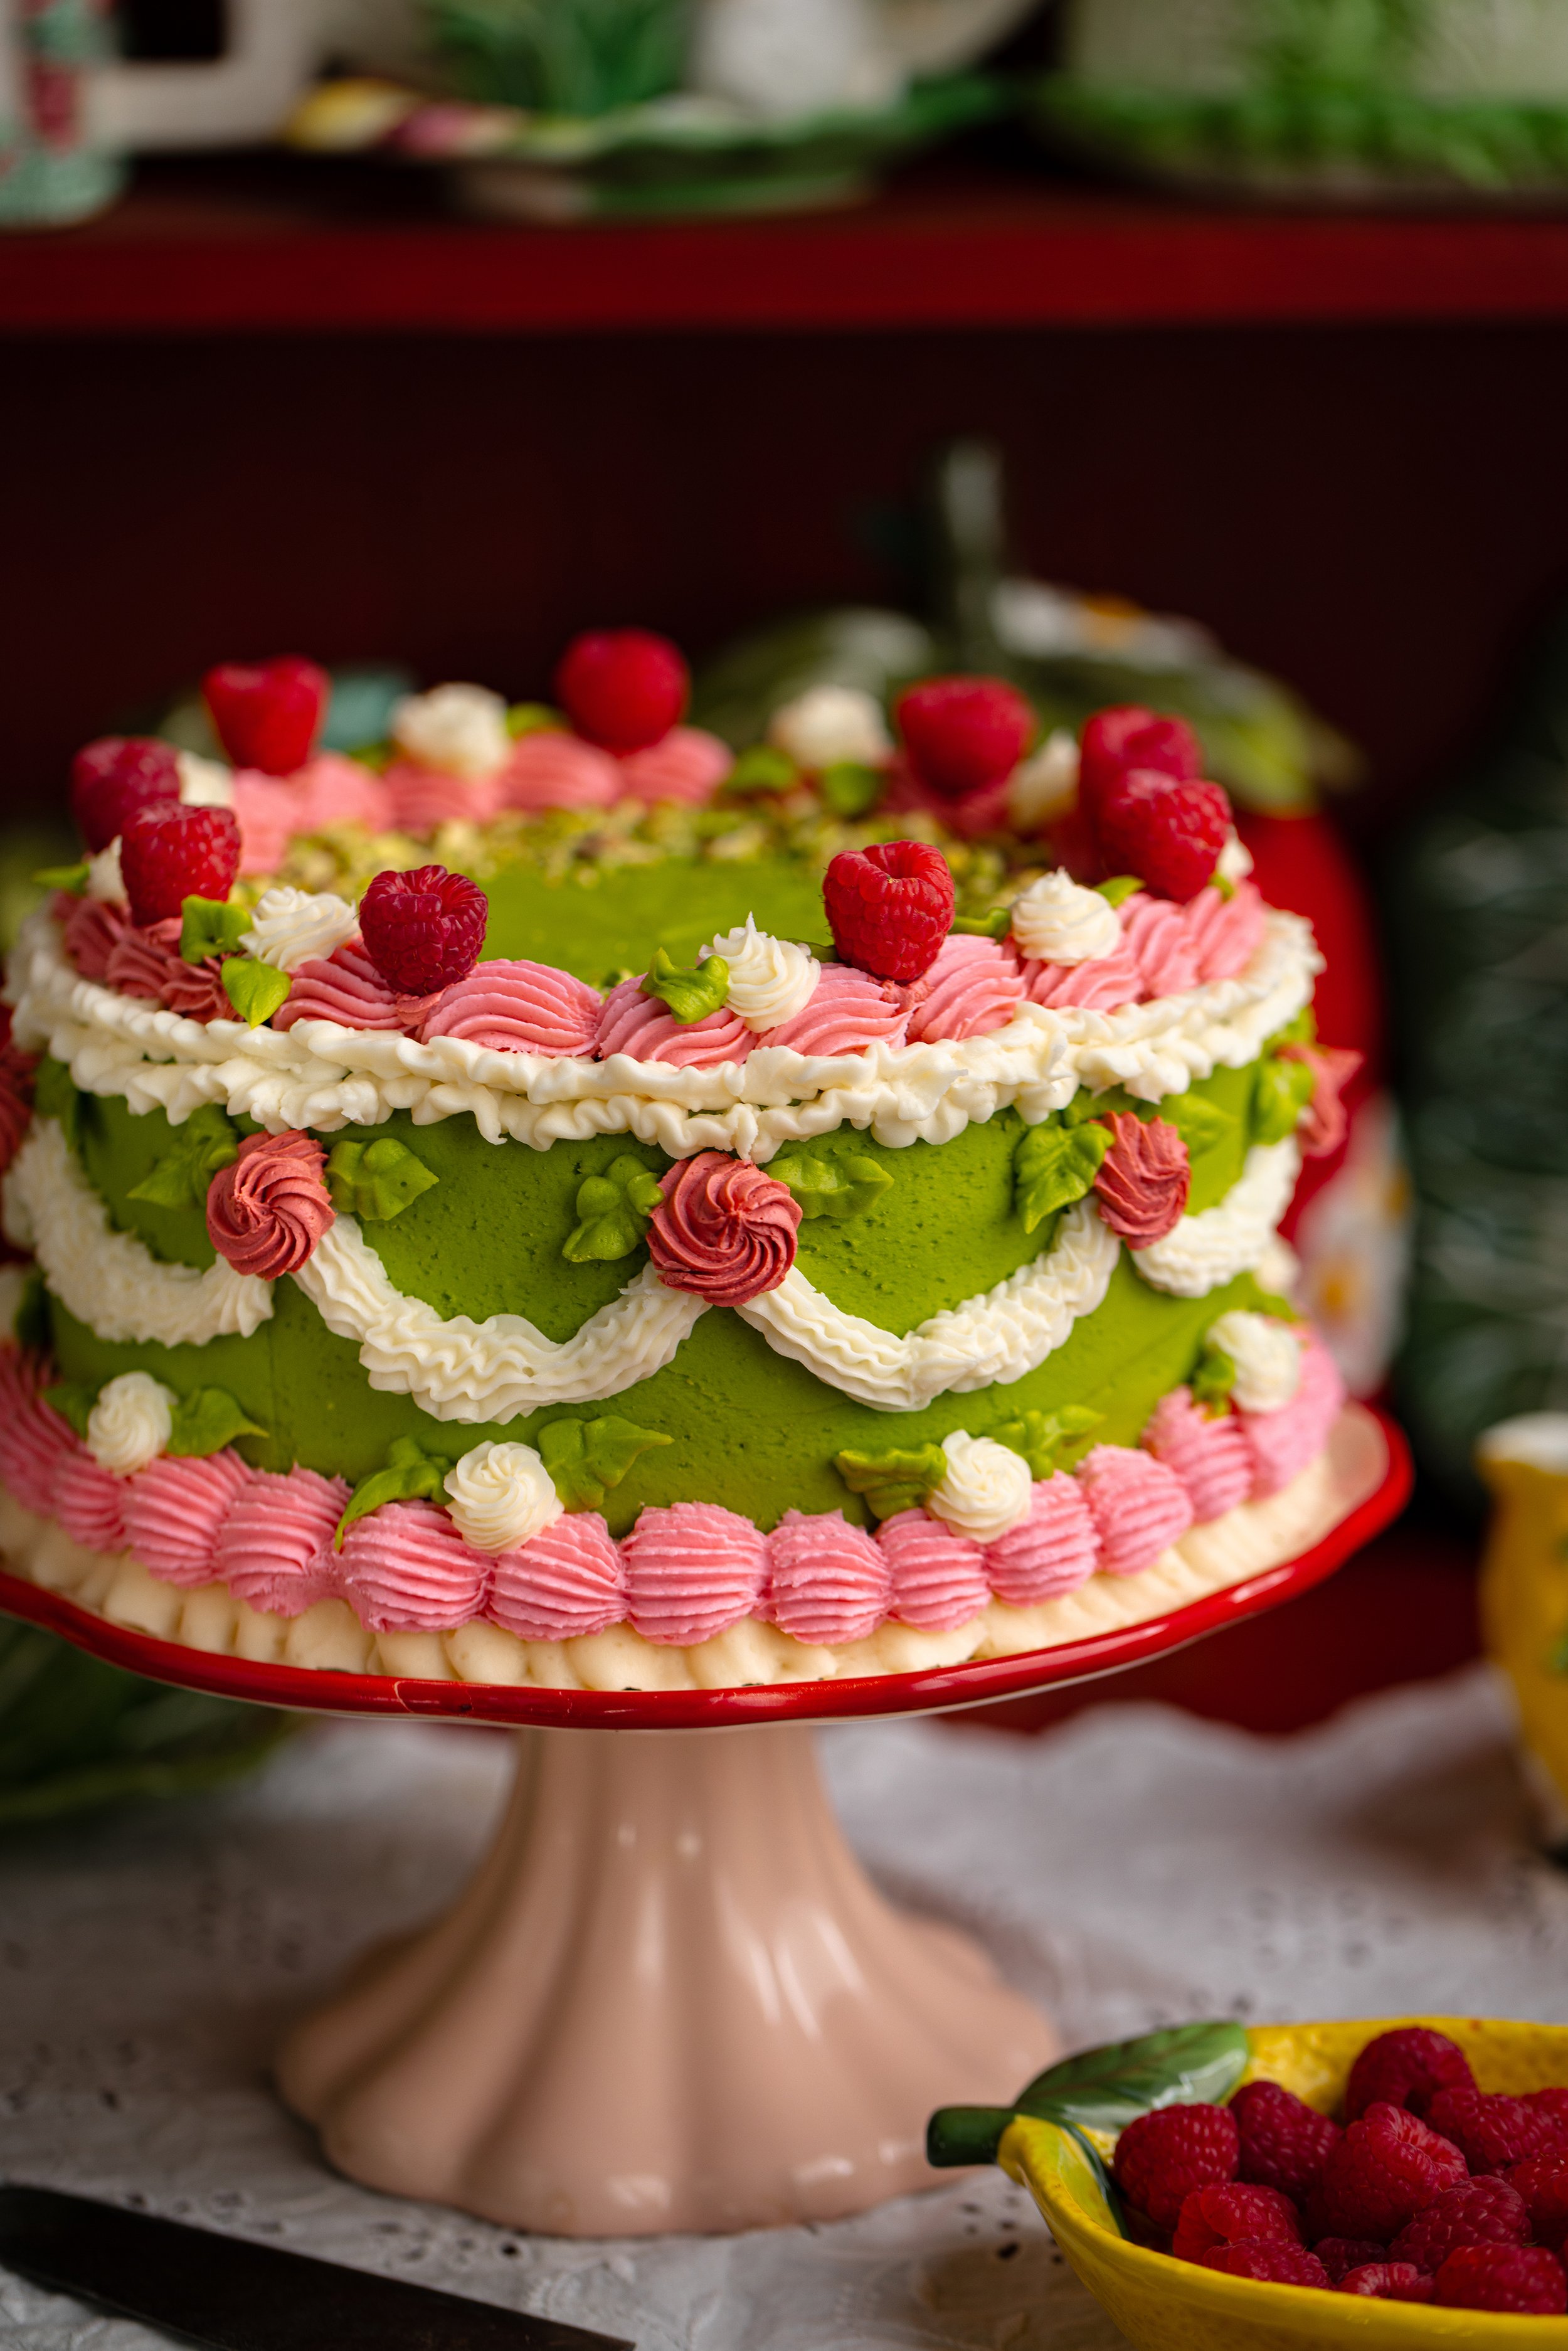
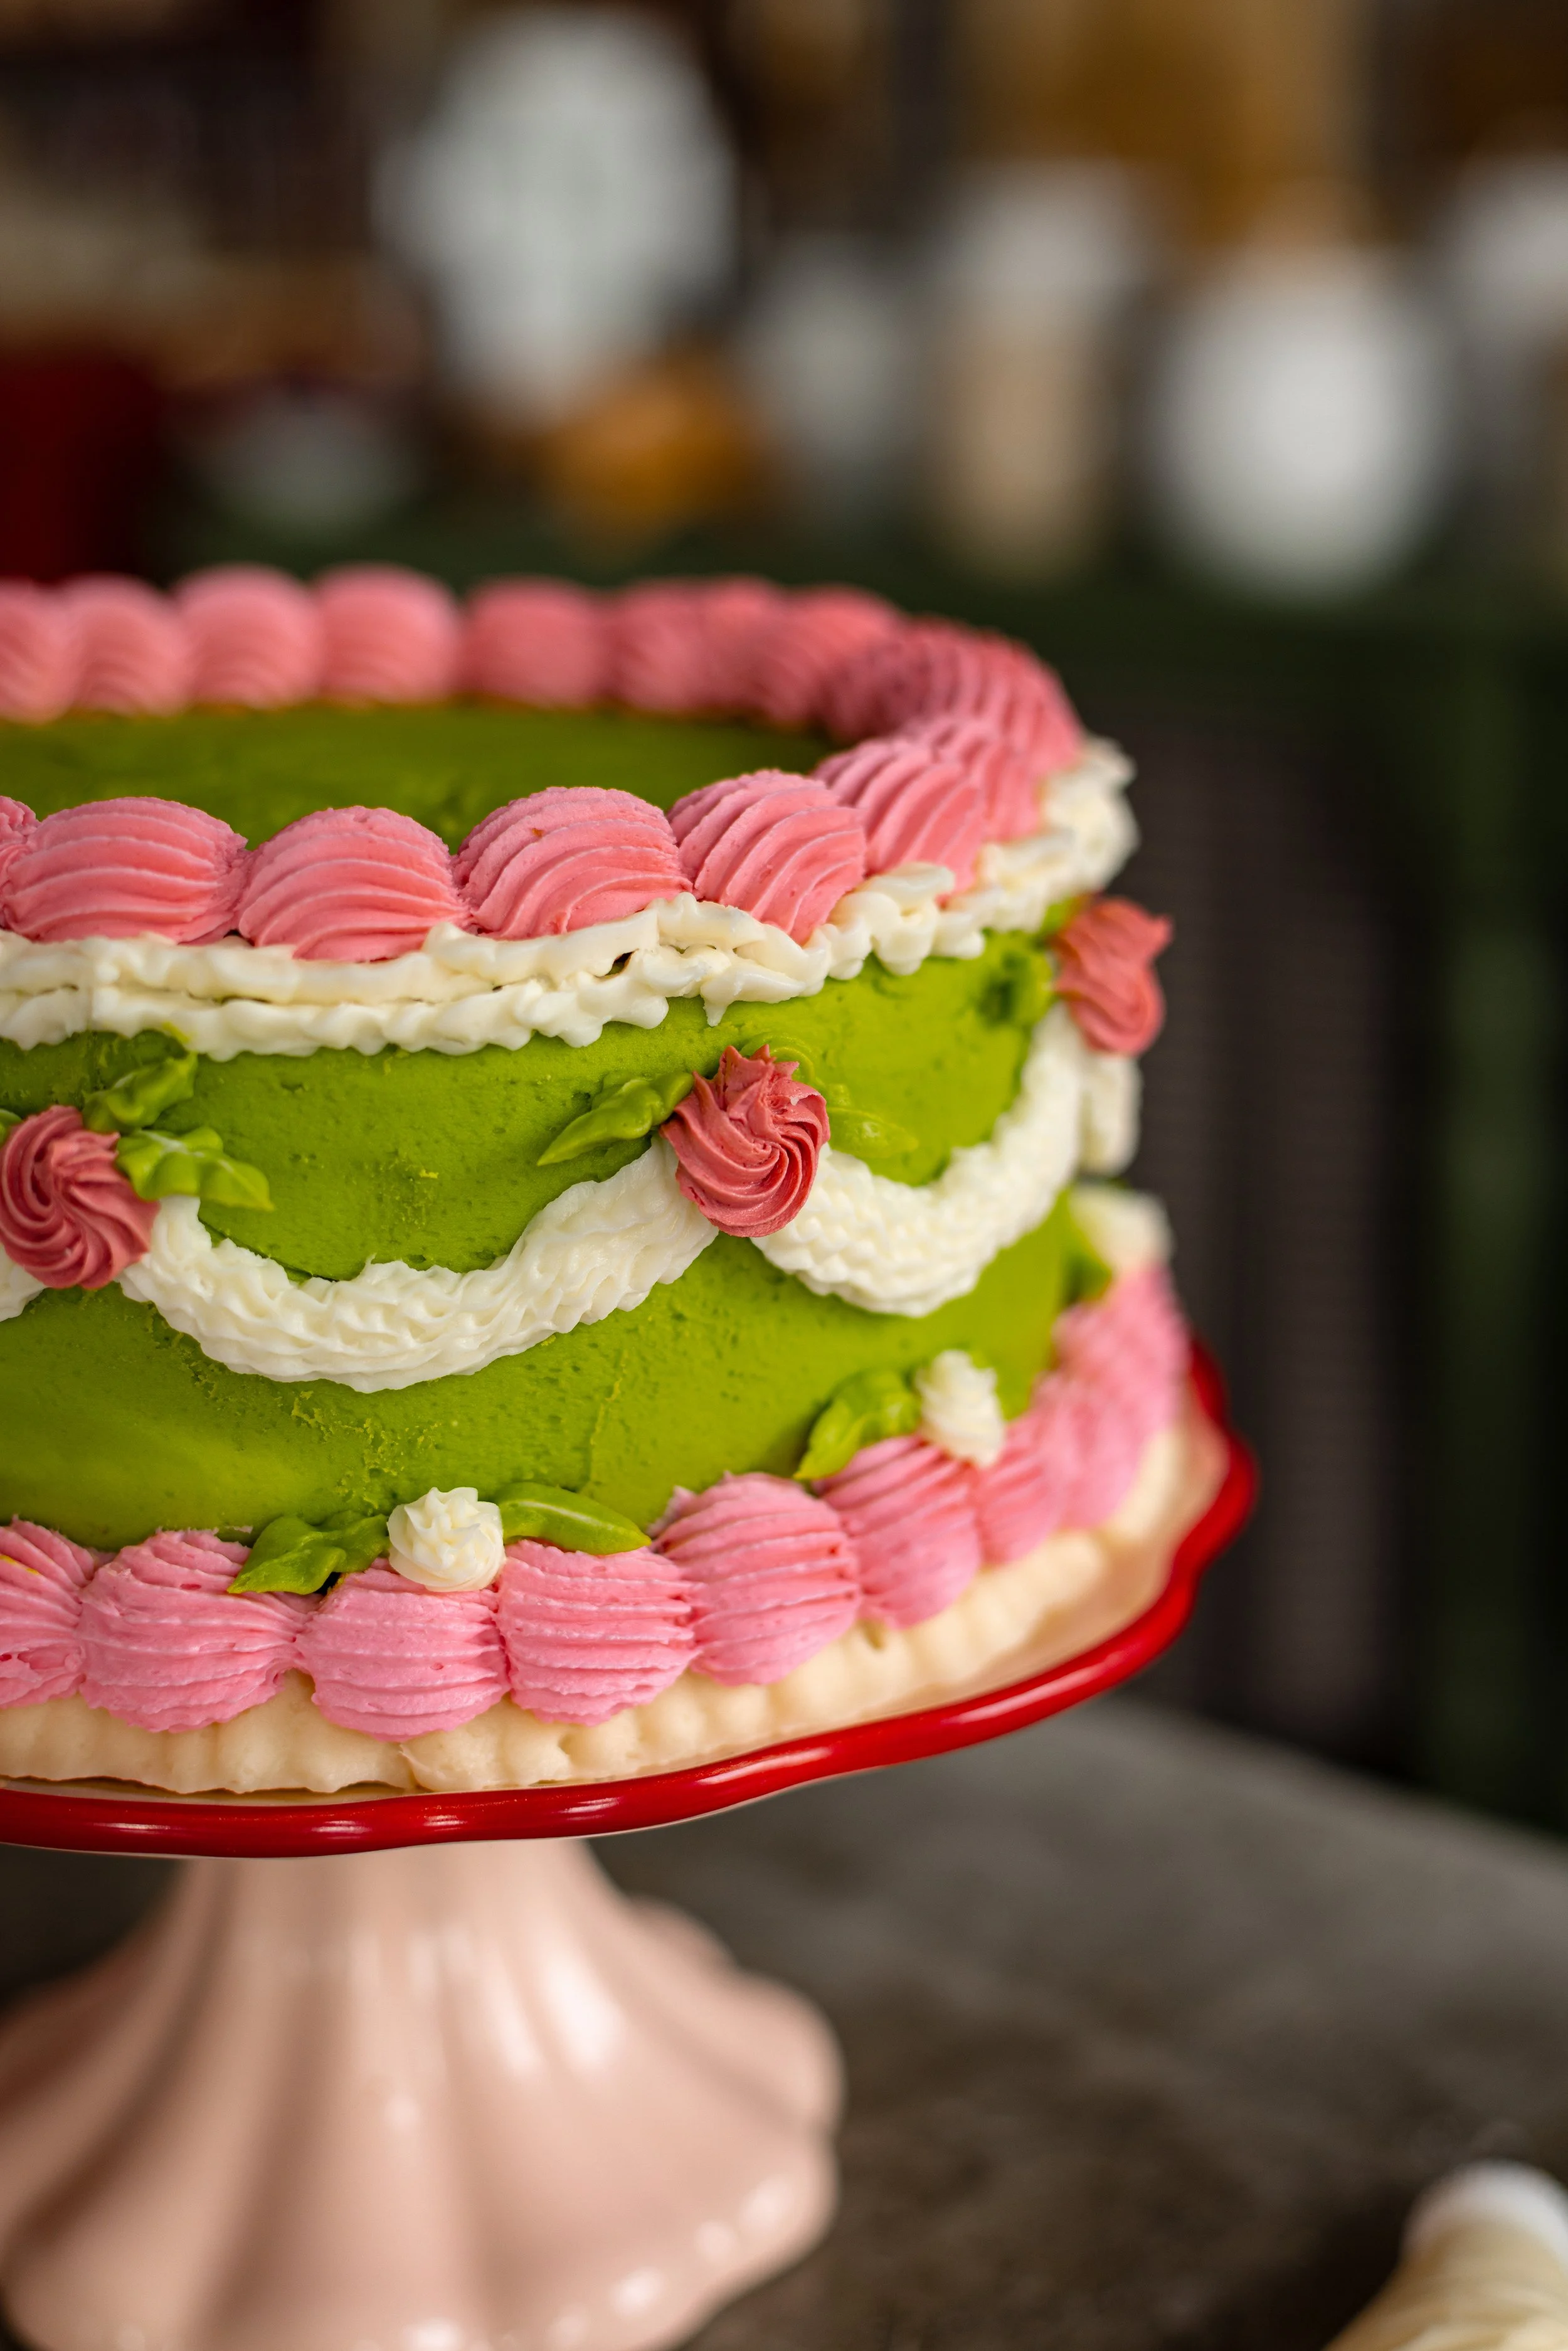
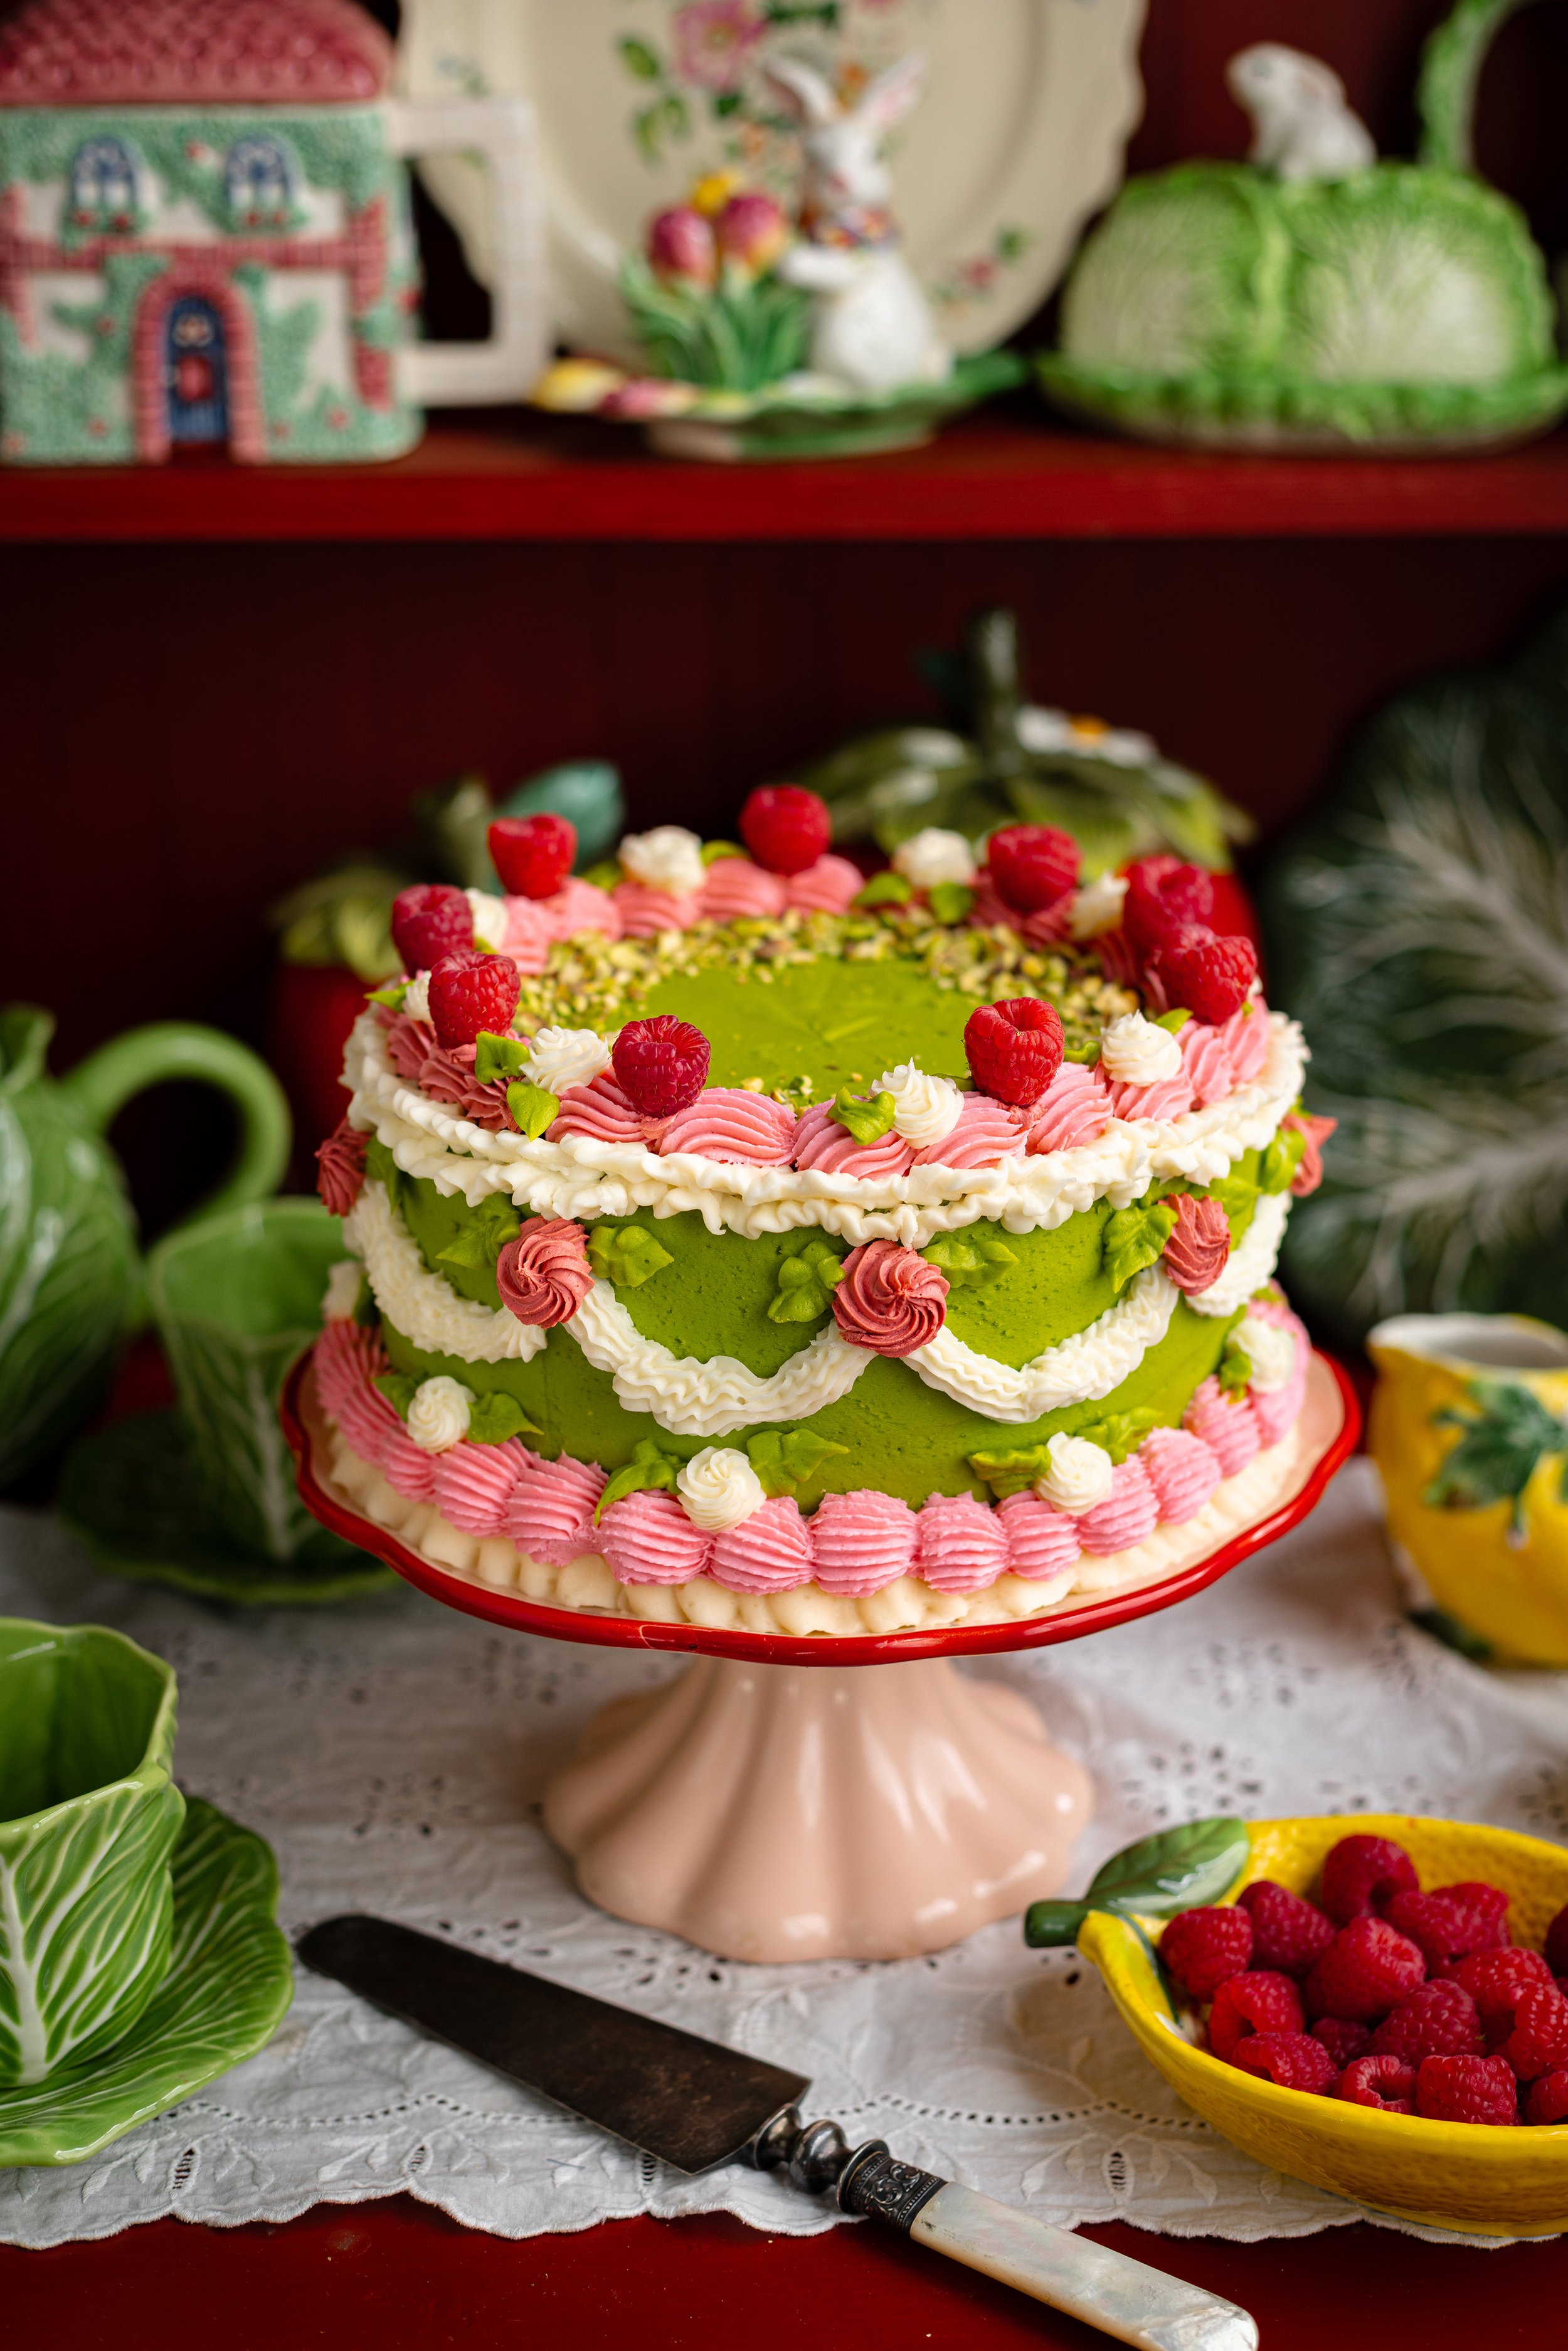
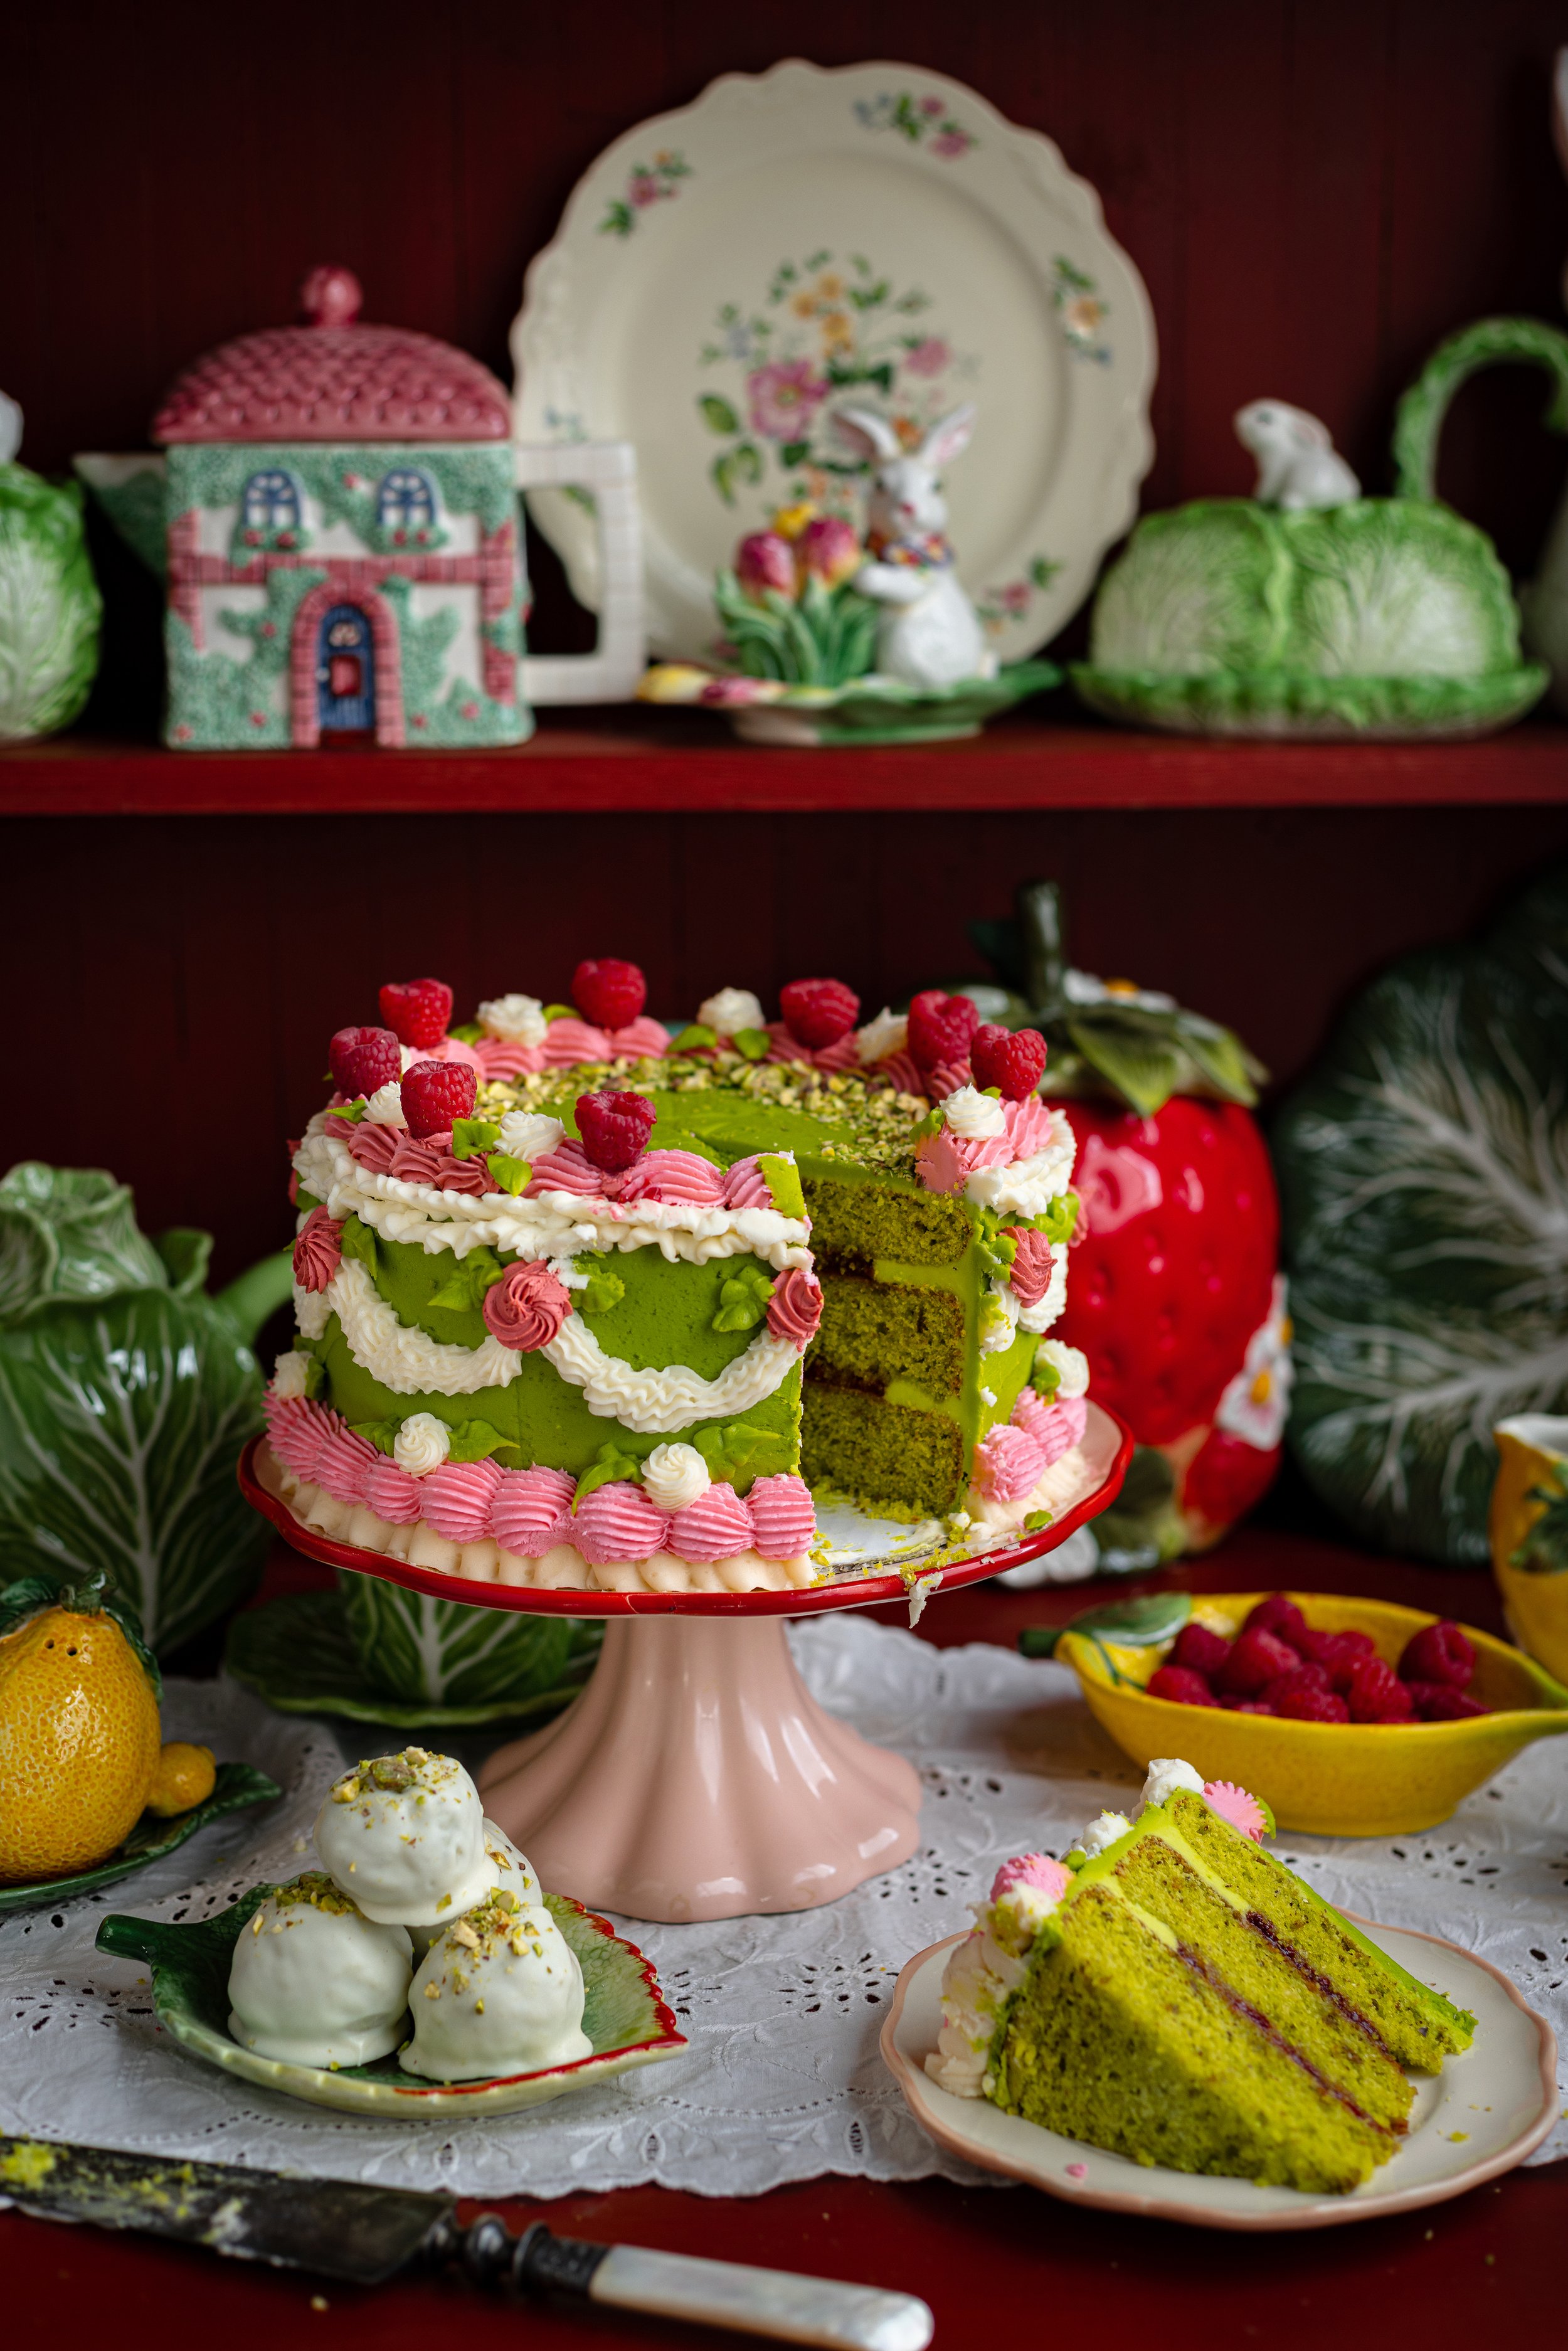
This Pistachio Cake with Raspberry Filling is a dreamy, old-fashioned dessert that brings together the nutty richness of pistachios, the bright tartness of raspberries, and the luxurious creaminess of pistachio buttercream. Styled like a vintage cake with intricate piping and delicate details, it’s a stunning centerpiece for any special occasion—whether it’s a birthday, tea party, or an elegant afternoon treat.
With its soft, nutty sponge, vibrant fruit filling, and beautifully piped frosting, this cake feels like a nostalgic nod to the elegant confections of decades past. If you love vintage-inspired baking and classic flavor pairings, this cake will be a showstopper in both taste and presentation.
Delicious Pistachio Flavor:
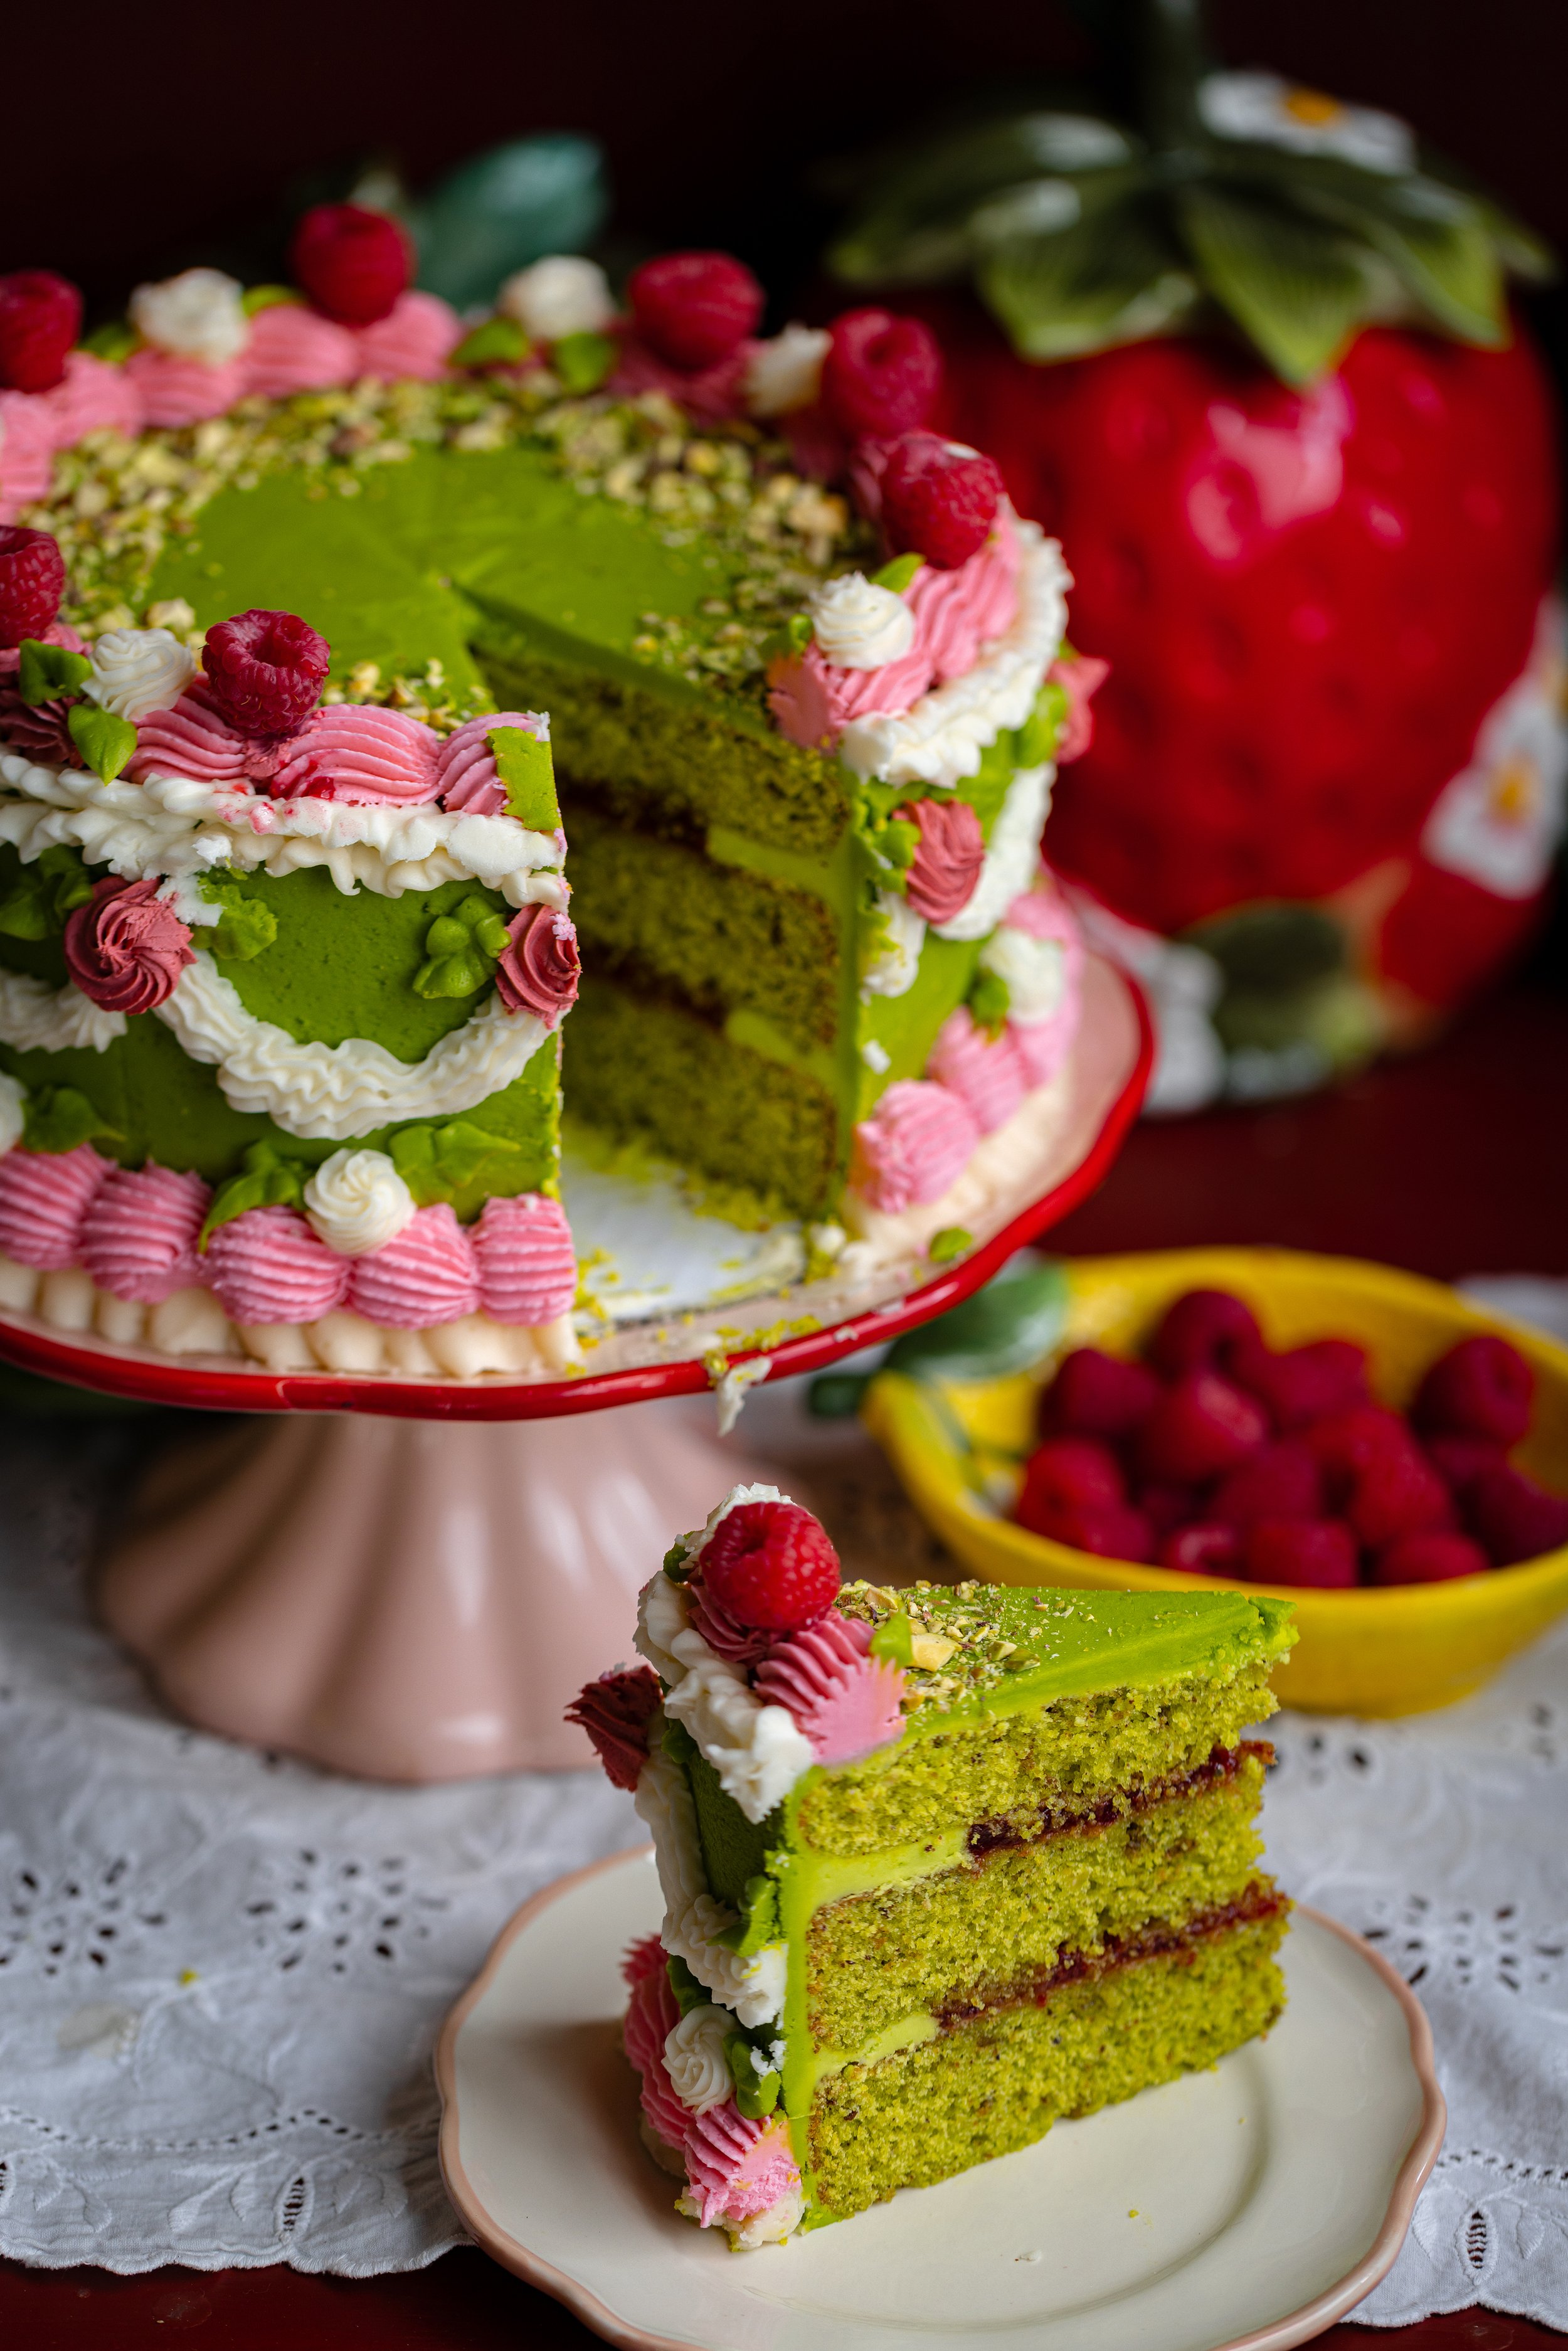
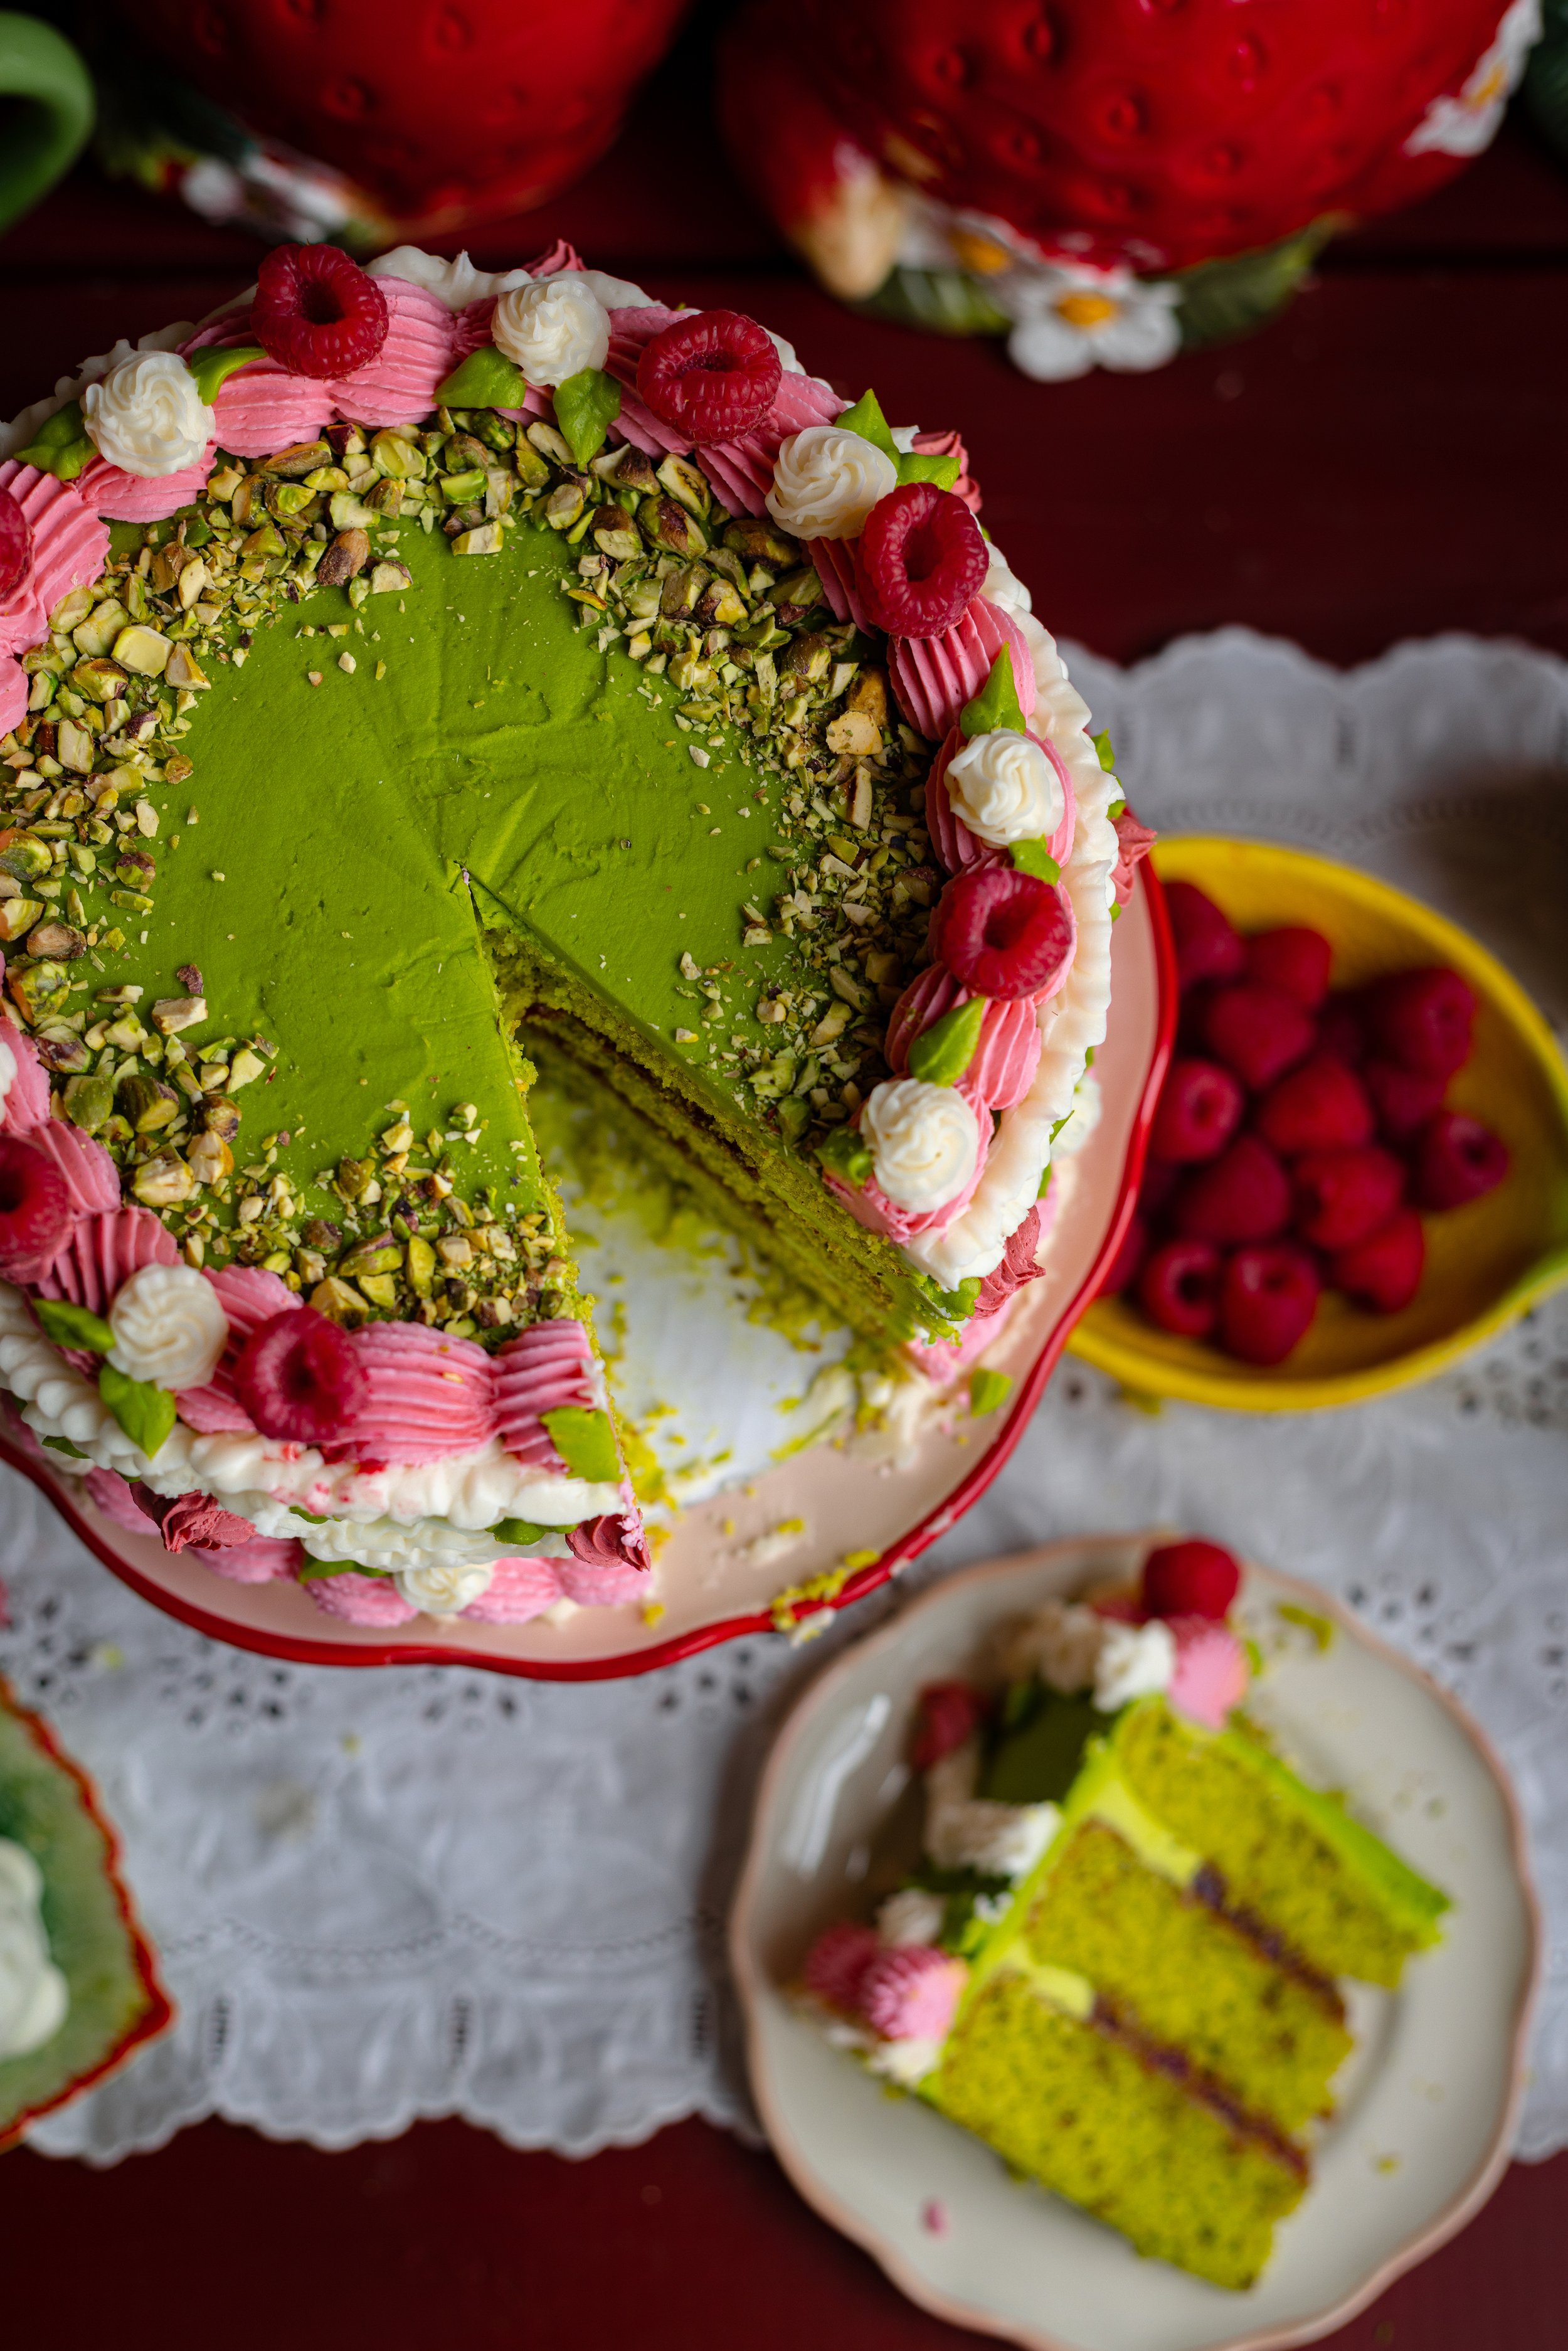
Pistachios have long been treasured in baking, from Middle Eastern pastries to European tortes. Their naturally sweet, buttery flavor pairs wonderfully with tart berries, making this pistachio and raspberry combination timeless and irresistible. The cake itself is soft and tender, enriched with finely ground pistachios for a delicate crumb. Between the layers, a homemade raspberry filling adds a touch of brightness, cutting through the richness of the cake and buttercream.
Why You’ll Love This Recipe:
A Stunning Vintage-Inspired Cake – Perfect for birthdays, weddings, or elegant tea parties. It’s an adorable spring cake decorating idea!
The Perfect Balance of Flavors – Nutty pistachios, tart raspberries, and silky buttercream create a harmonious bite.
A Soft, Moist Cake Texture – Made with ground pistachios for a rich and tender crumb.
Beautifully Customizable – Choose different piping techniques, add fresh flowers, or even color the buttercream for a personalized touch.
Gathering Ingredients:
Butter. For the best results, bring your butter to 60° F (16° C) before creaming into the cake batter and buttercream.
Caster Sugar. If you do not have caster sugar, fine granulated sugar works perfectly.
Eggs.
Vanilla Extract & Almond Extract. The classic pistachio cake flavor is a mixture of almond and vanilla!
Flour. For this recipe, I recommend using all-purpose flour.
Ground Pistachios. You will want to use raw pistachios, finely ground.
Baking Powder.
Salt.
Milk.
Powdered Sugar.
Heavy Cream.
Raspberry Jam. If possible, try to use seedless raspberry jam or jelly!
Whole Raspberries.
Roasted & Salted Whole Pistachios.
How to Make Pistachio Cake with Raspberry Filling:
Step One: In the bowl of a standing electric mixer, cream together the butter and sugar until light and fluffy, about 3 to 4 minutes. Beat in the eggs, one at a time, until well incorporated, about 3 minutes more. Then, beat in the vanilla and almond extracts.
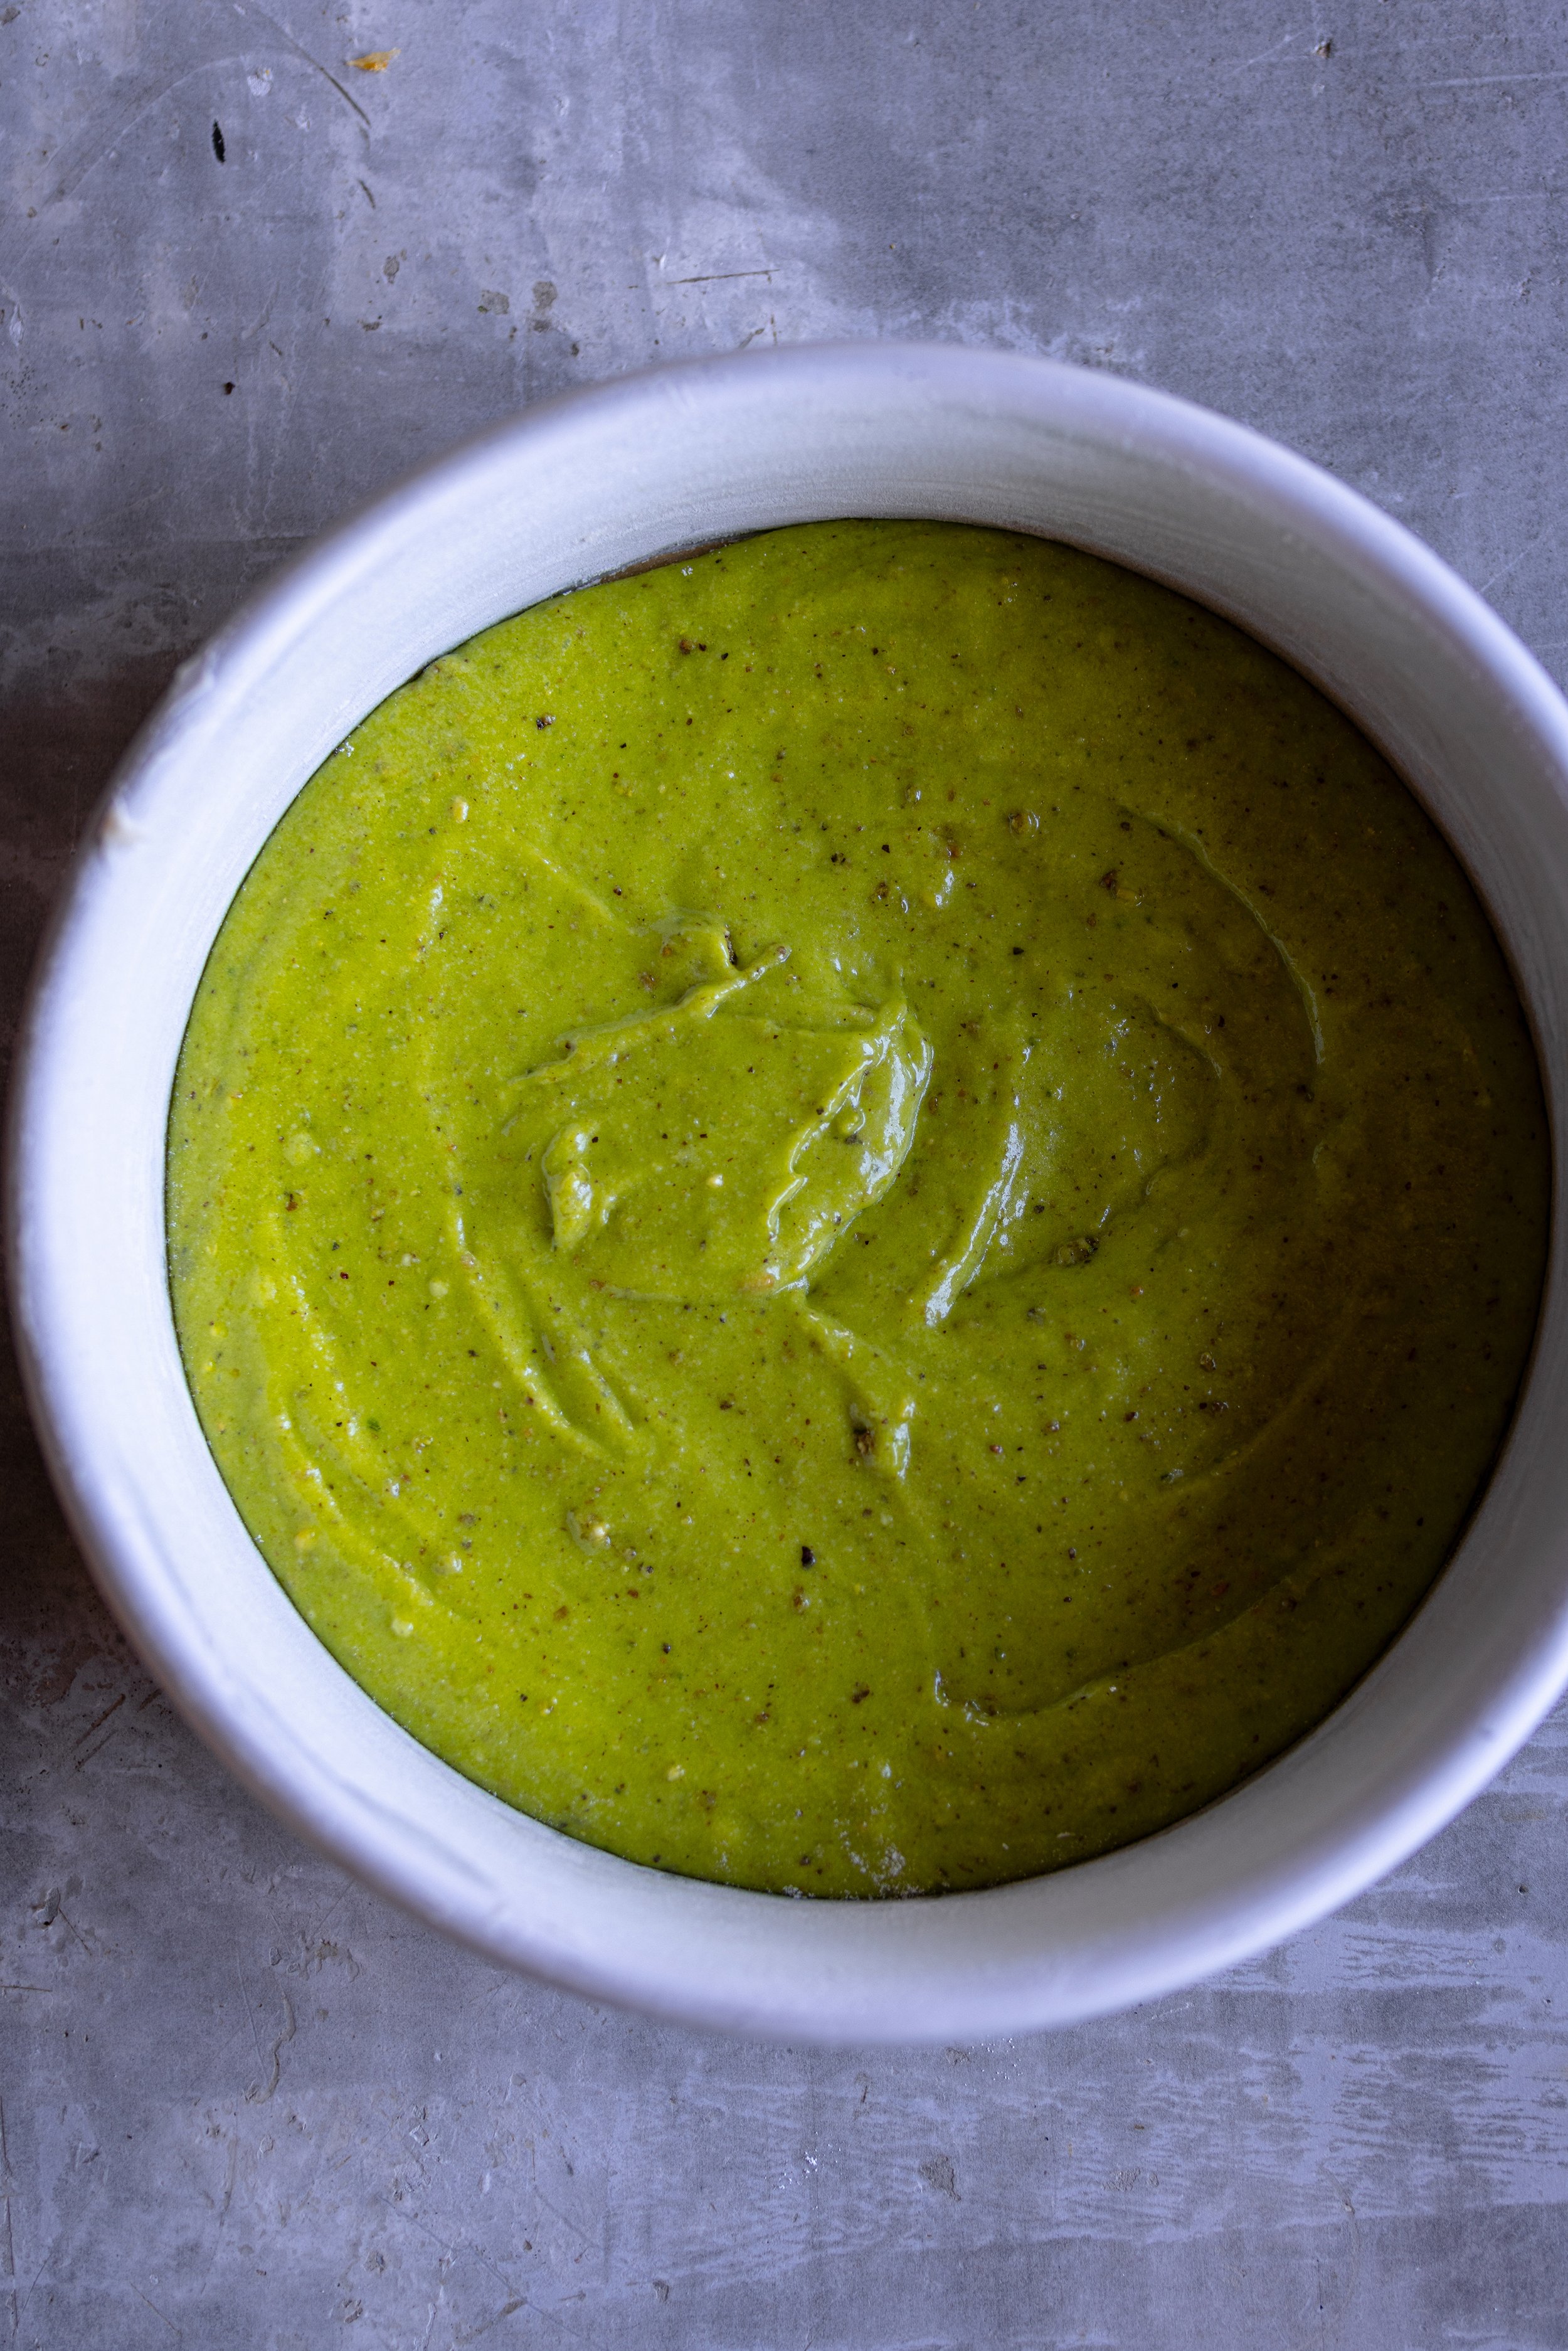
Step Two: In a separate medium bowl, whisk together the flour, ground pistachios, baking powder, and salt. Alternately, begin to the add the dry ingredients and milk to the butter and egg mixture, beginning and ending with the flour mixture. Continue to mix until the batter just comes together, about 5 to 7 minutes total. Mix in a few drop of green food coloring to create a light green color.
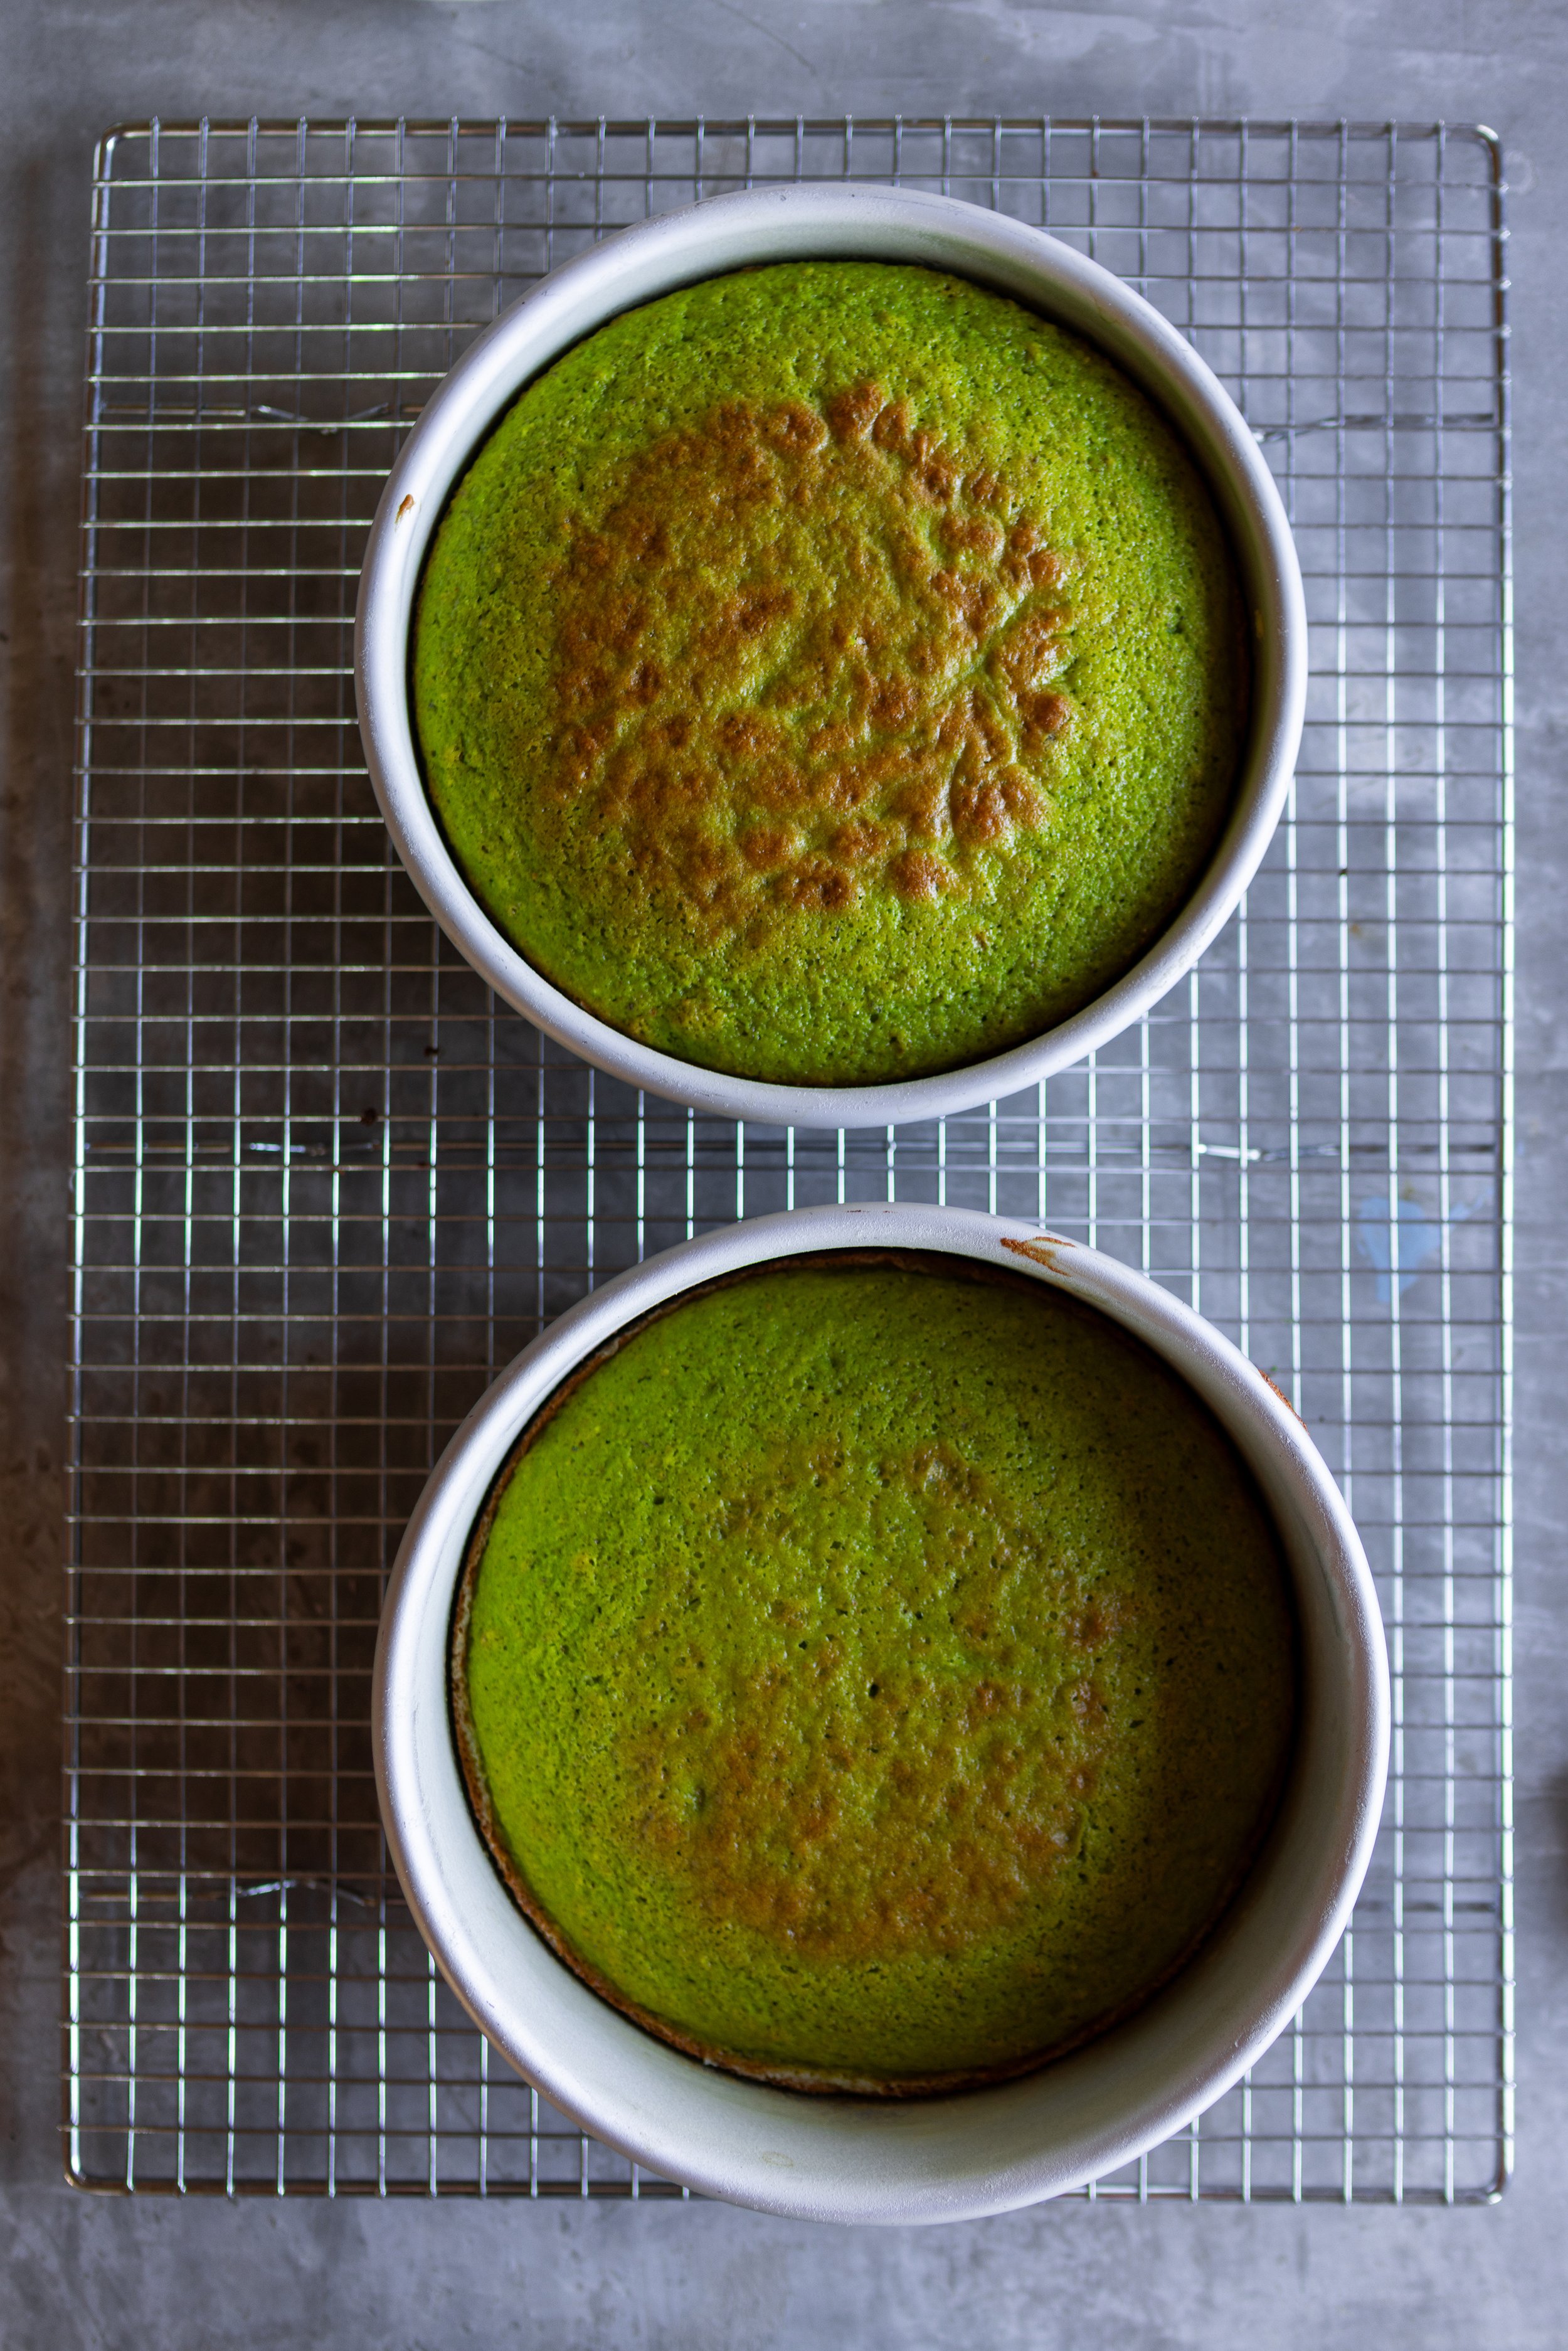
Step Three: Divide the cake batter evenly between the prepared cake pans. Bake the cakes for about 25 to 30 minutes or until a toothpick inserted in the center comes out clean. Remove the cakes from the oven and leave them to cool in their pans for about 10 minutes before transferring them to a wire cooling rack to finish cooling completely.
Step Four: When you are ready to decorate the cakes, it is time to make the buttercream. This recipe is enough to frost the outside of the cake and add a few decorations, but not enough to add all of the same details that I made on the photographed cake. If you would like to replicate the cake that I made, I would suggest doubling the buttercream recipe.
Step Five: Begin by beating the butter in a standing electric mixer fitted with a whisk attachment. It needs to be at room temperature but not overly soft. You should be able to easily make an indent with your finger, but the butter should not be melty or greasy. It should ideally be at about 60° F (16° C). Beat the butter in the mixer until it is pale yellow in color, light, and fluffy. This takes about 5 to 6 minutes.
Step Six: Slowly begin to add the powdered sugar. It will become thick and stiff. When this happens, add the heavy whipping cream. At this point, it will look like thick crusty frosting. Scrape down the sides of the bowl and then beat the mixture for 5 to 7 minutes, or until the frosting becomes fluffy, light, and full of air. It should appear foamy, like shaving cream, and be super soft and malleable.
Step Seven: When the buttercream has finished, divide it into bowls and color it to your liking. To replicate my cake, I colored about 3/4 of the frosting with Neon Green gel food coloring.
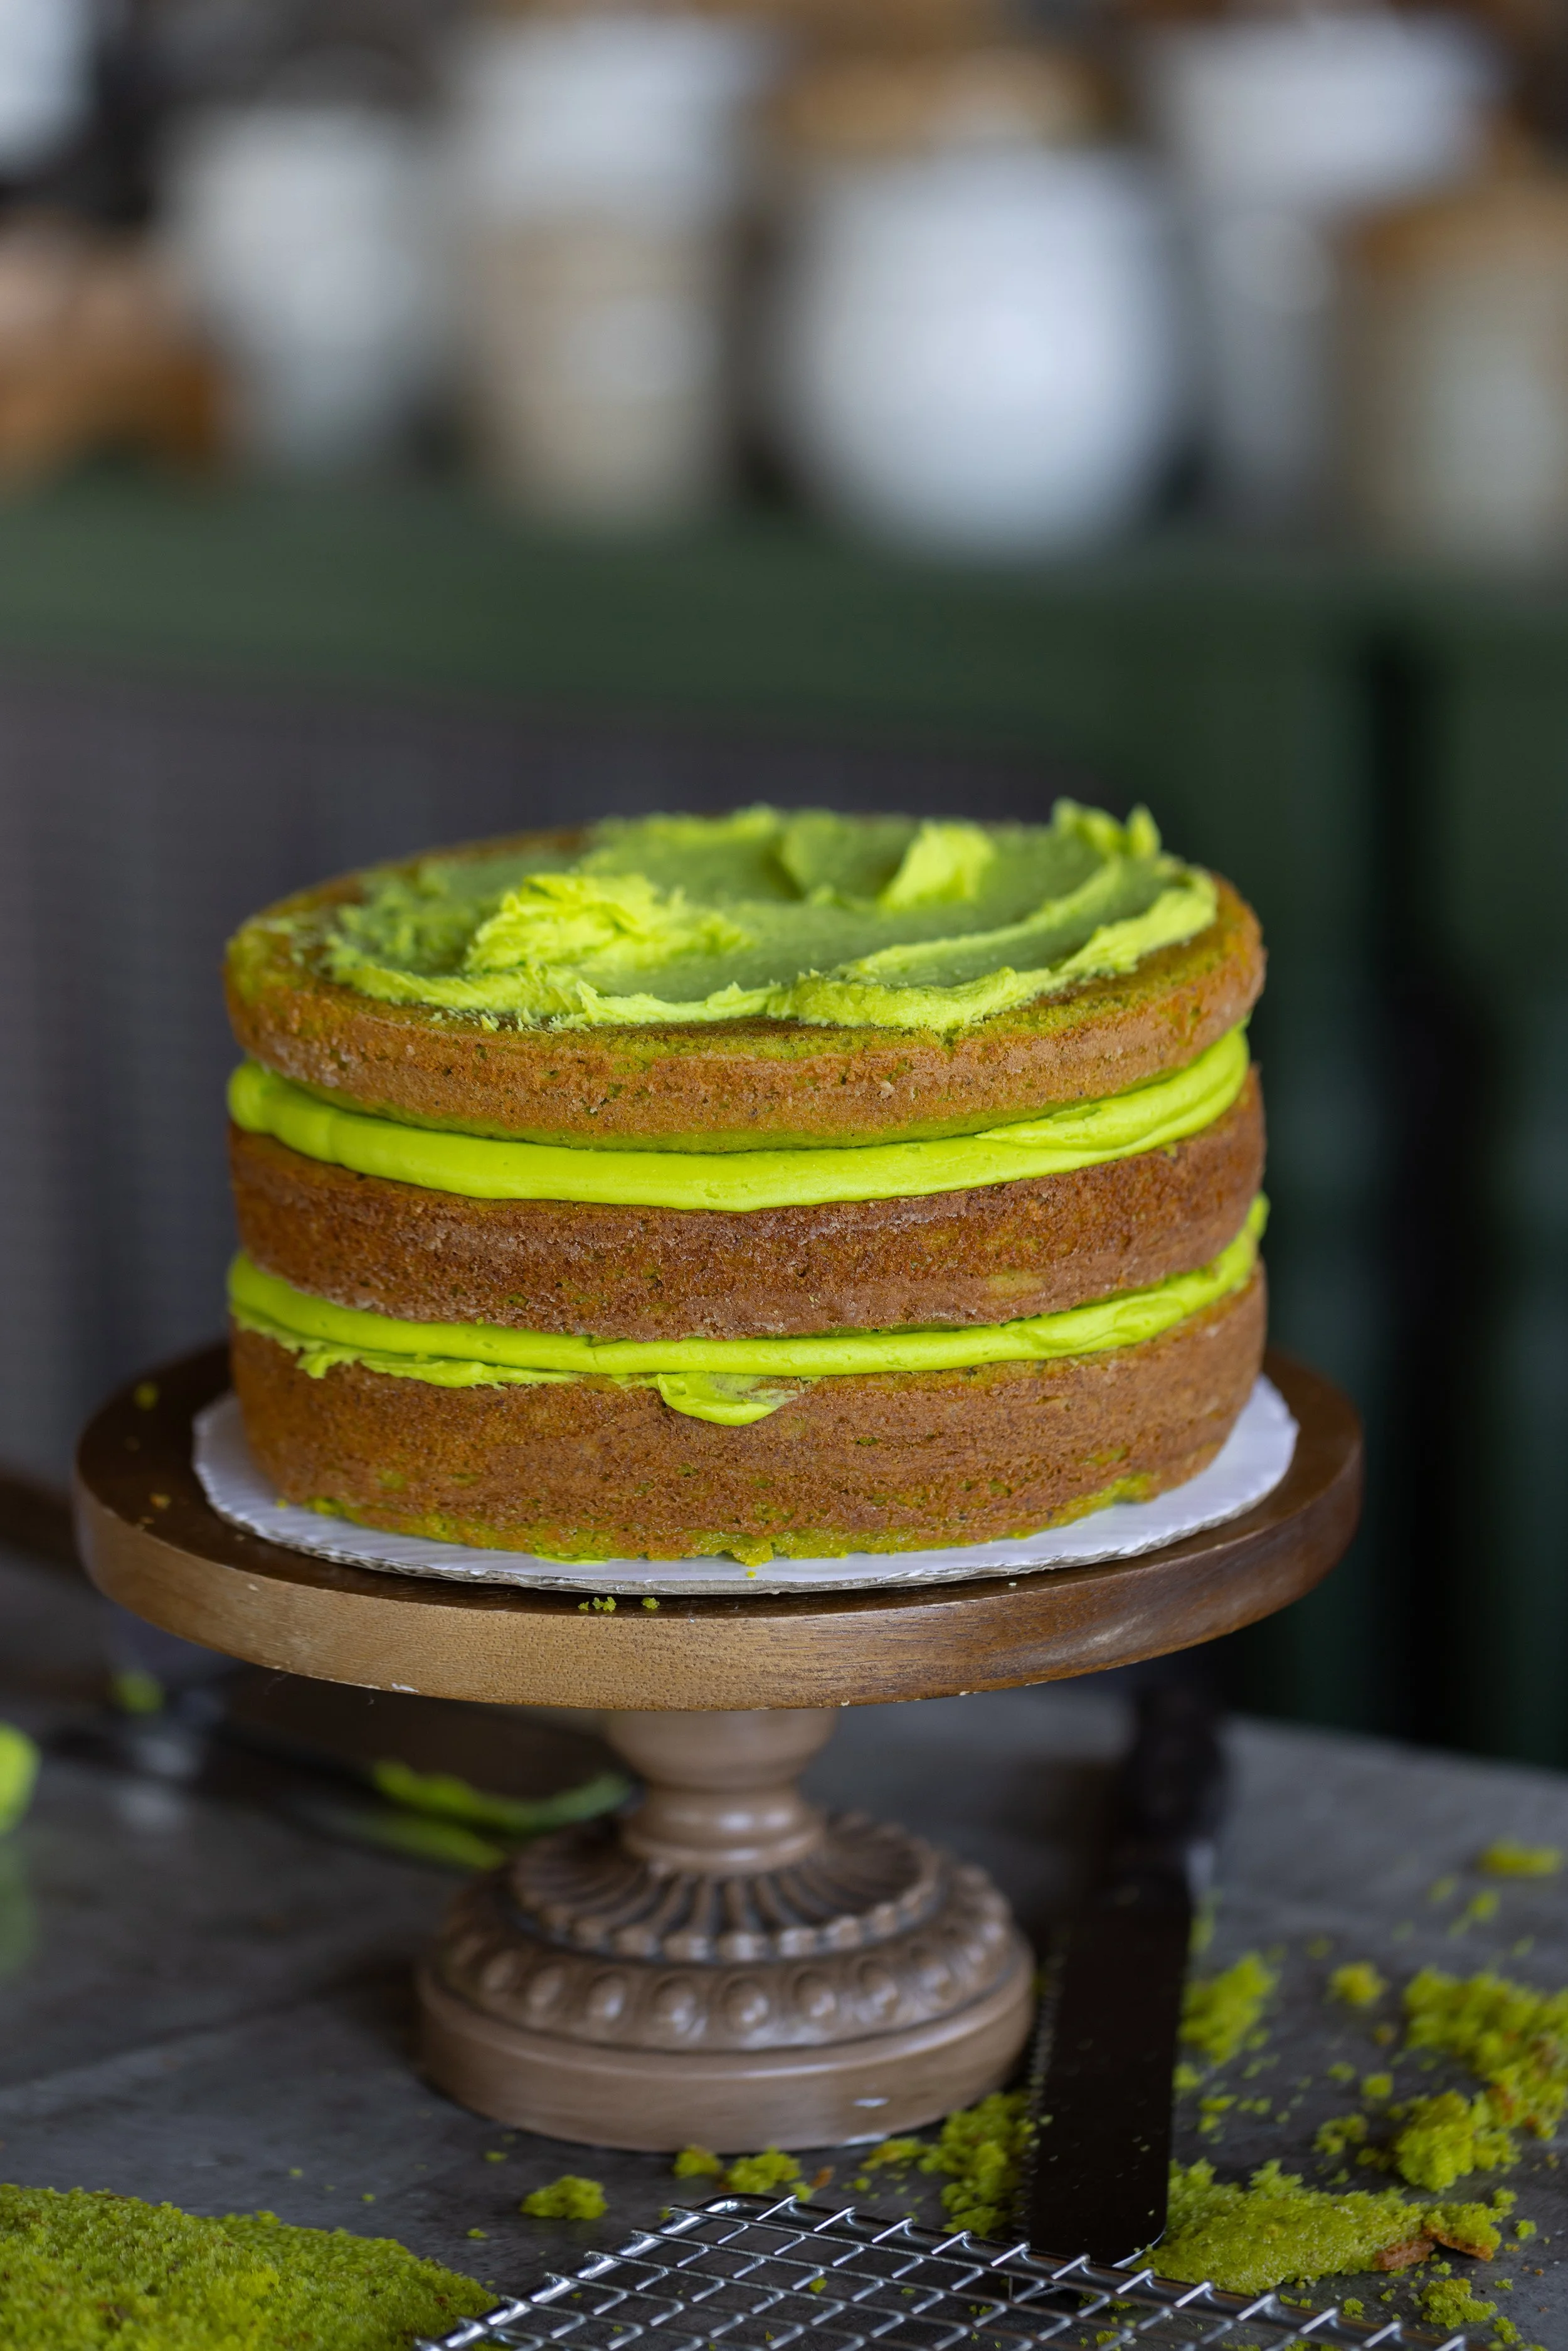
Step Eight: First, level the cake layers by slicing off some of the top with a serrated knife to make sure the cake is completely flat. Spread a small portion of buttercream on your cake's stand or plate. Then, place one layer of cake with the cut side facing down.
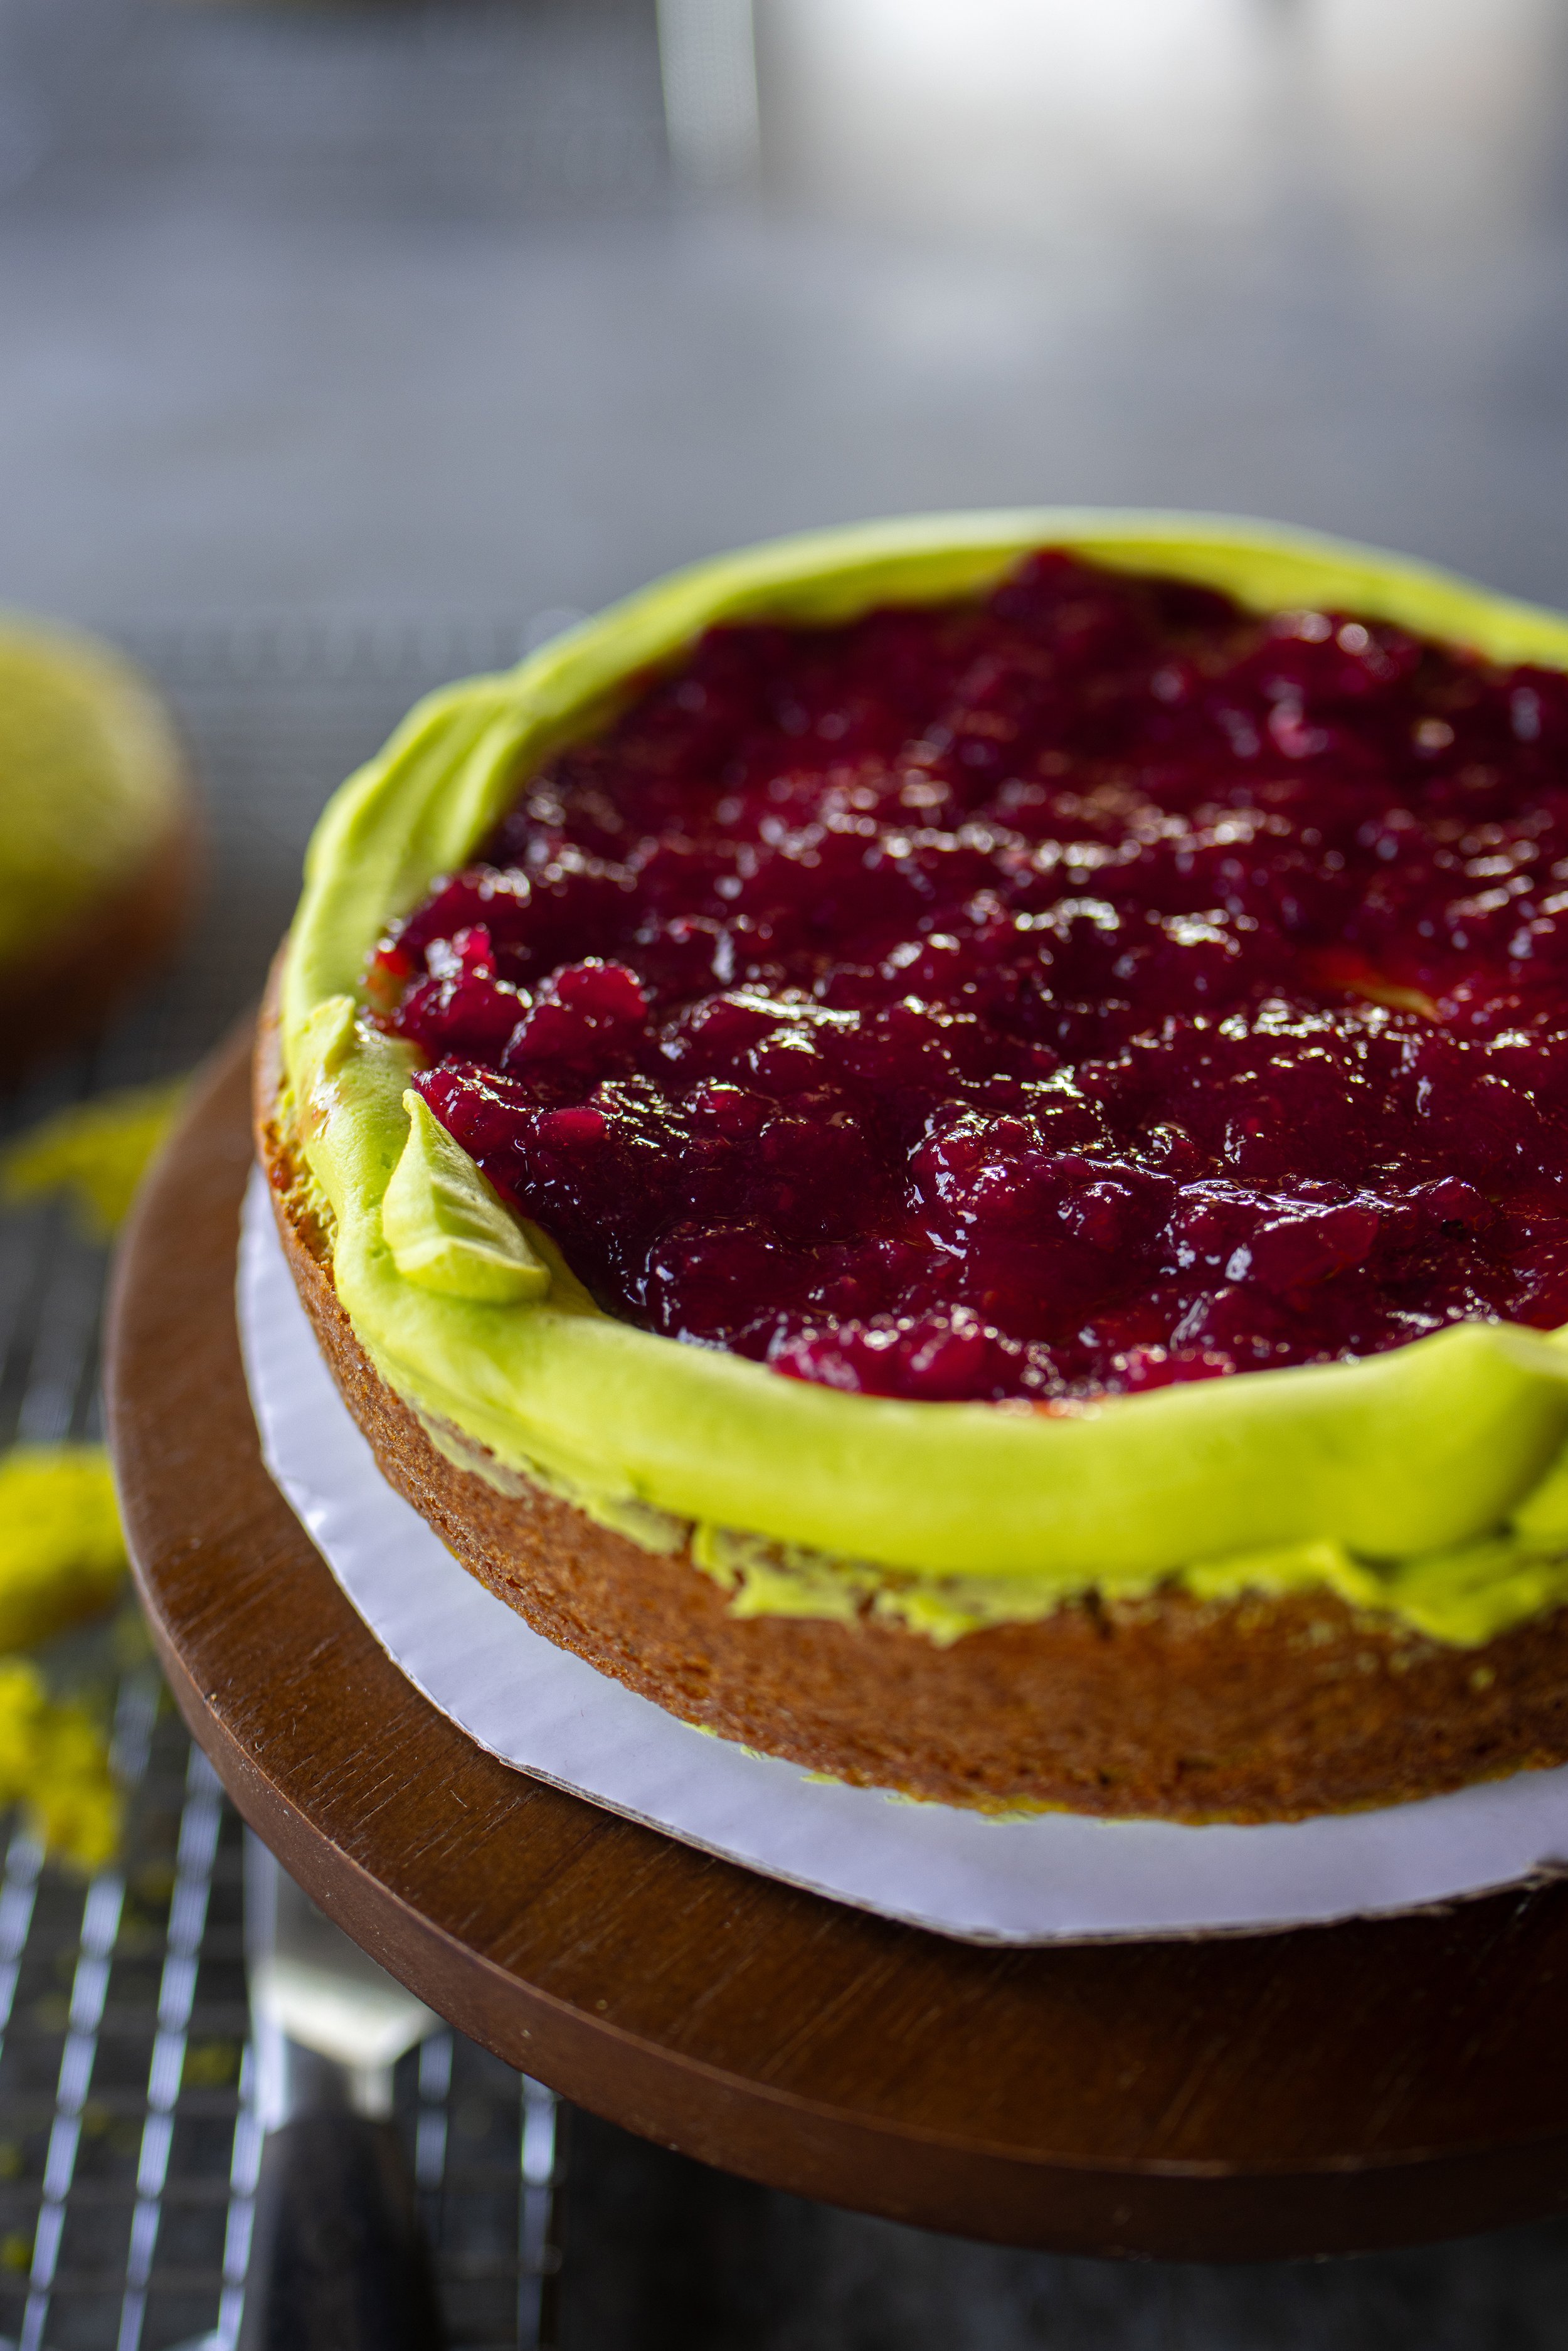
Step Nine: Transfer about 1/3 of your green frosting to a piping bag fitted with a large round tip. Pipe the frosting around the edge of the cake layer. Then, spread about 1/3 of the raspberry jam in the center of the cake layer. The frosting will act as a border to prevent the jam from seeping over the sides of the cake.
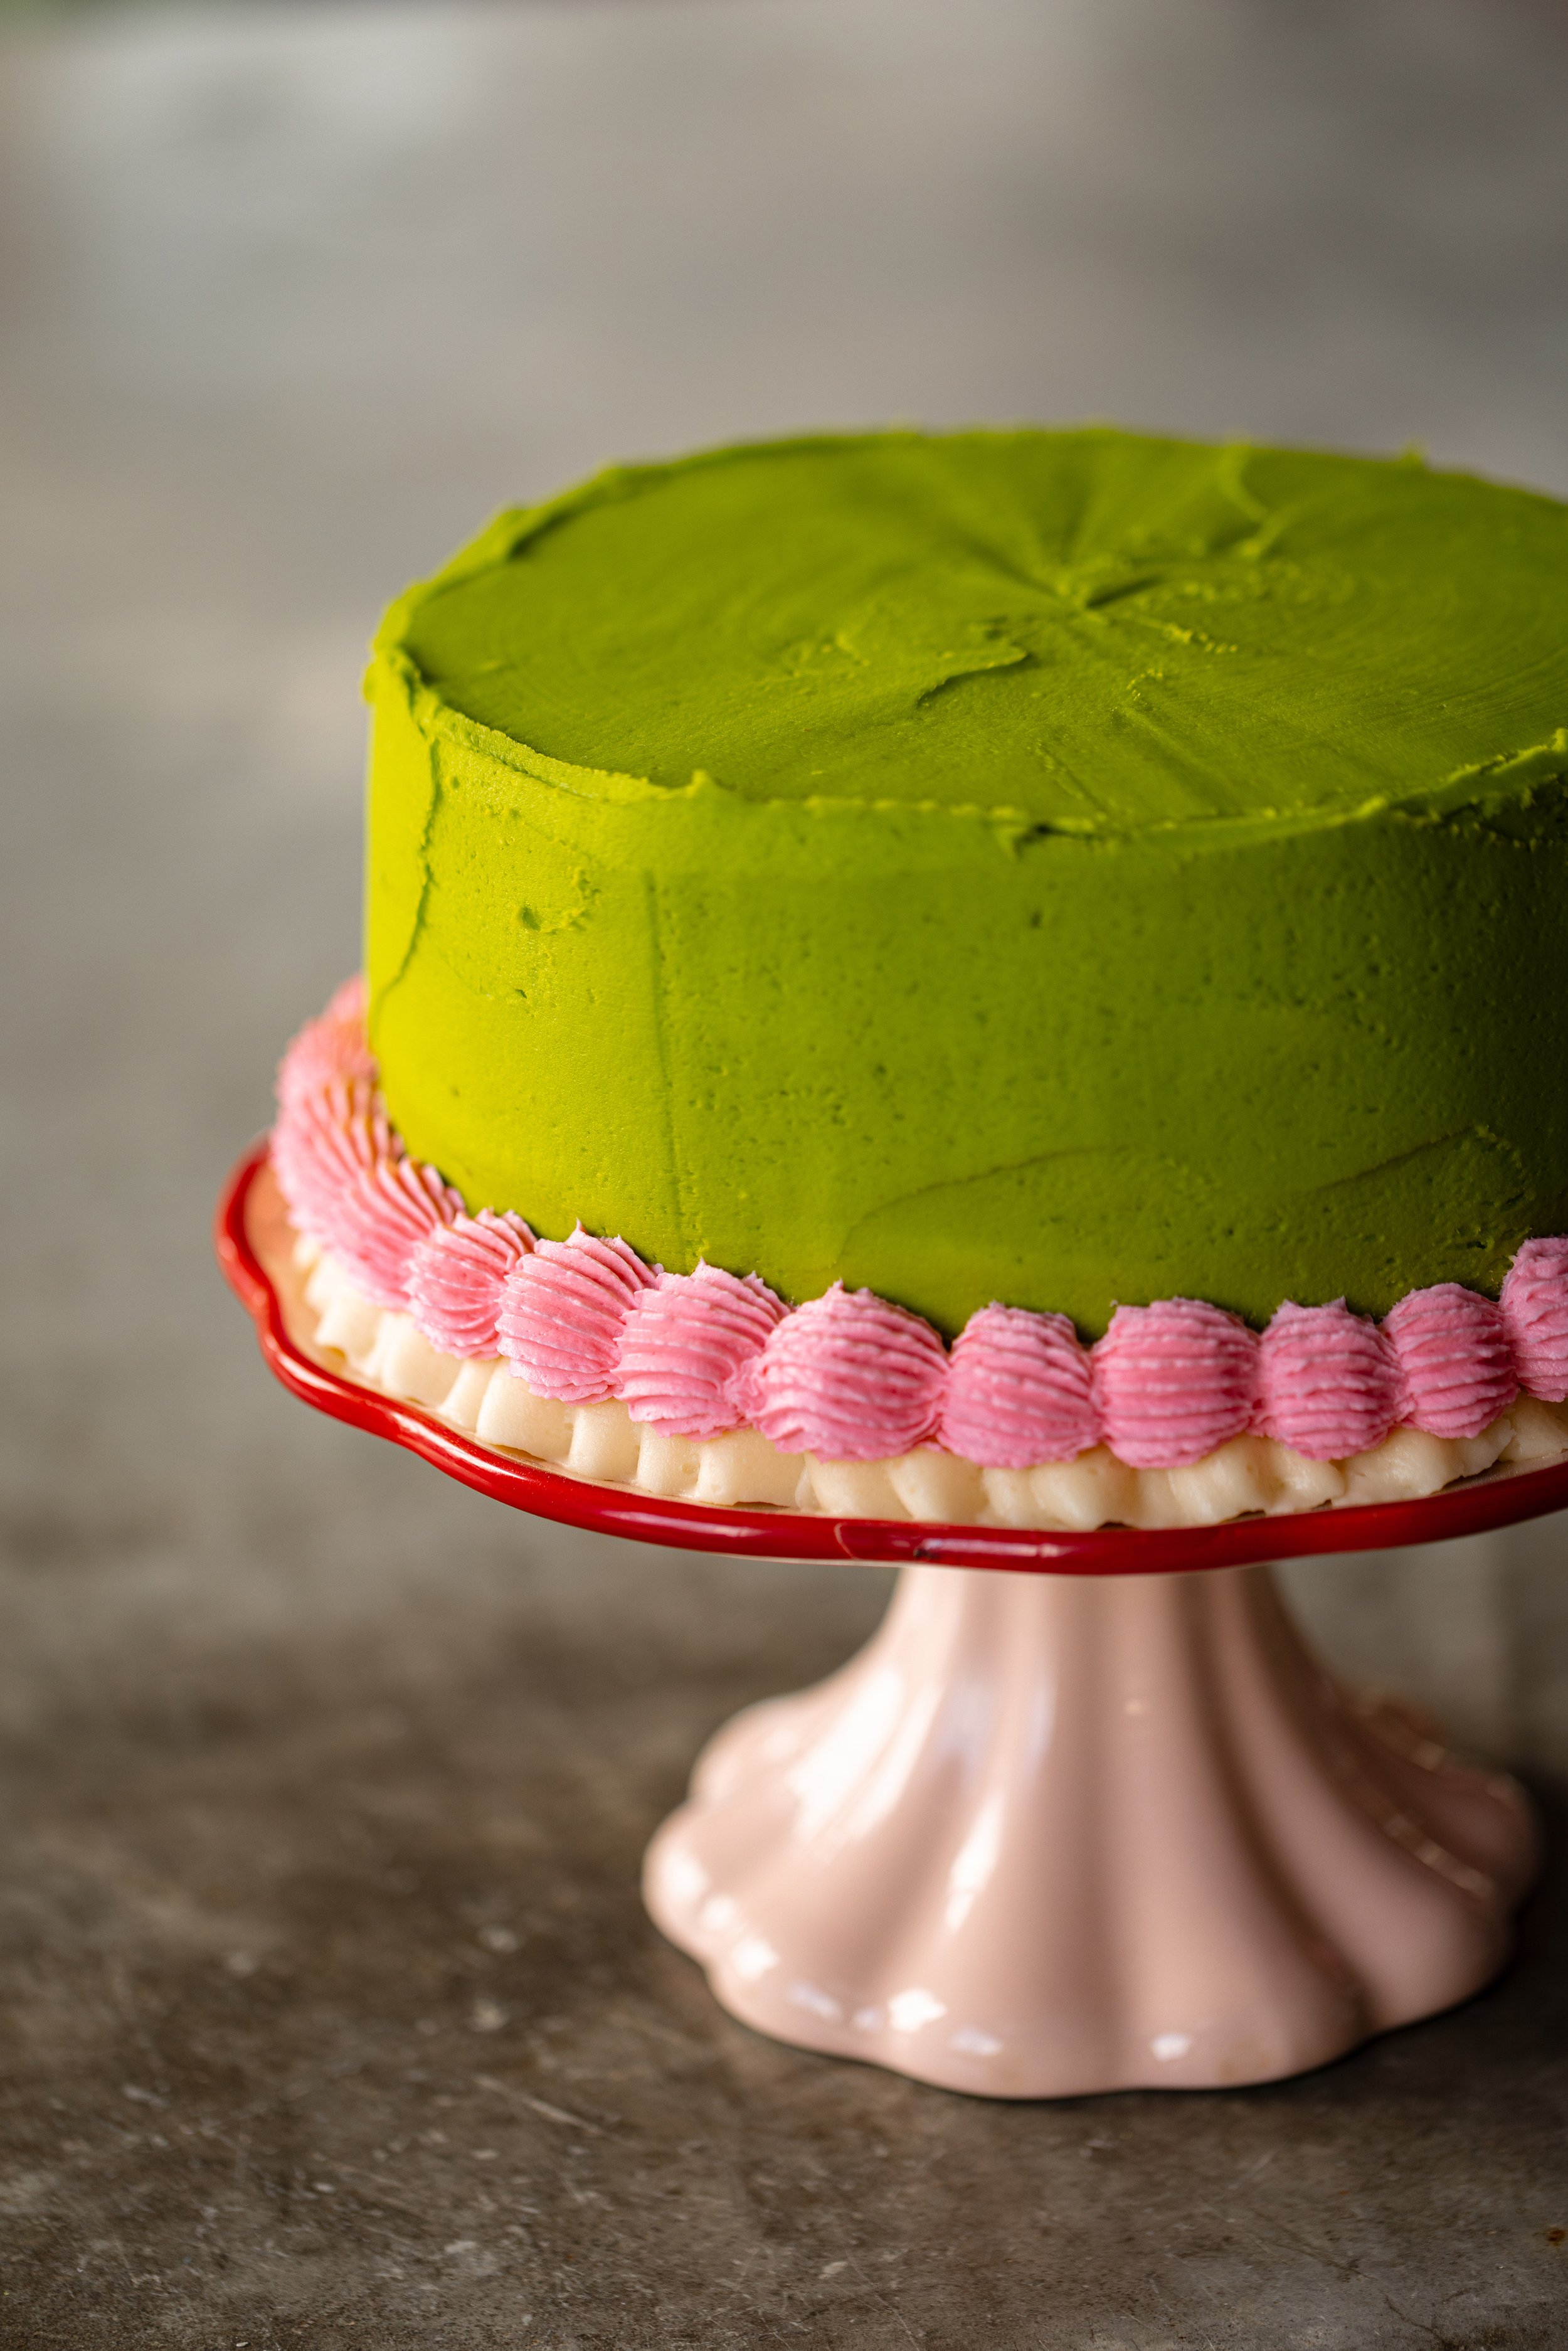
Step Ten: Place the next layers of cake on top, piping frosting and spreading jam on top. Finally, place the third cake layer on top. Pipe frosting all over the top and down the sides, spread it evenly all over the cake and scraping it away to create the thin layer of frosting or a crumb coat. With a bench scraper or straight edged tool, scrape down the cake so that the frosting layer is thin and even without large bumps or lumps.
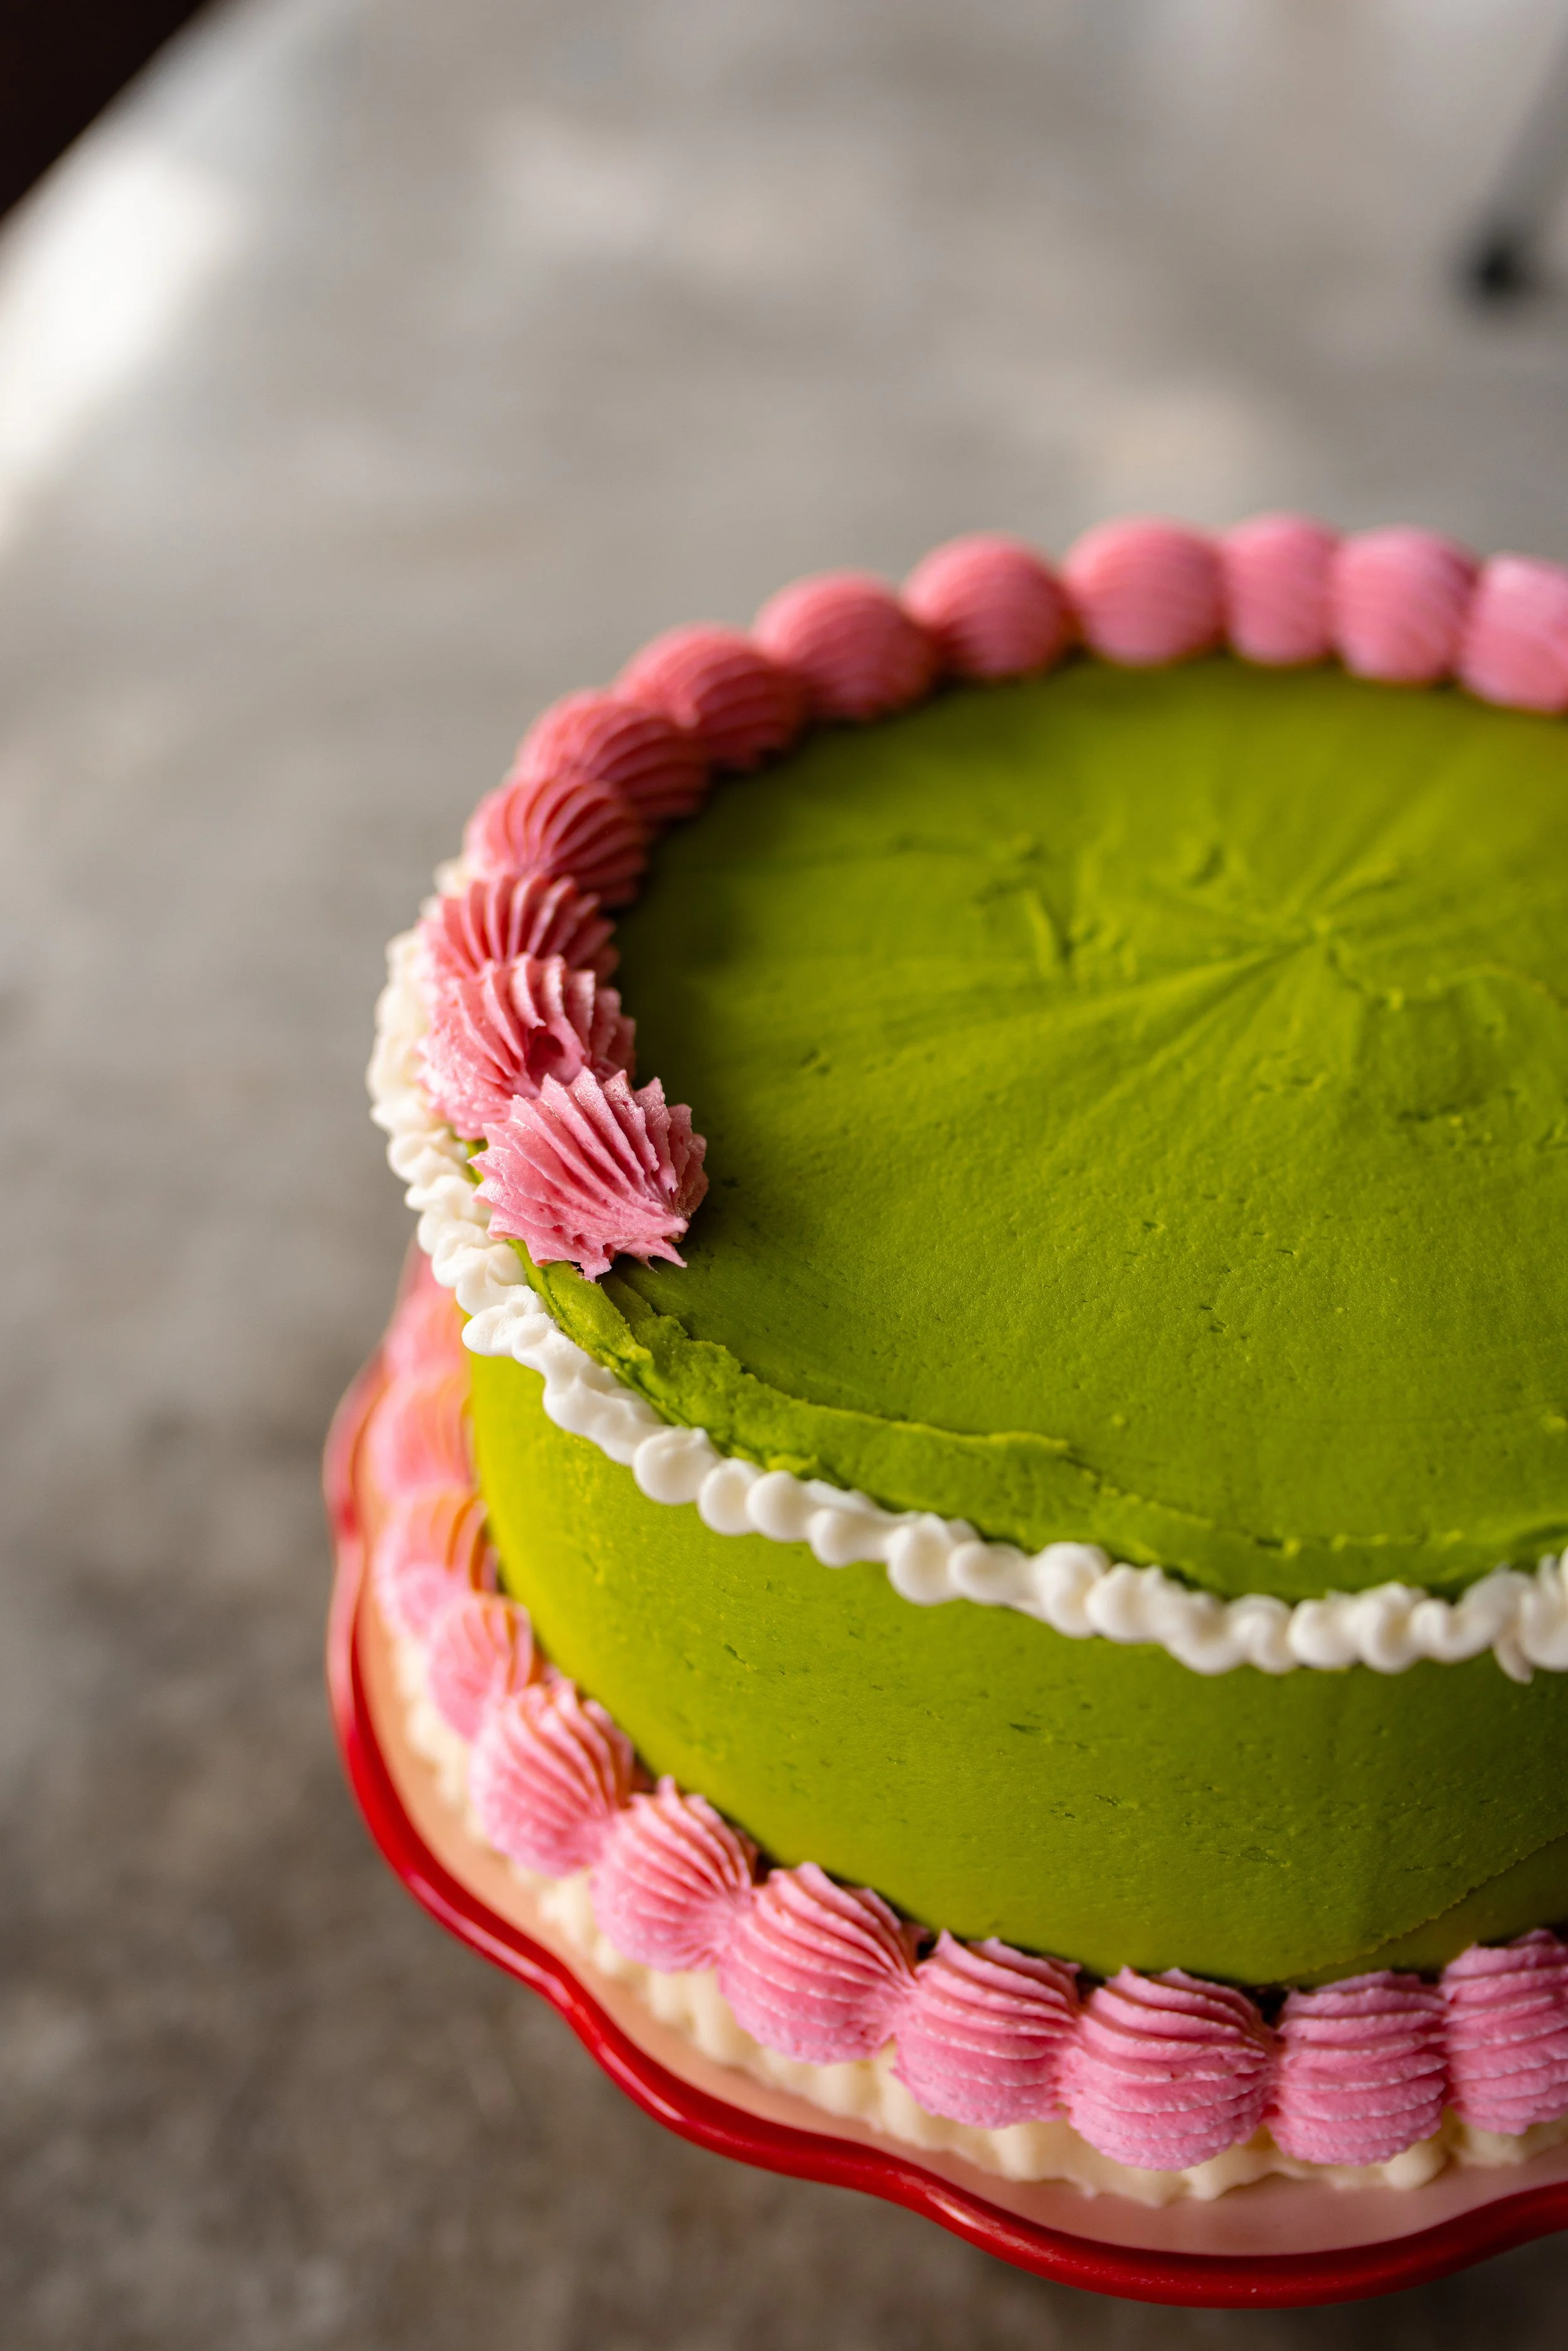
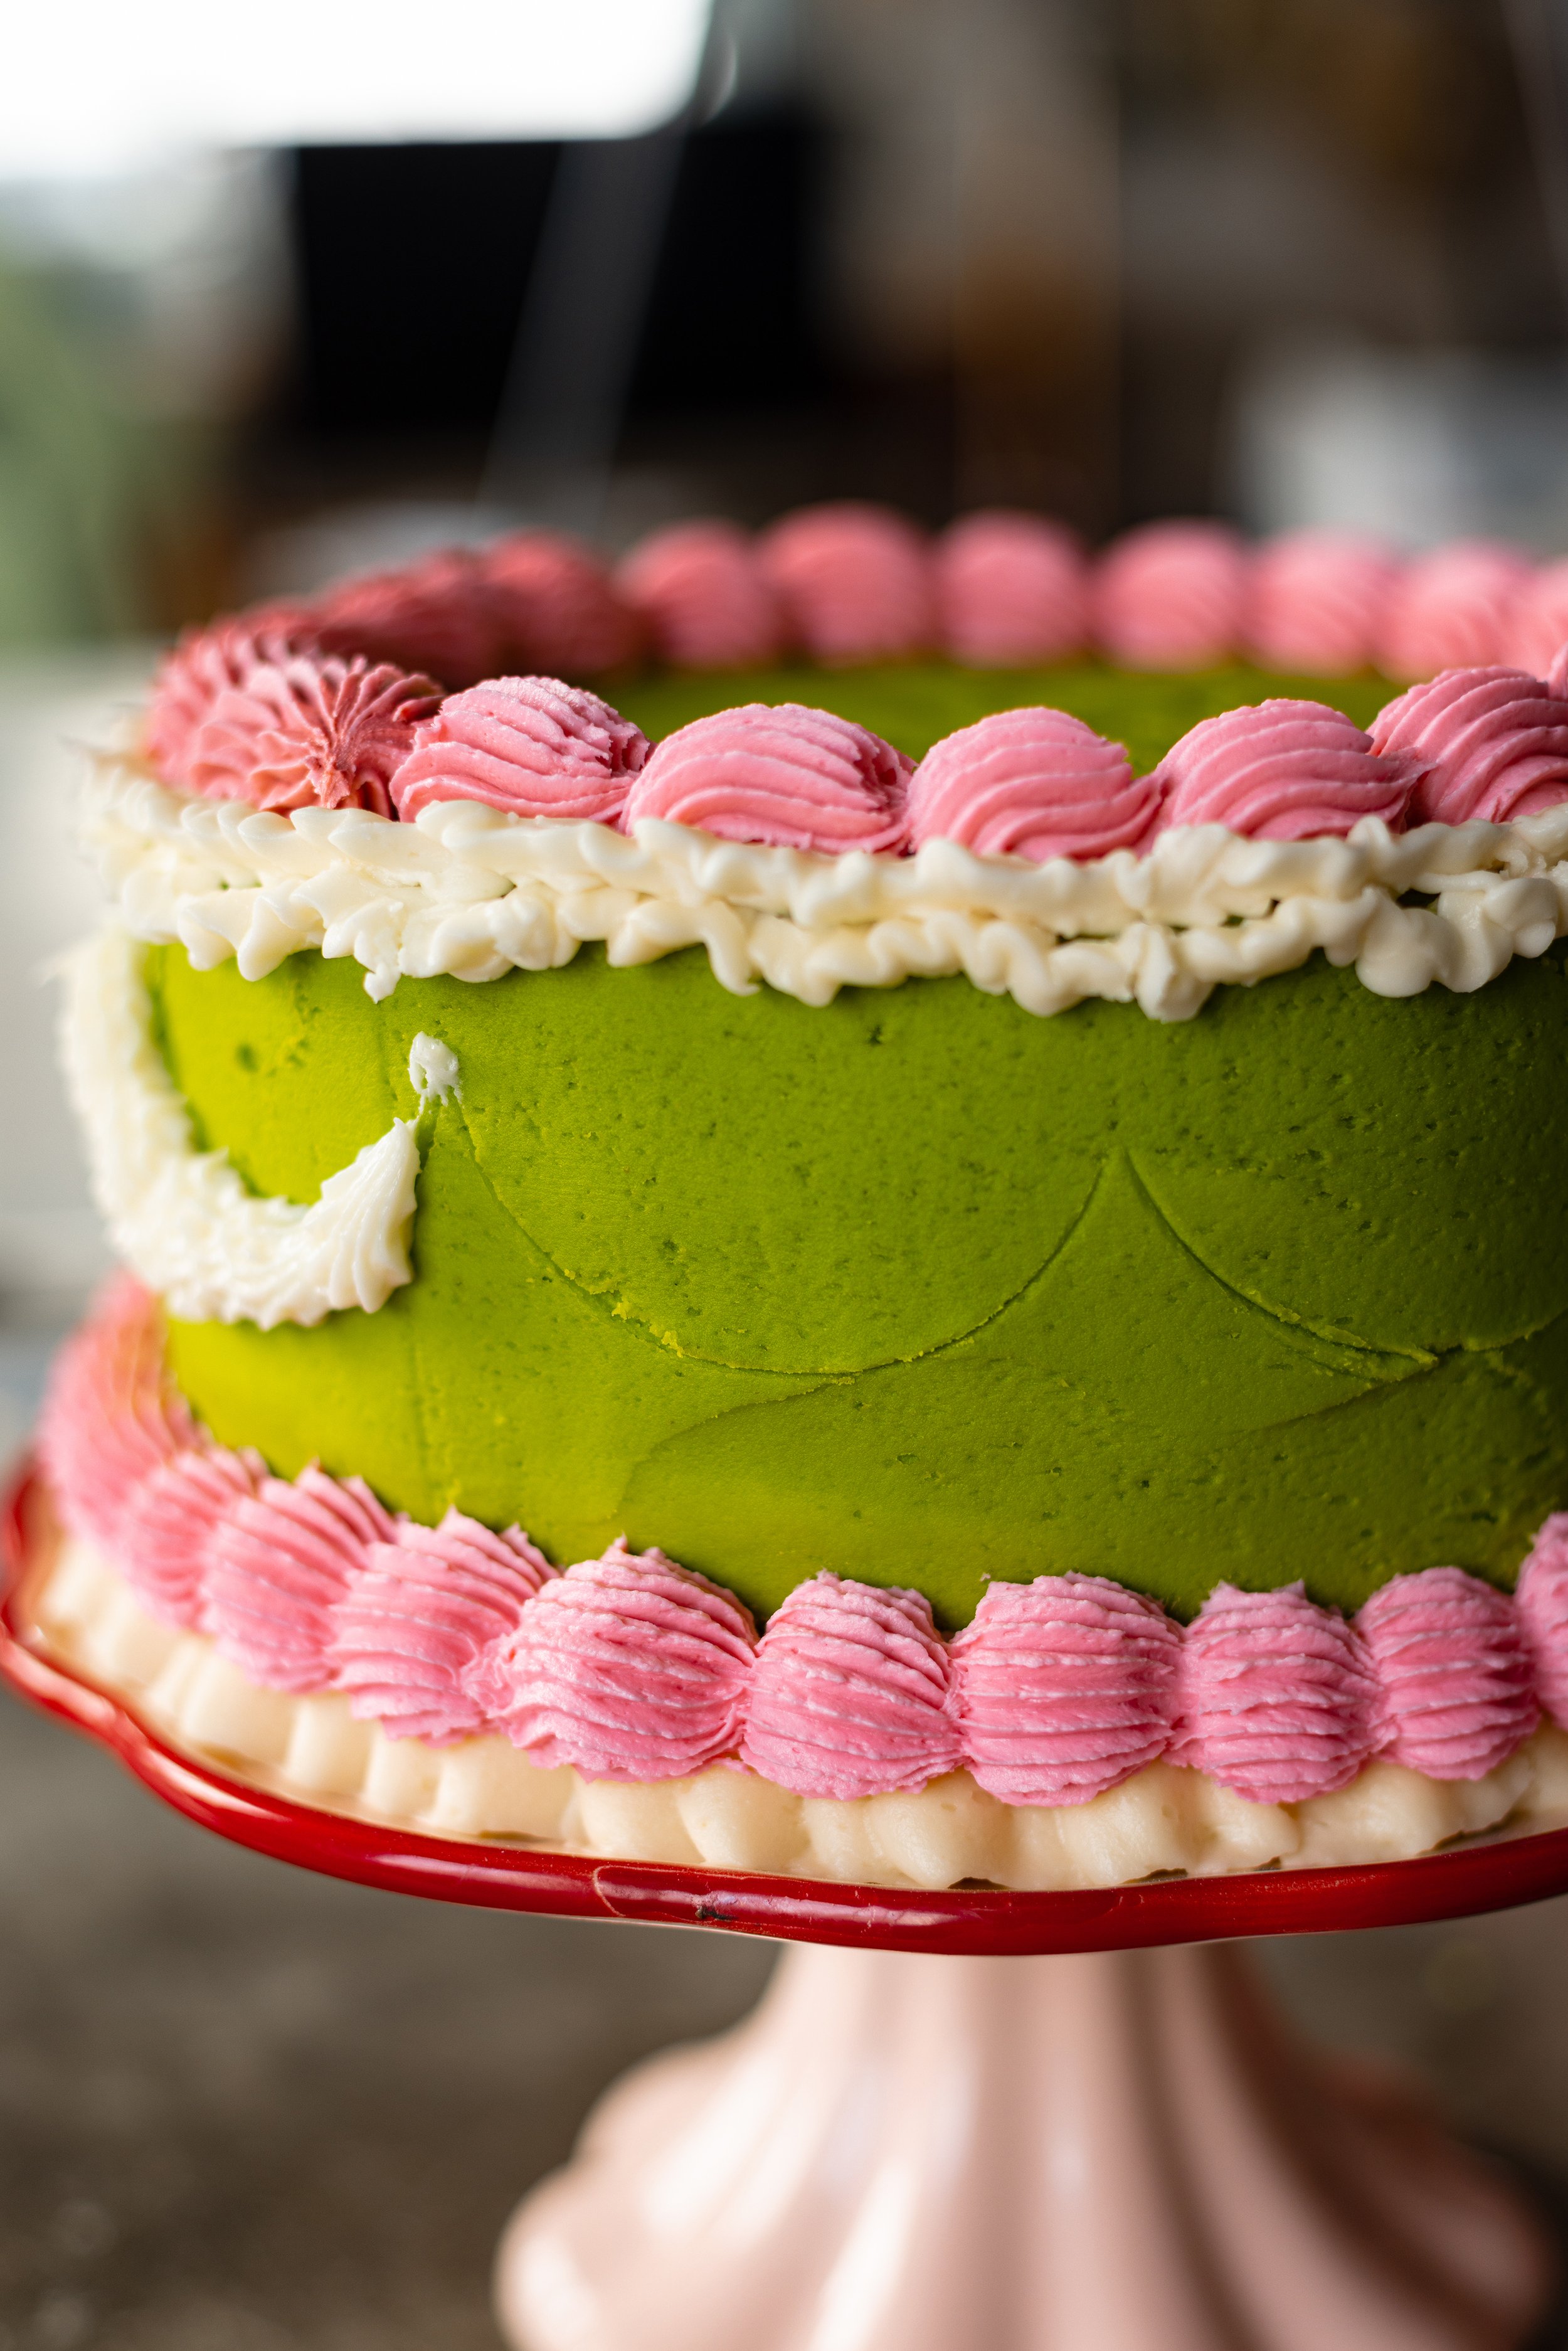
Step Eleven: Chill the cake for about 15 minutes to let the crumb coat set. Then, bring the cake back out onto the counter and add the remaining frosting to fully cover the pistachio layers underneath.
MY FAVORITE CAKE DECORATING SUPPLIES:
To make a vintage style red velvet cake, you will need some cake decorating supplies! You do not have to be incredibly fancy or professional when it comes to what you use. However, there are some tools that definitely come in handy and can really help make the entire process easier.
Cake Decorating Tips. If you want your piping details to have certain shapes, you will need some cake decorating tips. This set of tips is great for a beginner and will give you almost everything you need to get started! You may also want some jumbo sized tips or a set of French Star tips in multiple sizes.
Piping Bags. Personally, I like to use disposable piping bags because they are easier to work with, but there are also plenty of lovely reusable piping bags.
Bench Scraper. A bench scraper will make a huge difference to your vintage style cake! A Lambeth cake needs to have a smooth side so that the overpiping really stands out on the cake. To make this happen, you will want to have a bench scraper to smooth off your edges and help drag off any excess frosting.
Food Coloring. To create a cake that really pops, you may want to add some food coloring to your cake. If you are trying to stay away from artificial dyes, I like this brand of natural food colorings.
Tips for Piping Buttercream:
Working with buttercream can be difficult to master, and I still am not the world’s best cake decorator. I definitely fall more in the category of developing a tasty recipe and lacking in the presentation department - ha! However, I have learned some new techniques over the years that have taken my cakes from looking like a gigantic lump to a much prettier end result.
Buttercream needs to be slightly warm. I know, it seems strange. However, I have had such incredibly better decorated cakes by letting my butter become warmer than I ever had before. There is a fine line between having the butter become too melted vs too cold, so you will want to try and achieve a butter internal temperature of around 60° F (16° C). This helps the frosting become super spreadable and easy to work with, rather than fighting back against you and tearing apart your cake.
Beat the butter longer. In the same stride as having slightly warmer butter, you will also want to beat the butter for a longer amount of time than you might think! I cream my butter for about 8 minutes before adding in the powdered sugar and other ingredients. Then, once all of the ingredients have come together, I continue to beat the buttercream until its incredibly soft, fluffy, and close the consistency of shaving cream.
Temperature is your friend. When you are ready to begin piping on your designs, you will want to have moderate temperatures, somewhere between 60 to 70° F (16 to 22° C). If your home is too warm or too cold, you may have difficulties with keeping your frosting soft and easy to pipe.
Tips for The Best Pistachio Cake:
Use High-Quality Pistachios – Opt for raw, unsalted pistachios and grind them finely for the best texture.
Make the Raspberry Filling from Scratch – A simple mixture of fresh raspberries, sugar, and lemon juice will provide the best flavor. Otherwise, store bought raspberry jam or preserves works just as well!
Chill Before Frosting – A cooled cake is easier to frost and pipe with precision.
Practice Your Piping – If you’re going for a vintage look, test your piping techniques on parchment paper first.
Enhance the Pistachio Flavor – A touch of almond extract can help intensify the nuttiness.
Serving Suggestions:
This Pistachio Cake with Raspberry Filling is an elegant dessert that pairs beautifully with tea or coffee. Serve it as the centerpiece of a vintage tea party with floral china and lace table settings, or enjoy a slice with a glass of champagne for a more sophisticated treat. A dusting of powdered sugar, fresh raspberries, or even edible pearls can add the perfect finishing touch. If making it for a celebration, a pastel-colored buttercream or delicate floral decorations will enhance the nostalgic charm.
For an adorable tea party, try making these other cute spring desserts with your pistachio cake recipe:

Final Thoughts:
This Pistachio Cake with Raspberry Filling is the perfect blend of timeless flavors and vintage elegance. Whether you’re an experienced baker or trying your hand at vintage cake styling for the first time, this recipe offers a beautiful way to celebrate both flavor and your creativity. Each bite is a delightful combination of nutty, fruity, and buttery goodness—a delicious pistachio cake that’s just as lovely to look at as it is to eat.
xoxo Kayla

Pistachio Cake with Raspberry Filling
A dreamy, old-fashioned dessert that brings together the nutty richness of pistachios, the bright tartness of raspberries, and the luxurious creaminess of pistachio buttercream.
Ingredients
- 1 cup (232 g) salted butter, softened
- 1 3/4 cups (350 g) caster or granulated sugar
- 4 large eggs, room temperature
- 2 tsp (10 ml) vanilla extract
- 1 tsp (5 ml) almond extract
- 2 3/4 cups (350 g) all-purpose flour
- 1 cup (154 g) finely ground pistachios
- 3 tsp (13.5 g) baking powder
- 1 tsp kosher salt
- 1 cup (240 ml) milk, room temperature
- Neon Green gel food coloring
- 1 cup (232 g) salted butter, softened
- 8 cups (920 g) powdered sugar, sifted
- 1/2 cup (77 g) finely ground pistachios, optional
- 1/2 cup (120 ml) heavy cream
- 2 tsp (10 ml) vanilla extract
- 2 tsp (10 ml) almond extract
- 8 oz (226 g) raspberry jam
- Whole raspberries, for garnish
- Roasted and salted pistachios, for garnish
Instructions
- Preheat the oven to 350° F (177° C). Butter and flour 3 8-inch (20-cm) round cake pans. Set these aside for now.
- In the bowl of a standing electric mixer, cream together the butter and sugar until light and fluffy, about 3 to 4 minutes. Beat in the eggs, one at a time, until well incorporated, about 3 minutes more. Then, beat in the vanilla and almond extracts.
- In a separate medium bowl, whisk together the flour, ground pistachios, baking powder, and salt. Alternately, begin to the add the dry ingredients and milk to the butter and egg mixture, beginning and ending with the flour mixture. Continue to mix until the batter just comes together, about 5 to 7 minutes total. Mix in a few drop of green food coloring to create a light green color.
- Divide the cake batter evenly between the prepared cake pans. Bake the cakes for about 25 to 30 minutes or until a toothpick inserted in the center comes out clean. Remove the cakes from the oven and leave them to cool in their pans for about 10 minutes before transferring them to a wire cooling rack to finish cooling completely.
- When you are ready to decorate the cakes, it is time to make the buttercream. This recipe is enough to frost the outside of the cake and add a few decorations, but not enough to add all of the same details that I made on the photographed cake. If you would like to replicate the cake that I made, I would suggest doubling the buttercream recipe.
- Begin by beating the butter in a standing electric mixer fitted with a whisk attachment. It needs to be at room temperature but not overly soft. You should be able to easily make an indent with your finger, but the butter should not be melty or greasy. It should ideally be at about 60° F (16° C). Beat the butter in the mixer until it is pale yellow in color, light, and fluffy. This takes about 5 to 6 minutes.
- Slowly begin to add the powdered sugar. It will become thick and stiff. When this happens, add the heavy whipping cream. At this point, it will look like thick crusty frosting. Scrape down the sides of the bowl and then beat the mixture for 5 to 7 minutes, or until the frosting becomes fluffy, light, and full of air. It should appear foamy, like shaving cream, and be super soft and malleable.
- If your butter is too cold or the frosting is not fluffing up, you can warm the bowl slightly by blowing a hair dryer on high heat on the outside of the bowl.
- When the buttercream has finished, divide it into bowls and color it to your liking. To replicate my cake, I colored about 3/4 of the frosting with Neon Green gel food coloring.
- First, level the cake layers by slicing off some of the top with a serrated knife to make sure the cake is completely flat. Spread a small portion of buttercream on your cake's stand or plate. Then, place one layer of cake with the cut side facing down.
- Transfer about 1/3 of your green frosting to a piping bag fitted with a large round tip. Pipe the frosting around the edge of the cake layer. Then, spread about 1/3 of the raspberry jam in the center of the cake layer. The frosting will act as a border to prevent the jam from seeping over the sides of the cake.
- Place the next layers of cake on top, piping frosting and spreading jam on top. Finally, place the third cake layer on top. Pipe frosting all over the top and down the sides, spread it evenly all over the cake and scraping it away to create the thin layer of frosting or a crumb coat. With a bench scraper or straight edged tool, scrape down the cake so that the frosting layer is thin and even without large bumps or lumps.
- Chill the cake for about 15 minutes to let the crumb coat set. Then, bring the cake back out onto the counter and add the remaining frosting to fully cover the pistachio layers underneath.
- To make a Lambeth cake the sides need to be as smooth as possible so using a bench scraper is ideal. Scrape around the outside of the cake to make a flat surface, adjusting any air pockets or divots in the frosting.
- Divide your extra frosting among piping bags with various cake tips and decorate the cake to your liking! The cake can be left at room temperature for about 1 to 2 days, or it can be refrigerated for 4 to 5 days. This cake freezes beautifully, too!
Nutrition Facts
Calories
1547