How to Grow Salad Mix and Leafy Greens: A Beginner’s Guide to Cut-and-Come-Again Harvests
This post may contain affiliate links, please see our privacy policy for more information.
There’s nothing better than harvesting a bowl of fresh, tender salad greens straight from the garden before a meal!
Whether you are planting your very first vegetable bed or adding more diversity to an established garden, salad greens are one of the easiest crops to grow. They germinate quickly, thrive in small spaces, and give you fresh harvests week after week with minimal effort. In this guide, you will learn how to grow and harvest homegrown salad mix and greens with ease!

Video: How to Harvest Lettuce
Why Grow Your Own Salad Greens?
There are so many reasons to grow your own salad mix and leafy greens. Here are just a few of my personal favorites:
Fast-growing: Lettuce and greens grow fast! Most varieties are ready to harvest in 25 to 35 days. If you are wanting to enjoy “baby greens” like baby spinach and baby arugula, it’s even faster.
Space-saving: Greens don’t take up much space! They also have shallow roots, which make them great for containers, window boxes, balcony tubs, and tiny garden beds.
Cost-effective: One seed packet yields weeks of salad green sowings. You can easily use an entire seed packet (in smaller spaces) for the entire growing season from spring to fall.
Nutritious: There have been a lot of recalls lately on fresh greens that are sold at the grocery store. It’s so easy to grow your own, and much healthier for you!
Flavorful: If you have never been a big fan of iceberg lettuce, then you might enjoy knowing that there are hundreds of different lettuce and leafy green varieties available! You might find something new that you absolutely love, and I guarantee that it’s going to be much more flavorful. Be sure to grow a mix of different kinds for maximum flavor potential!
Best of all, greens are ideal for cut-and-come-again harvesting— meaning you don’t have to pull up the entire plant, but simply snip away leaves as needed and let it regrow for another round or two.
Best Salad Greens to Grow Together
A good salad mix combines color, texture, and flavor. You can buy premixed seed blends (labeled as "mesclun" or "baby greens") or make your own by sowing a variety of individual types.
This is my favorite premixed lettuce seed blend!
Easy-to-Grow Salad Greens:
Looseleaf Lettuce – Try varieties like Black Seeded Simpson, Lolla Rossa, or Buttercrunch.
Dense Head Lettuce — Personally, I love growing romaine for its sturdy qualities! Other types include butterhead types and cos lettuces.
Spinach – Fast-growing and cool-loving
Arugula – Adds a peppery kick
Kale – Baby kale mixes are perfect for tender harvests
Mustard greens – Spicy and flavorful
Mizuna & Tatsoi – Mild Asian greens that regrow quickly
Swiss chard – Beautiful stems and tender baby leaves. You might also consider growing beets for their baby greens!
Red-veined sorrel – Tangy with visual flair

When and Where to Plant Salad Mix
Most salad greens are cool-season crops— they thrive in the spring and fall, which means that they will have a hard time growing in summer heat. They may start to bolt, or send up flower stalks, to try and create seed. This can be avoided with a few tricks like watering regularly or planting in partial shade.
Timing Tips:
Spring Planting: Sow 2 to 4 weeks before your last frost date with soil temperature between 45°F and 65°F (7°C and 18°C).
Fall Planting: Sow 6 to 8 weeks before your first expected frost.
Start Seeds Indoors: 6 to 8 weeks before the last spring frost.
Transplant Seedlings: 3 to 4 weeks before the last spring frost. Transplants can go out earlier than direct seeded lettuce because they have had more time to establish themselves. Be sure to harden them off properly first!
Best Growing Conditions:
Sun: 4 to 6 hours of sunlight per day (some tolerate light shade)
Soil: Loose, well-draining soil enriched with compost
Containers: Ideal for small-space or patio gardeners
Pro Tip: Try succession planting every 1 to 2 weeks for a continuous harvest.
Tools & Supplies You Will Need
Salad Mix Blend — I love this blend from Johnny’s Select Seeds!
Garden bed, pot, or shallow container — Containers are great for lettuce, especially looseleaf types.
Compost or potting mix — You will want to amend your garden bed with plenty of compost to help your soil to drain well.
Shower head watering can or spray bottle — Lettuce can be delicate, so do not water with a powerful spray setting.
Garden scissors or Hori Hori Knife — for cutting your lettuce so that the leaves grow back!
Floating Row Cover — This is an optional tool, but it can be incredibly useful. If you are wanting to prevent insects from eating little holes in your lettuce (hello, flea beetles!), then a floating row cover can be your best option. This keeps insects from getting to your greens without using any sprays. You will also need these wire hoops to support your row cover.
Shade Cloth (optional) — This is an optional tool that can be useful in the summer heat to help keep your lettuce cool and prevent bolting.

How to Plant Salad Greens
Direct Sowing (recommended):
Prepare your bed or container by gently loosening soil and removing weeds.
Scatter seeds lightly across the soil surface or in shallow furrows about .
Cover seeds with a thin layer of soil (about 1/4 inch) or vermiculite.
Water gently with a fine mist or rose-headed watering can.
Thin seedlings once they have 2 to 3 leaves, gently pull out any crowded seedlings, spacing them 2 to 4 inches apart.

1. Prep the Garden Bed
You can sow lettuce and greens seeds directly into prepared soil, or they can be planted into small containers or seed trays. To sow, remove any weeds and rake the soil into a fine, crumbly texture. Lettuce prefers loose, well-draining soil.
Because lettuce and greens seeds are so small, a well-tilled bed is necessary for properly growing plants. Lettuce will not germinate well in areas where there are large clumps of dirt or rocks.
2. Sow the Seeds
Salad Mix: Simply sprinkle the seeds over the entire area that you would like the lettuce to grow — this is called broadcasting. It does not need to be planted in rows as you are focusing on only growing a few leaves per plant and not a full head of lettuce. You can choose to thin out the seedlings as they grow, which will result in bigger leaves, but this is not necessary.
Lettuce Heads: Plant the seeds in single rows that are 12 to 15-inches (20 to 38-cm) apart. The seeds can be sown in little clumps (about 3 to 4 seeds per clump) that are about 4-inches (10-cm) apart. Thin seedlings according to the variety, usually about 8 to 16-inches (20 to 40-cm) apart.

3. Water and Cover
After sowing, cover the rows with a thin layer of soil, or vermiculite for salad mix. Then, water with a fine mist or shower setting. Keep the soil consistently moist— lettuce loves water!
You can also choose to use some control methods for preventing pests from eating your lettuce such as floating row covers or planting rows of chives or garlic in between your lettuce rows to act as a barrier.
4. Schedule Succession Plantings
Lettuce grows quickly! If you have the space, it can be smart to schedule succession plantings for your lettuce and greens. This means that you will sow additional rows of seeds about every 2 weeks for a continuous harvest.
How to Harvest Salad Mix
The best way to harvest salad greens is by using the cut-and-come-again method:
Wait until leaves are at least 3 to 4 inches tall.
Use sharp scissors or a knife to cut leaves about 1-inch (2.5-cm_ above the soil line.
Water after harvesting to encourage regrowth.
Leaves should regrow in 7 to 10 days—repeat the process!
Pro Tip: Avoid cutting into the central crown of the plant if you want it to regrow.

Harvest Early in the Morning
When it comes to harvesting lettuce and greens, it’s best to get outside early, generally as soon as the sun comes up to about 9AM. This may not sound ideal, but it is necessary.
Lettuce and greens are still moist and cool at this time of day after spending the night without any of the sun’s heat on them. Heat causes greens to become bitter-tasting, which is not ideal. If they are harvested when they are too hot, they can even have a gritty or sandy texture to them. Ideally, it’s best to harvest lettuce in the morning or on a cool, overcast day. The younger the leaves, the less bitter, too.
2. Prepare your Equipment
Before you begin cutting, it’s wise to prepare your harvesting equipment ahead of time. While you should do this before all harvests, it’s especially important with lettuce and greens because they need to stay cold. If you are harvesting on a warm spring or summer day, you want to get them into cold water as quickly as possible.
This is the equipment I use to harvest my lettuce and greens:
Hose or Water Pump— Have your hose nearby or place your washing station near your water pump or spigot.
Harvest Basket or Bin— You will want something to carry your cut greens in.
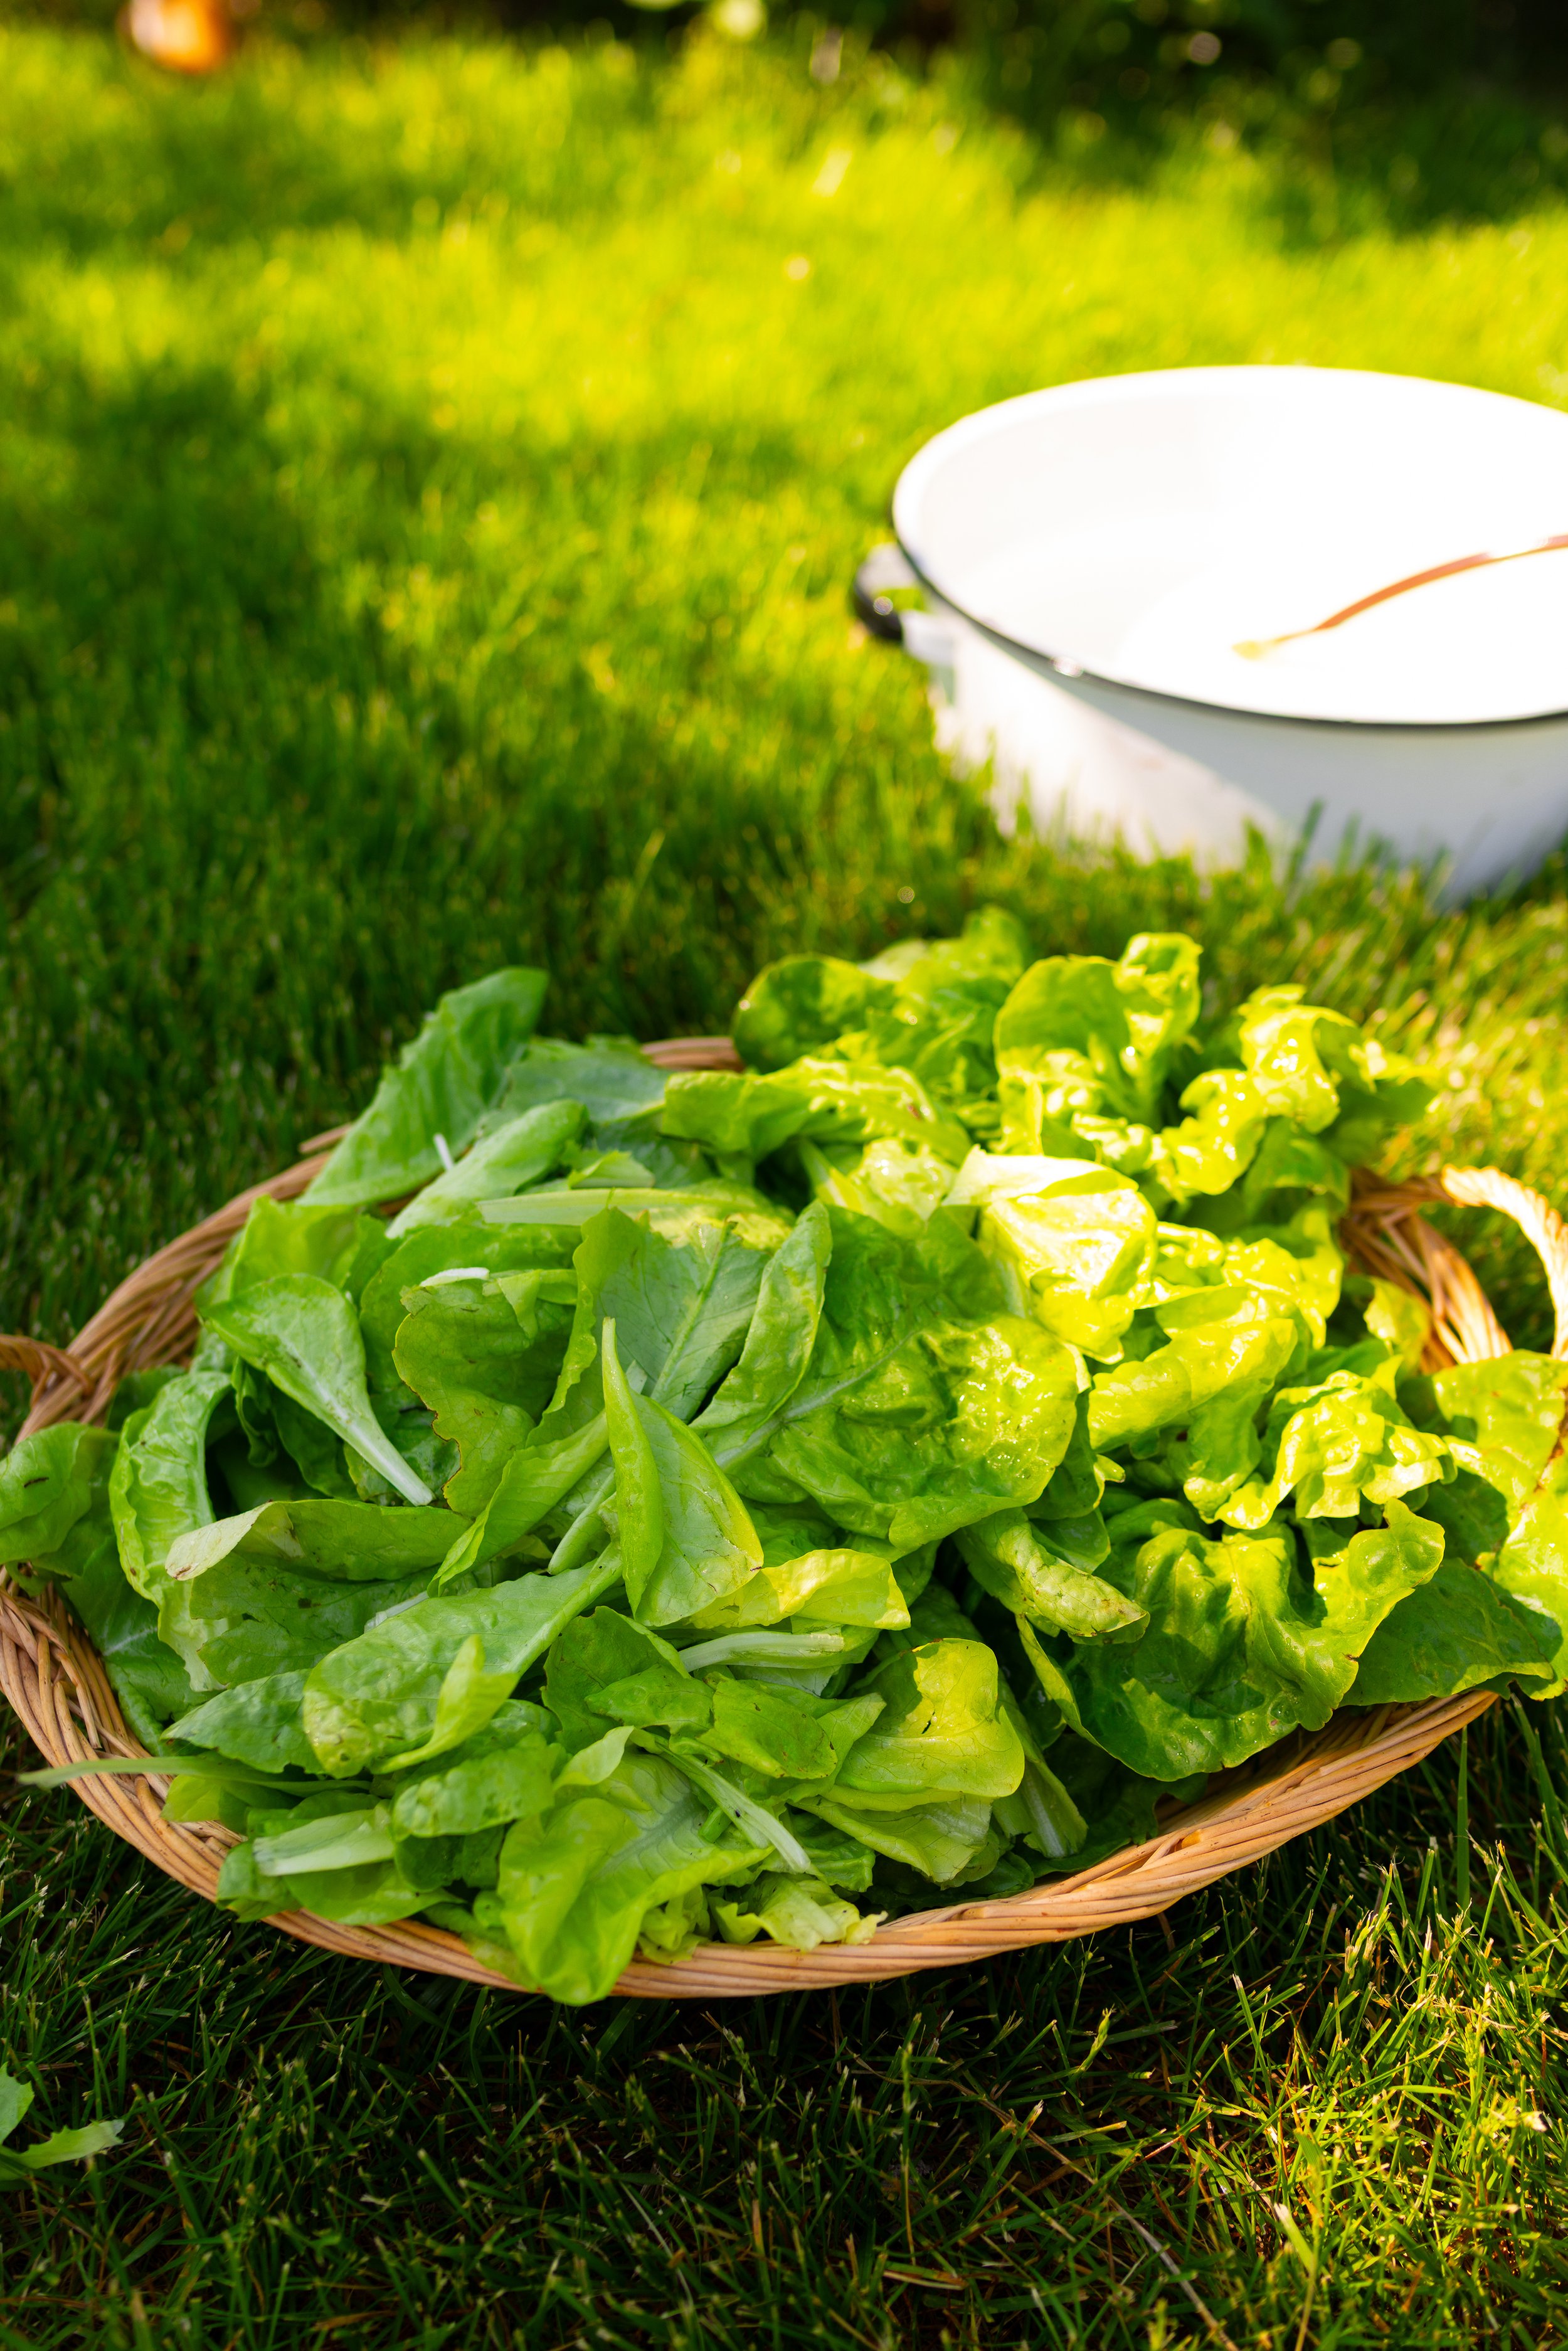
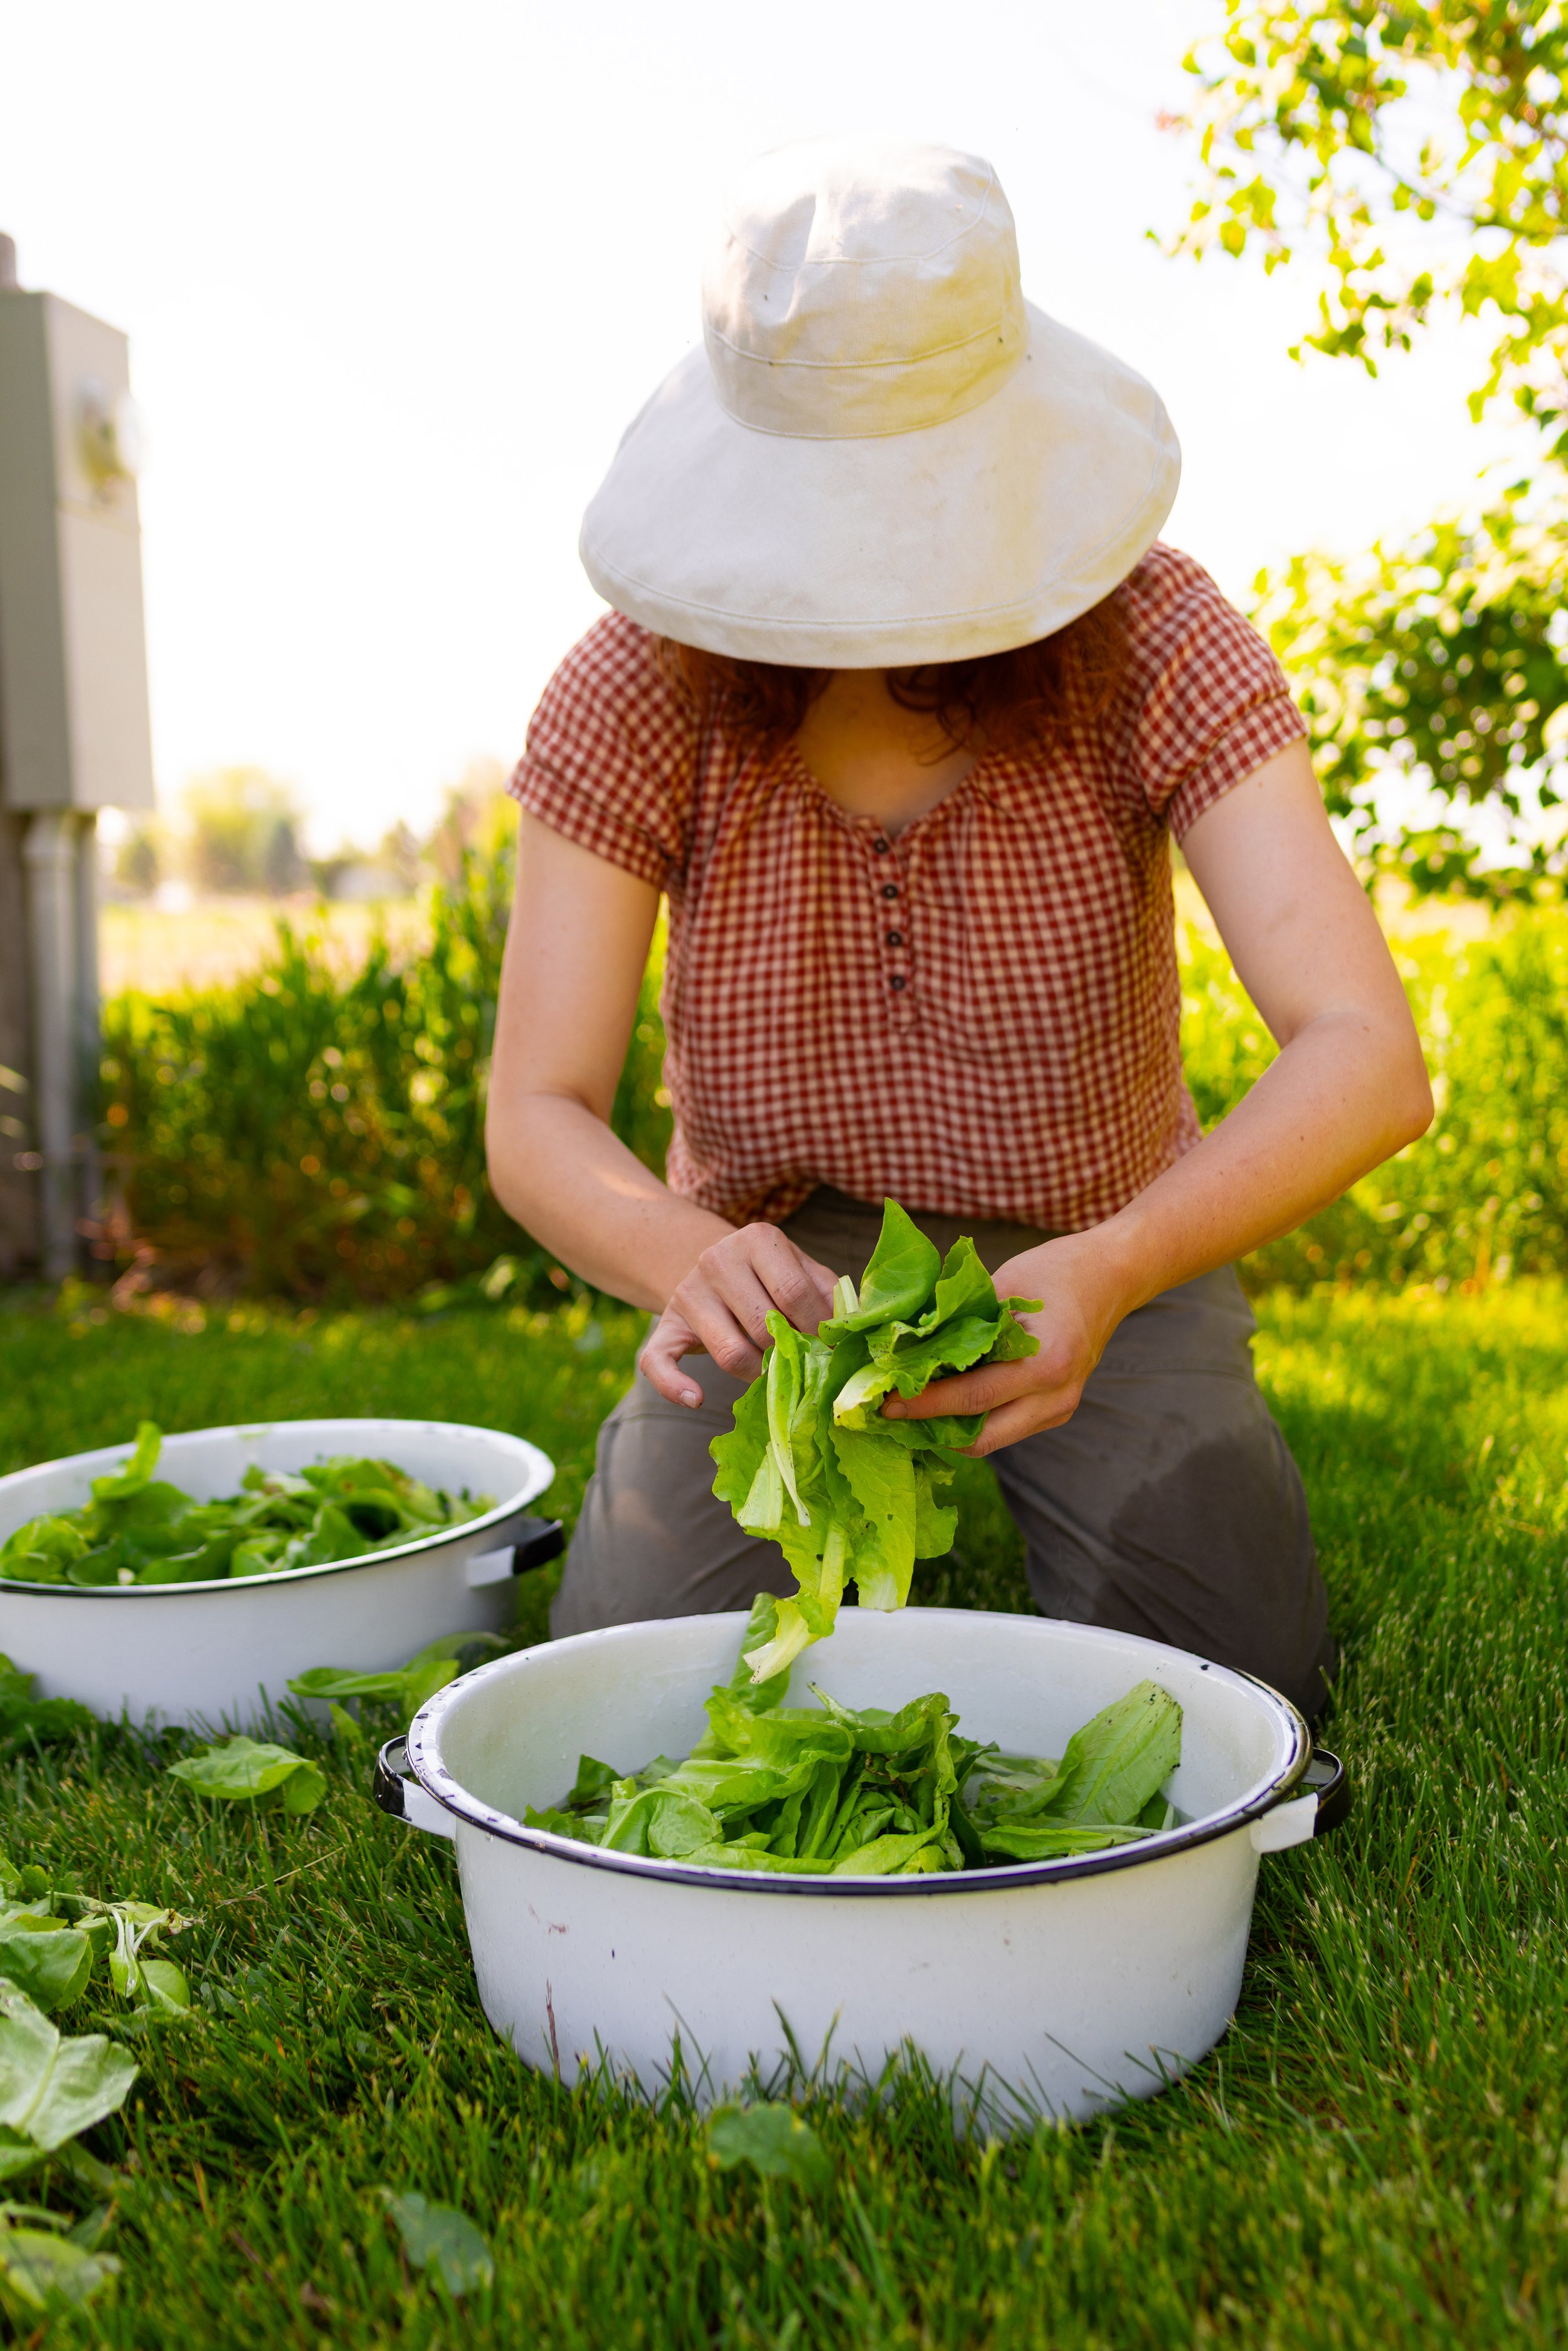
Large Wash Tub, Bucket, or Bowl— It’s best to wash lettuce and greens by dunking! Any large container that can hold water will work.
Salad Spinner— This is essential to dry the greens after washing.
Airtight Containers or Plastic Bags— Package your freshly harvested lettuce the same way they do at the grocery store for optimal freshness.

3. Cut the Greens
With a sharp pair of scissors or a garden knife, such as a Hori Hori knife, neatly cut off a handful of greens. Leave about 1-inch (2.5-cm) of the plant sticking out of the ground.
That’s it! It’s a very simple process. If you cut the lettuce too deeply, it can take longer to grow back, or it can possibly die. You want to make sure that the center of the plant has some decent length because that is where the new growth will come from.

You can also simply pinch or pull off the outer leaves of the plant over time instead of cutting it. This is more ideal for single heads of lettuce rather than a bed of broadcasted salad mix.
With this method, the center of the lettuce head will continue to grow and you can keep pulling off the outer leaves over time.
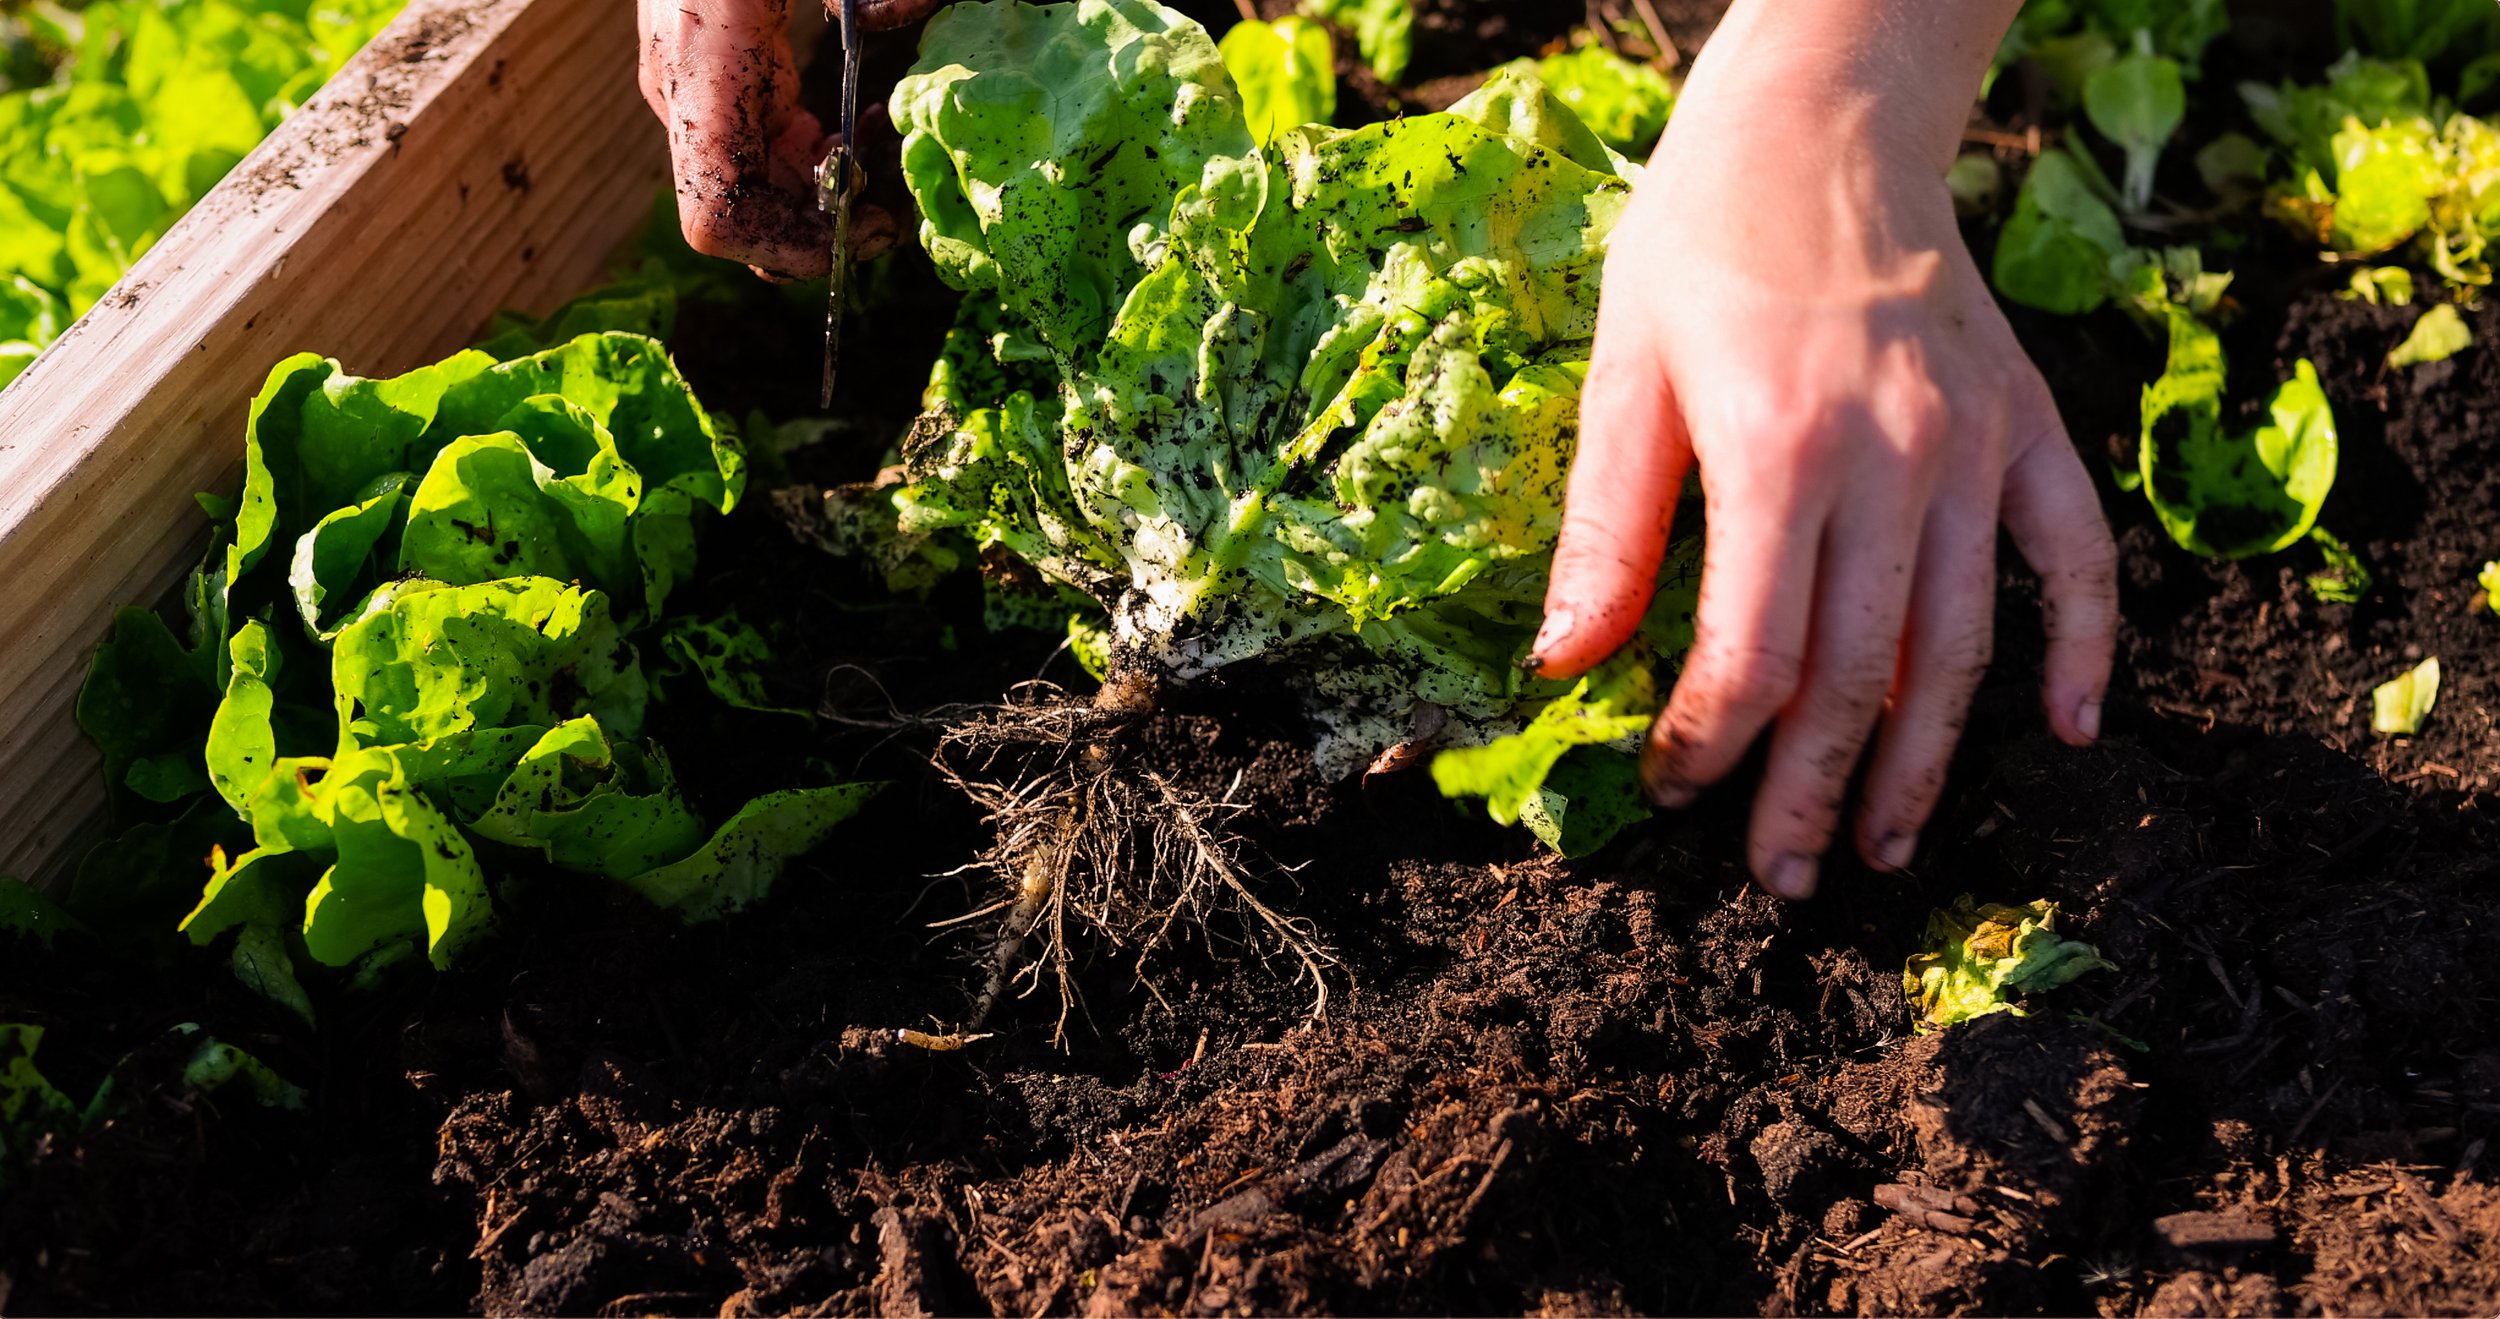
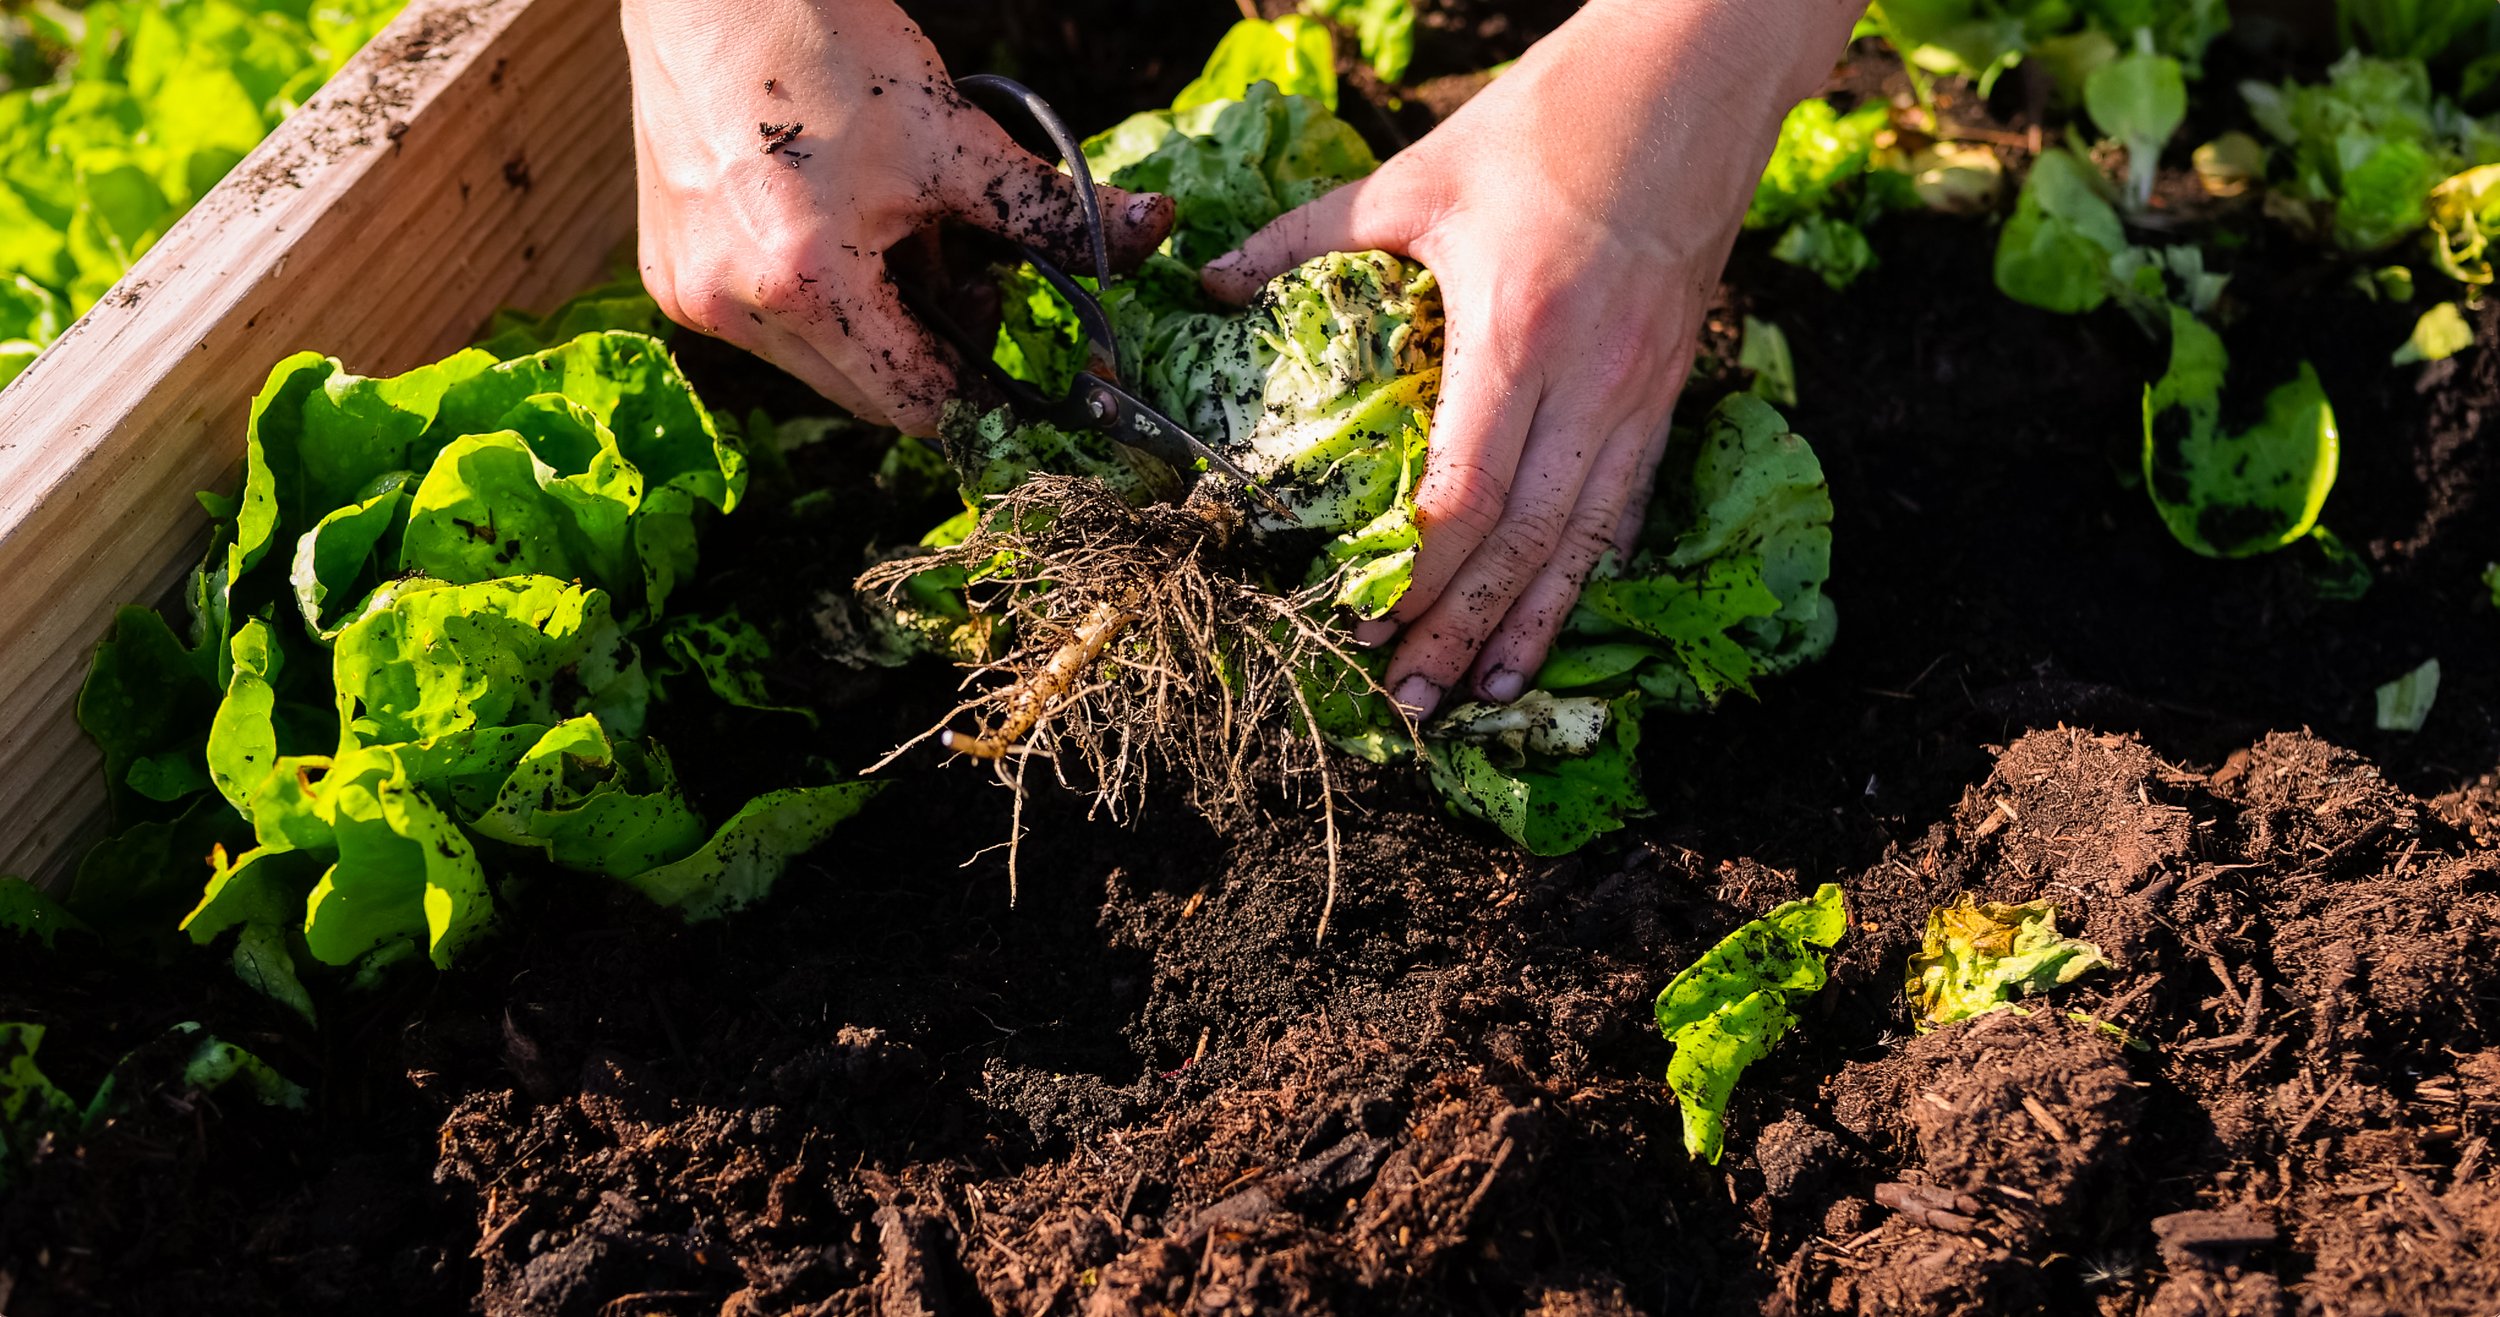
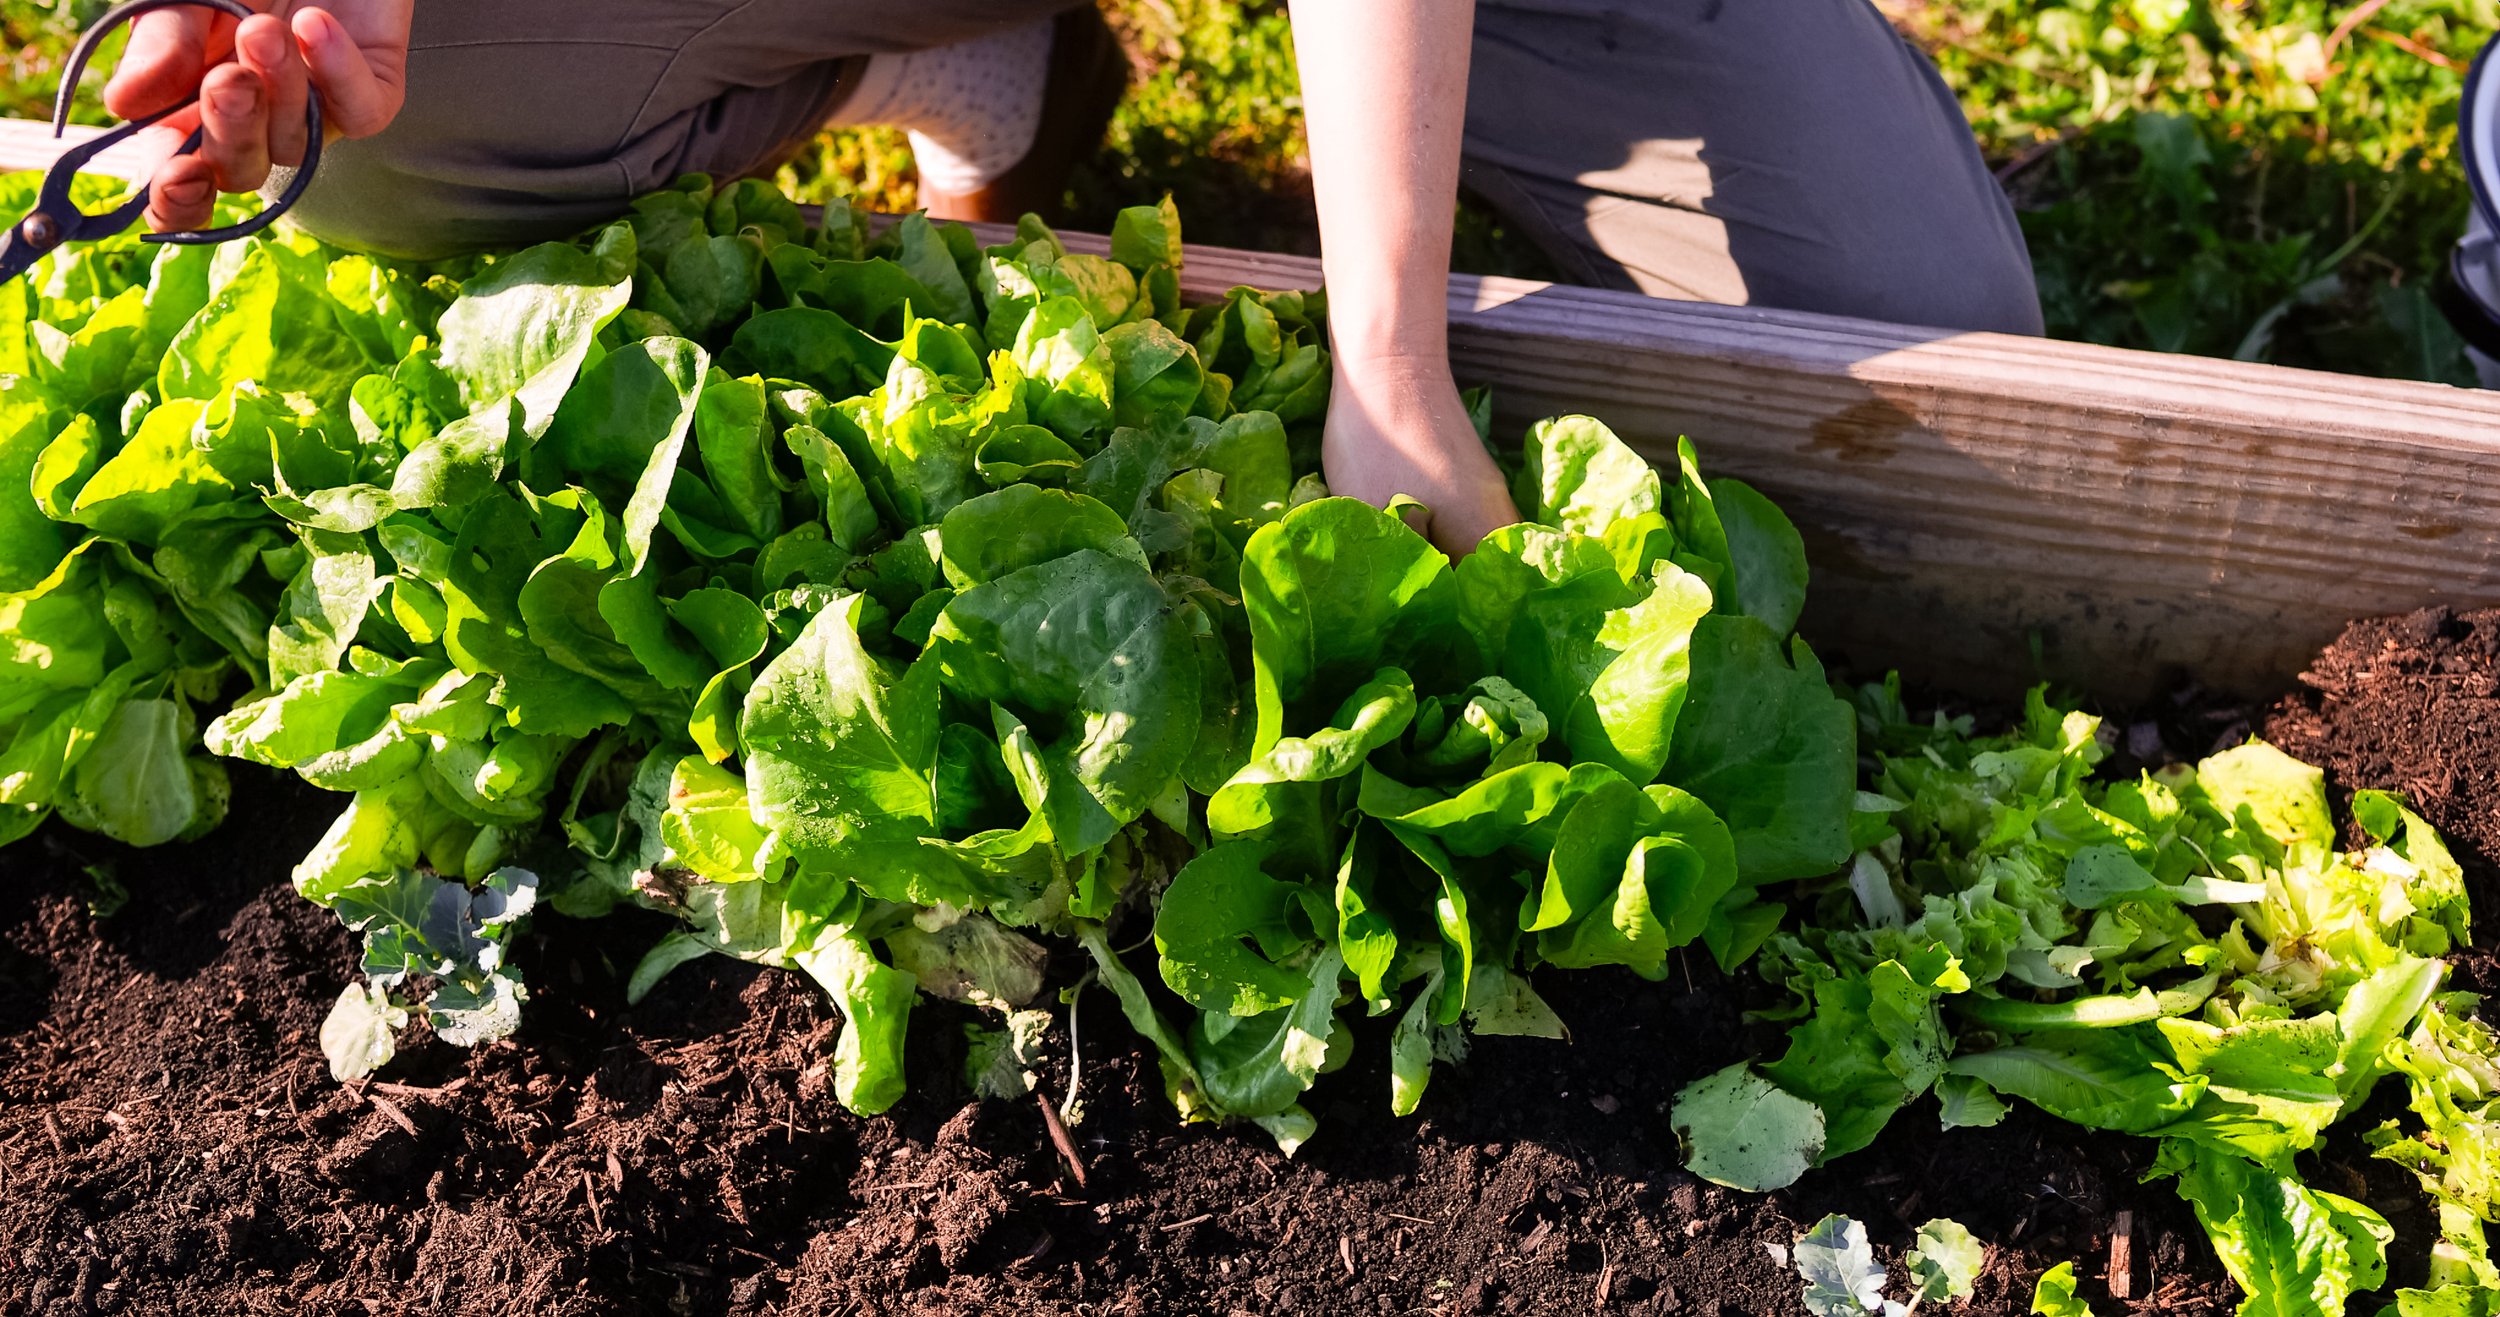
4. Harvest Full Heads
To harvest a full head of lettuce, you can pull the head out of the ground by gently tugging at the base of the plant near the roots. Lettuce has very shallow roots, so they are easy to pull out, especially if you have well amended soil. Be careful not to pinch or squeeze the outer leaves too much as they can become crushed or break easily.
Then, trim off the stem and roots being careful not to cut too close to the leaves so that the head does not fall apart.
Otherwise, you can simply cut the entire head off at the base of the plant and leave the roots in the ground to decompose on their own.

5. Wash and Pack
Washing is definitely the most time-consuming part of this entire process. It can be really overwhelming to wash and pack lettuce and greens, especially if you are growing for production. If you are growing a small kitchen garden for your family, it shouldn’t take as much time or effort.
Washing lettuce and greens is a wet and messy process, though, so be prepared if it is a cold day. The process of washing greens takes up a lot energy and resources, and it generally uses up the most water and creates the most waste of all the vegetables you can grow. I highly recommend doing this outside, if possible. Otherwise, it’s best to wash greens in your sink inside.

After your greens are harvested, move the greens into a wash tub or bucket filled with cold water. This should be done as quickly as possible to prevent the greens from becoming too hot or wilting. The water should be cold to the touch— from the hose or pump is usually just fine. If it is a really hot day, you may want to consider adding ice to the water to keep it colder longer, depending on how much lettuce you are washing.
The best way to wash greens is by plunging them into cold water and diluted vinegar solution (this helps kill off any potential bacteria from the soil/fertilizers). I prefer this method over spraying them down with the hose, which doesn’t keep them cold. I have tried various different ways to do this, and this is by the far the best way to fully get off any excess soil, insects, and debris as well as preventing the greens from ripping or breaking.
Cold water is the key to fresh, crisp, and sweet-tasting greens.

After the lettuce and greens have been washed, you want to make them as dry as possible.
I know, this seems a bit counterproductive, but I promise it works. When it comes to washing your garden harvest, you have to think a bit like a farmer or a grocery store. How are the greens kept at the store? They aren’t soaking wet in the bag. They’re actually pretty dry!
Place the washed greens into a salad spinner. Spin away as much water as possible. Then, pick out and discard any broken, wilted, or browning leaves. You may have to spin the greens 2 to 3 times.
If the lettuce and greens are coated in water when they are stored, they will wilt and become slimy after a couple of days.

Once the majority of the water has been spun away from the lettuce, immediately place it into an airtight storage container or plastic bag that can be sealed or tied off. Then, place the container into the refrigerator.
This process will keep your salad greens fresh, crisp, and sweet for over a week!

Troubleshooting & Tips
Bolting. Bolting is a common problem caused by warm temperatures (over 70°F/20°C). When lettuce bolts, it is trying to put out its own seed to re-sow. It will send up a central stalk with a flower, and the leaves become bitter. To prevent this from happening, or at least delay it, you can use shade cloth so that the greens are growing in dappled sunlight. You can also water regularly and keep the greens moist and cool to help stave off the heat. The best option to prevent bolting is to plant in early spring or fall rather than in the middle of summer.
Pests. Flea beetles are the worst enemy of lettuce and greens. If you see little holes eaten over all of your leaves making them look like lace, that would be the work of flea beetles! To prevent them from eating your precious salad, you can use a floating row cover. This keeps any flying insects off of your lettuce without having to spray your veggies. Other pests that love lettuce include aphids, cutworms, earwigs, and slugs. These pests can generally be controlled by hand picking them off of your plants and drowning them in a bucket of hot, soapy water.
Weeds. Weeds are an inevitable part of gardening. Be sure to regularly look for weeds growing in your salad mix and pull them out as soon as possible. It can be really annoying to harvest and wash your salad mix while sorting out weeds from the mix!
Yellowing Leaves— You will know if your lettuce needs more water by looking at the leaves. The leaves will wilt in hot temperatures and they can even begin to turn yellow. Yellowing leaves can also be a sign of overwatering or poor soil drainage.

Storage Tips
Harvested greens are best used fresh, but they’ll keep for up to 5 days and even over a week in the refrigerator.
Store your freshly harvested and washed greens in an airtight storage container or plastic bag. They can also be kept in a damp towel inside of a container to boost the crisp texture.

Related Posts You’ll Love

Final Thoughts
Growing salad greens is one of the most satisfying ways to connect with your garden. Whether you’re snipping arugula for a lunchtime sandwich or harvesting a bunch of salad mix for a weekend picnic, these quick-growing crops offer flavor, beauty, and nourishment all season long.
So tuck a few seeds in some soil and see what grows. Your next salad might be just a few snips away.
xoxo Kayla
You Might Also Like


Learn how to grow big beautiful onions easily in this beginner planting guide.